Blog Barista: Jessica Davis | December 4, 2019 | Productivity | Brew time: 12 min
Welcome to Part 7 of the Harnessing the Power of Microsoft Word series. The series has covered a lot of ground, from editing and navigation features, to creating templates and styles, and enhancing your styles with numbering schemes, as well as using custom properties to support content reuse and inserting dynamic cross-references. Today’s post explains how to use building blocks to house your reusable content assets in Word and how to build a custom ribbon so that you can insert an asset from a drop-down menu in Word.
Building Blocks are another time-saving feature that can skyrocket your productivity. Additionally, with some configuration, you can place the building blocks on a custom ribbon so that you can select them from drop-down menus that reflect your business needs. For example, KL&A uses a custom ribbon containing proposal assets that are categorized by the types of information typically sought in a request for proposal (RFP), such as project experiences, processes, and company information. This post explains how to:
- Create a Building Blocks Template (to house your building blocks)
- Create Building Blocks
- Insert a Building Block in a Document
- Build a Custom Ribbon for your Building Blocks
- Distribute the Building Blocks
- Share the Custom Ribbon Configuration
Are you ready for this deep dive into a topic that can take your team’s productivity to the next level?
Create a Building Blocks Template
Later in this post, you will learn how to create and manage building blocks. One step involved in those processes calls for identifying the location in which the building blocks are saved. If you would like the ability to distribute your building blocks to other authors, consider creating a building blocks template that you place in Word’s STARTUP file and then saving all your building blocks in that template.
You might also consider including some sort of version information in the file name so that everyone can easily identify whether they have the latest version. For example, KL&A appends the filename with the year, month, and day (YYYYMMDD). Our appointed building blocks administrator creates and updates the building blocks. After closing Word, she changes the date information in the file name and then distributes the file to the applicable authors. The authors then place the distributed file into their Word STARTUP folder and then they delete the old version. Placing the file in your STARTUP folder automatically loads the file when you start Word.
To avoid collisions of style definitions, use a template that has minimal styles. For example, start a document based on Word’s built-in Blank Document template, then use the Save As command to save it with the desired name, in the Word STARTUP folder, as a dotx file.
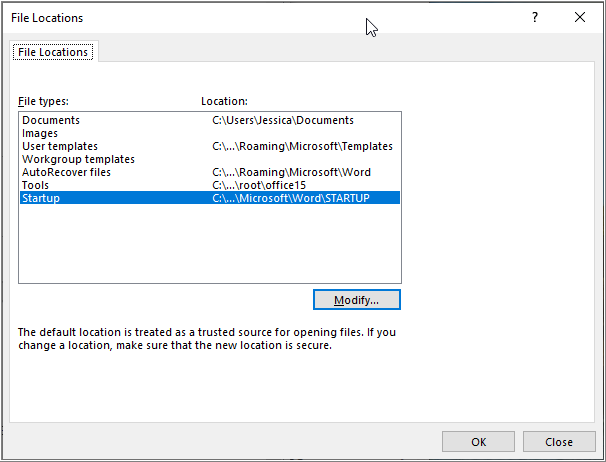
In Word 2016, Word’s STARTUP folder is located in:
C:\Users\<username>\AppData\Roaming\Microsoft\Word\STARTUP
If you are using another version of Word, the STARTUP folder may be in a different location. To find the location:
1. Enable view of hidden files on your system. Refer to Microsoft support for instructions. Here is a link to Microsoft’s instructions for Windows 10 users.
2. In Word, select File > Options.
3. On the Word Options screen:
a. Select Advanced in the pane on the left side of the screen.
b. Scroll to the General section.
c. Click the File Locations button.

4. On the File Locations dialog:
a. Click the Startup file type.
b. Click Modify. A file-browser window is displayed showing the STARTUP folder. Once found, you may want to pin the location to your Quick Access panel.
Now that you have created the dotx file that will contain your assets, it’s time to start making your building blocks.
Creating Building Blocks
You can create building blocks at any time from any document. While you will be storing these building blocks in your dotx file, I recommend also saving a copy as a Word document in a well-organized folder structure as a safeguard. That way, if the dotx file ever becomes corrupted for any reason, you will have the Word docs.
To create a building block:
1. Highlight the content that you want to save as a building block.
2. On the Insert ribbon, select Quick Parts > Save Selection to Quick Part Gallery.
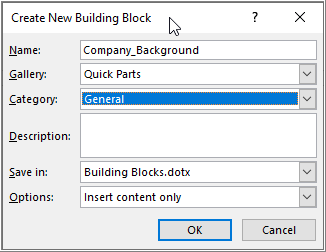
3. On the Create New Building Block dialog:
a. Fill in the fields on this screen. Refer to the field definitions following the screenshot.
b. Click OK.
To make referencing information easier, the following expandable table defines each field on this screen and provides some useful background information.
Name
A name for the building block. Consider sort order when naming your building blocks. For example, we prefix all project description assets with “Project_” so that all these building blocks appear next to one another on the applicable menu.
Gallery
The gallery in which to store the building block. For example, if you select Quick Parts, the building block will appear on the menu when you select Insert > Quick Parts. If you select Cover Pages, it will show in the Insert > Cover Pages menu. If you wish to build a custom ribbon for your building blocks, you may want to use one of the Custom 1–5 galleries.
Category
A category to apply to the building block. This allows you to group building blocks within the menus on which they are displayed.
Description
A description of the building block, which is displayed in the Building Block Organizer. I use this field to note the creation date or the date that the building block was last updated, providing easy identification of assets needing review.
Save in
The location in which to save the building block. You can save the building block to:
- Normal.dot, which is the default template that Word uses when no other template is explicitly selected and it is always loaded even if you are using another template. This option makes the building blocks available to you regardless of the template or document you are using.
- Building Blocks.dotx (selected by default) is another globally loaded template that makes the building blocks available to all open documents.
- The templates on which your currently open documents are based. This makes the building blocks available to only documents that are based on selected template.
If you want to share the building blocks with other authors, you’ll want to create your own dotx file in your STARTUP folder as described in the previous topic and save the blocks there.
Options
Options for how the building block will be inserted.
- Inserted as content only inserts the building block at the location of your cursor.
- Inserted in its own paragraph inserts the block into a new paragraph.
- Inserted on its own page inserts a page break, then the building block.
Once you’ve created some building blocks, you can begin using them, which is described next.
Inserting a Building Block into Your Document
Inserting a building block is as simple as selecting it from the applicable menu. For example, if you save a cover page to the Cover Pages gallery, it will appear on the Insert > Cover Pages drop-down menu. You can also insert them from the Building Block Organizer, discussed next.
Managing Your Building Blocks
Word provides a screen for:
- Editing building block properties;
- Deleting building blocks;
- Viewing a preview of the building block; and
- Inserting a building block.
The columns on the Building Blocks Organizer are sortable so that you can easily find blocks based on name, gallery, category, template, or description.
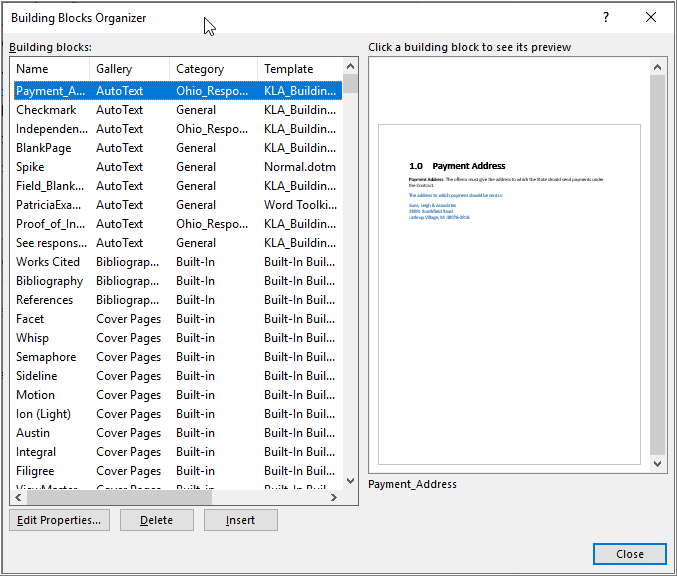
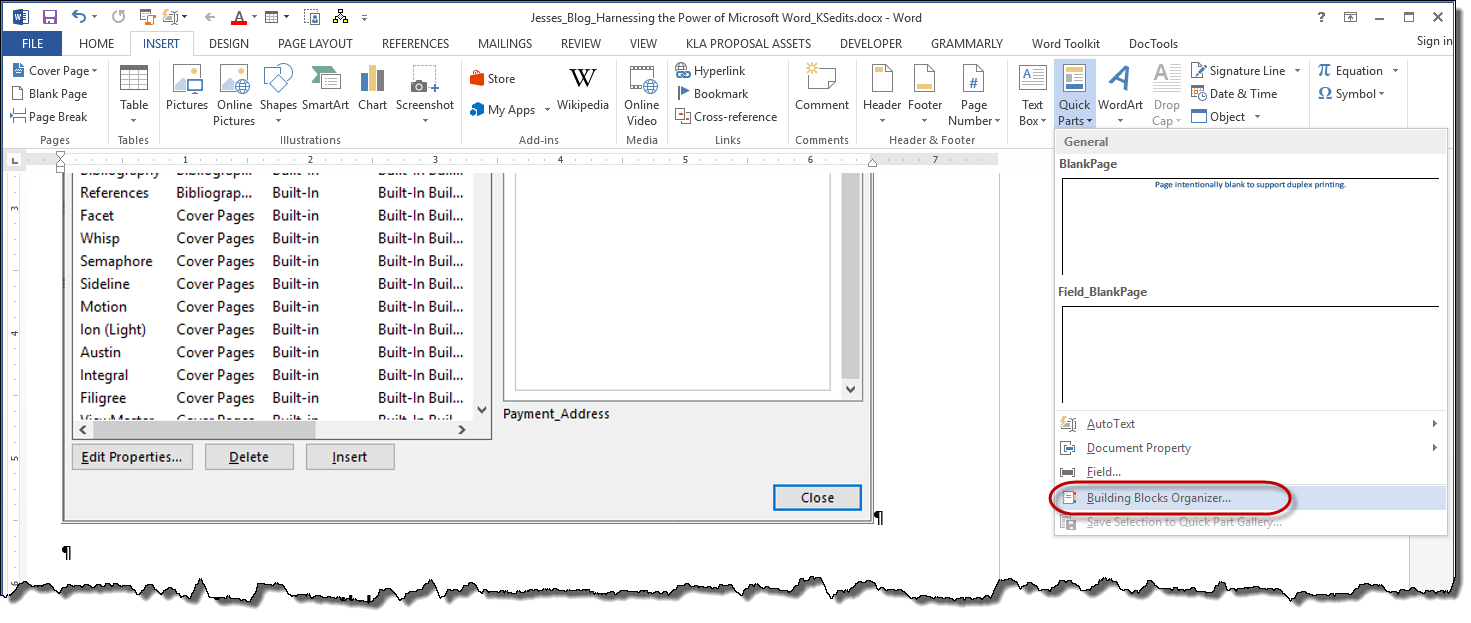
To access the Building Blocks Organizer:
1. Click the INSERT ribbon.
2. Click the Quick Parts drop-down and select Building Blocks Organizer.
What you’ve learned so far is enough to dramatically increase your productivity but you can take it even further. So, let’s take a look at how you can build your own ribbon so you can organize your building blocks under menus that you define.
Building a Custom Ribbon
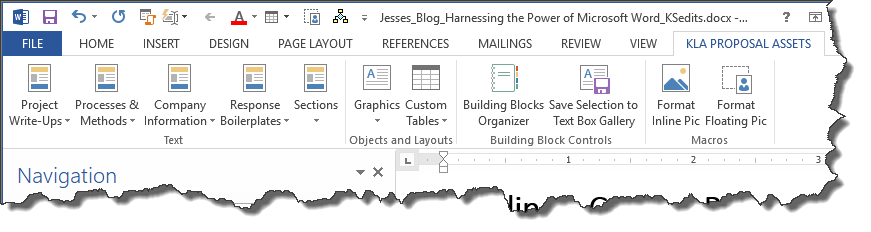
If you have a lot of building blocks, you may want to consider configuring a custom ribbon to make them easily accessible. For example, the screenshot below shows the custom ribbon that I created for KL&A’s proposal team. The first five options correlate to the Custom 1-5 galleries that I mentioned earlier; I’ve just renamed them to something meaningful for my team. That is, the Project Write-Ups option is actually the Custom 1 gallery and the Processes & Methods option is the Custom 2 gallery, and so on.
After you’ve created a custom ribbon, you can distribute the configuration and building block files to others in your organization so they too will have access to your library of assets.
To create a custom ribbon for your building blocks:
1. Select File > Options.
2. On the Word Options dialog:
a. Select Customize Ribbon from the pane on the left.
b. Under the Customize the Ribbon controls on the right, select the ribbon name after which you want to insert the new ribbon and then click the New Tab button. A new tab containing one group will be created.
c. Right-click on a tab or group name to rename the tab and group.
d. Use the New Group button to add groups to the ribbon. This places all the commands into a block on the ribbon that is labelled with the group name.
e. In the Choose commands from field above the left box, choose All Commands. Then select the commands you want to add to the custom ribbon and click Add. If you saved building blocks in the Custom Galleries 1-5, you will likely want to add them to your ribbon and rename them to match your categorization of content.
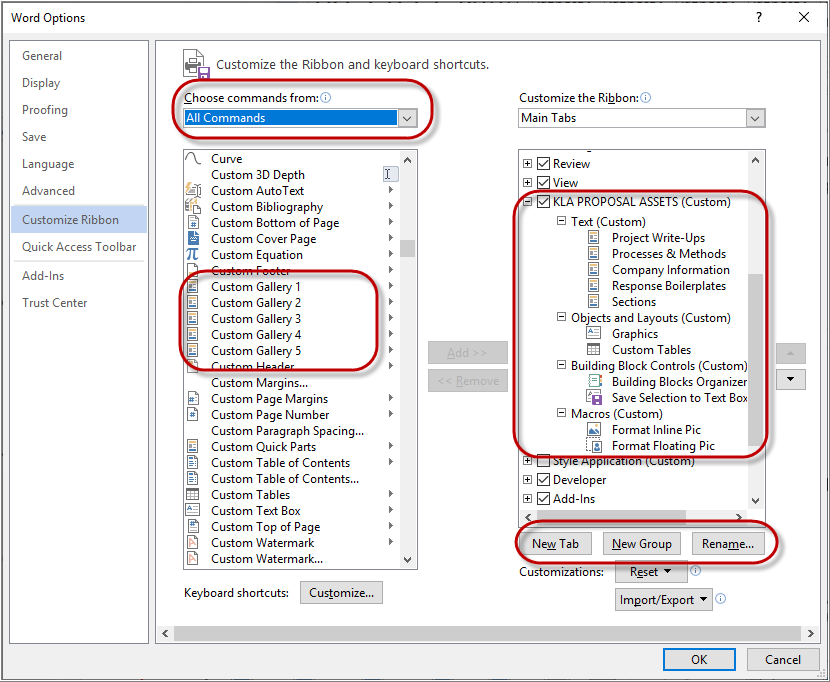
The screenshot above shows KL&A’s configuration for our proposal assets custom ribbon. The items under the Text (Custom) group are the renamed Custom Galleries 1-5.
The Objects and Layouts group contains an option called Graphics. This is actually the renamed Custom Text Box gallery to which I save all commonly used graphics.
To make creating and managing building blocks easier, I’ve also added Word’s building blocks commands to the ribbon under the Building Blocks Controls group.
Finally, I’ve added a couple of macros to the ribbon for formatting pictures, but that’s beyond the scope of this post.
After you build this wonderful new ribbon, it’s time to send the ribbon configuration file and the building blocks template file to your team so they can benefit from the fruits of your labor. I’ll explain how to do both these tasks, starting with distributing the building blocks first.
Distributing Building Blocks
In the first topic of this post, I explained that you choose where to store your building blocks when you are creating them. I also recommended creating your own template file (dotx) for this purpose with some sort of version identifier in the file name so that your users can easily determine if they have the latest. For example, I append the file name with a date indicator—BuildingBlocks20191014.dotx. I also explained that placing this file in Word’s STARTUP folder automatically loads it when you start Word. This ensures that your building blocks are available without having to find and open the building blocks template each time you want to use them and it makes them easily distributable.
After adding new building blocks or updating your existing building blocks, you can distribute the file in whatever fashion works best for your organization, such as email or posting to a shared drive. Simply copy the file, which is in your Word STARTUP folder and then email it or post it to your shared location.
Note: There may be other ways to automate distribution, such as creating a script that automatically downloads the latest building blocks whenever a user logs into the network. Talk to your IT department for help with something like this.
There is a caveat to this process. It demands that only one person at a time make revisions to the building blocks file. Be sure to define a process and protocols around who can revise the building blocks file, when, and how they will distribute the file once updates are made. Also, include a process for requesting building block updates. While this is a bit restrictive, it will not prevent users from using the blocks. They can plug in a building block and then edit the content. It’s just the process of writing the edits back to the library that needs to be managed.
If you’ve designed a custom ribbon for your building blocks, you can also export the configuration and distribute it to your authors so that they can quickly and easily enable the ribbon in their environments.
Sharing the Custom Ribbon Configuration
Rather than each author going through the steps of configuring the same custom ribbon, you can export your configuration which can then be imported by the other authors. Please note that if they’ve made other configuration changes, those changes may be overwritten when importing the new settings.
To import or export Word configuration:
1. Select File > Options.
2. On the Word Options dialog:
a. Click Customize Ribbon in the pane on the left.
b. Use the Import/Export button. The default name of the exported file is Word Customizations.exportedUI.
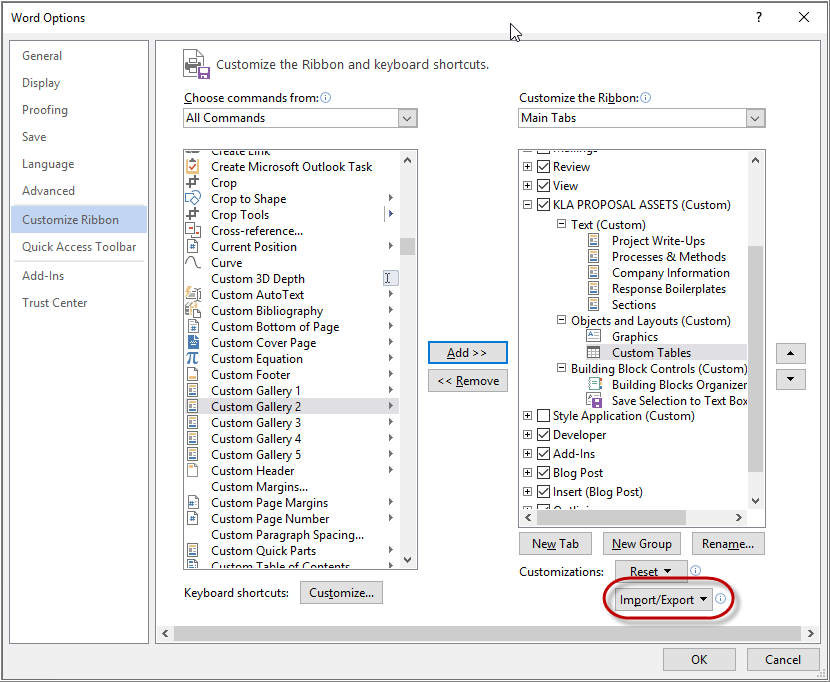
3. Email the exported file or place it in a shared location for your authors to download.
The recipients of the file will follow the same steps to import the configuration file.
Build Documents Faster than Ever Before
Now that you know how to create, manage, and insert building blocks, you can build a library of content assets for you and your team that will reduce or even eliminate redundant content creation and further the mission of consistency.
You also now know how to maximize these benefits with a custom ribbon that makes building block usage easy and intuitive for even the most novice Word users. Heck, you can even build ribbons and assets for different purposes. For example, you could create an engineering ribbon with design-focused assets, a project management ribbon with PM-related assets, and a proposal ribbon with marketing assets.
Finally, you can reduce editing time and potential errors related to content reuse by coupling building blocks with custom properties. The powerful combination provides the one-two punch needed to streamline leveraging your content.
Make sure you check out the rest of the Harnessing the Power of Microsoft Word series:
2 Comments
Other recent posts:

Kunz, Leigh and Associates (KL&A) Announces the Retirement of KL&A Co-Founder John Leigh
OKEMOS, MI, April 11, 2023 – Kunz, Leigh and Associates (KL&A) announces the recent retirement of KL&A Co-Founder John Leigh as of March 31, 2023. Mr. Leigh began his career as a developer working on large mainframe systems before moving…

Team Building in a Remote Environment
Blog Barista: Dana Graham | June 15th, 2022 | Culture | Brew time: 5 min
Let me start by saying I don’t care for the term “work family.” I have a family I love, and they have absolutely nothing to do with my career. I want my work life to be its own entity. I like boundaries (and the George Costanza Worlds Theory). Certainly, I want to enjoy and trust my coworkers, and I want to feel supported and cared for…
I found this via LinkedIn and have shared it with others on my team. This is an excellent resource. Thank you. It is good information, well written and presented. I appreciate you sharing it.
Thank you Michelle!