Blog Barista: Jessica Davis | November 27, 2019 | Productivity | Brew time: 12 min
Welcome to Part 6 of the Harnessing the Power of Microsoft Word series. In case you missed it, my last post covered custom properties which support content reuse and are a wonderful accoutrement to templates.
Today’s post discusses how to create and maintain dynamic cross-references.
When writing a complex document, such as a user’s guide or proposal, you may find occasions in which you want to direct the reader to another section of the document. If you type “See page 30,” and the topic rolls onto page 31, your cross-reference will no longer be correct. Fortunately, Word provides a tool for inserting dynamic references, meaning the references will update to reflect the current text of the referenced information with a simple key combination that refreshes all the dynamic items in your document.
In this post, I’ll cover how to insert and refresh cross-references. I’ll also discuss how to avoid a common error that can happen when using cross-references and how to troubleshoot errors when they do occur. Lastly, I’ll discuss a really helpful add-on that makes Word’s cross-reference feature much more user friendly.
Insert a Dynamic Cross-Reference
Inserting a dynamic cross-reference is really quite easy. All you need to do is:
1. Place your cursor where you want to insert the reference and type any leading text, such as the words “Refer to” and any necessary punctuation such as opening quotation marks.
2. Select the REFERENCES ribbon and then select Cross-reference.
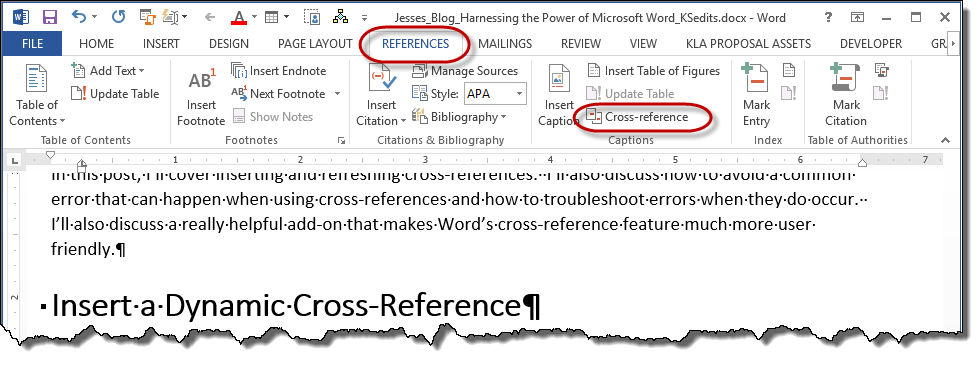
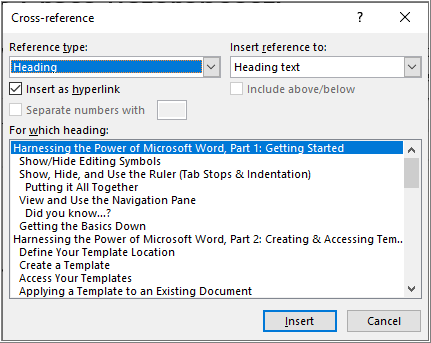
3. On the Cross-reference dialog:
a. Fill in the fields. Refer to the field definitions after the illustration.
b. Click Insert. The reference is inserted.
c. Repeat steps a – b as many times as necessary to build your desired cross-reference. For example, to build a cross-reference that says, [See “1.0 Getting Started,” on page 30.] and your headings are auto-numbered, you will need to insert three cross-references: one to the paragraph number, one to the paragraph text, and one to the page number.
d. When you are done inserting references, click Cancel to close the dialog. Please note, you can leave this dialog open as long as you like.
To make referencing information easier, the following expandable table defines each field or control on this screen and provides some useful background information.
Reference type
The type of element that you need to reference. Options include:
- Numbered item
- Heading
- Bookmark
- Footnote
- Endnote
- Equation
- Figure
- Table
Tip: If you need to cross-reference text that isn’t a numbered item, heading, footnote, endnote, equation, figure or table, you can highlight the text and insert a bookmark (from the INSERT ribbon) that you can then cross-reference.
Note: Figure and Table options are used to reference dynamic figure and table captions, which are inserted with the Insert Caption option on the REFERENCES ribbon.
Insert reference to
The element that you want to return from the referenced item. The options displayed depend upon what you’ve selected in the Reference type field.
The following describes the mostly commonly used options:
- Text—returns the text of the selected items.
- Page number—returns the page number on which the selected item appears.
- Paragraph number—returns the paragraph number with relative context. Meaning Word adds context if the referenced item can be confused with another numbered item. This option is helpful when reference nested numbered items, such as sub-steps in a procedure or nested outline items.
- Paragraph number (full context)—returns the paragraph number with full context. For example, if you are referencing item “a” which is nested under step “1” this option will return “1.a”.
- Paragraph number (no context)—returns the paragraph number with no context.
- Above/below—returns the word “above” or “below” based on the relative position of the cross-reference to the item being referenced.
- Entire caption—returns the label, number, and caption from the selected figure or table caption.
- Only label and number—returns only the figure or table label and number. Useful for building a reference such as “Figure 1, below, …”
- Only caption text—returns only the caption text.
This article gives more detail about the Paragraph number options.
Insert as hyperlink
The option to make the reference a link. When selected, users can jump to the referenced item by pressing Ctrl and clicking on the reference.
Include above/below
The option to return the word “above” or “below” based on the relative position of the cross-reference to the item being referenced. This option works in conjunction with the other selections. For example, if you select paragraph number and then check this box, Word will return both the paragraph number and the word “above” or “below.”
Separate numbers with
The option to insert the specified characters before each number of a full-context reference. For example, if you are referencing sub-step “a” of step “2” and you select this box and enter the word “Step,” Word would return “Step 2. Step a.”
For which <heading>
The item that you want to reference. This box shows the type of items that match what you selected in the Reference type field.
Note: The label on this field changes to also reflect the type of item you are referencing.
To save system resources, Word only updates dynamic items under certain circumstances. For example, if your Word options are configured to update before printing, the action of printing will force an update. However, you may want to send the document without printing or that particular option may not be enabled in your environment. Whatever the case, you can refresh all the dynamic items in your document with a simple key combination, described next.
Refresh Cross-References
As you are working in a document, referenced information is likely to change position, moving forward with the addition of content or backward with the deletion of content. The referenced content itself may change too. For example, you may change a heading that you’ve referenced. Before you distribute or print your document, be sure to refresh dynamic items (a.k.a. field codes) so that all your references are up-to-date.
Note: This is the same process used to update all sorts of dynamic items, including custom properties, page numbers, figure and table captions, and table of contents, just to name a few.
To refresh all dynamic items in a document:
1. Press Ctrl + A to select all the content in your document.
2. Press F9 to refresh dynamic items.
Now you know how to insert and refresh dynamic cross-references.
While this feature can enhance the user friendliness of your documentation, it does have some caveats. There are certain actions that can cause errors to occur relating to your cross-references. The next sub-topic will explain how to avoid the errors and fix them if they do occur.
Avoid & Fix Cross-Reference Errors
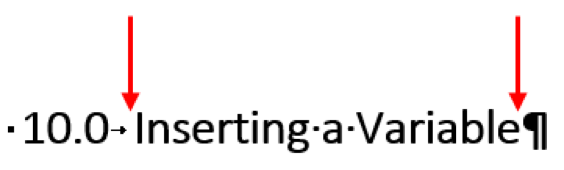
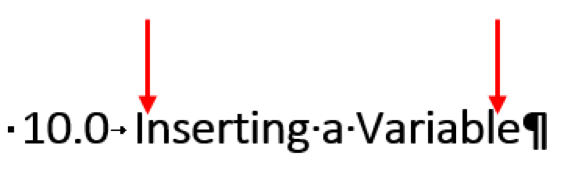
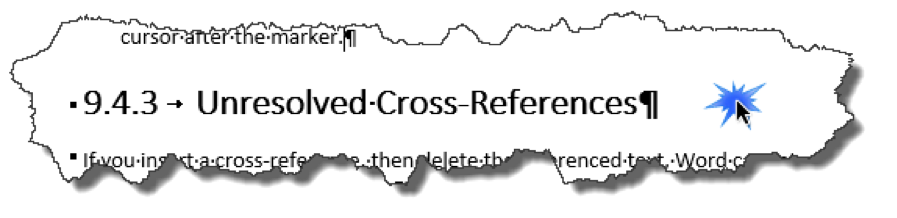
Word inserts invisible markers at the beginning and end of the referenced text. For example, if you cross-reference the heading, “Inserting a Variable,” Word inserts an invisible marker before the “I” in “Inserting” and after the “e” in “Variable,” as shown below.
Various problems can occur if these invisible markers are inadvertently moved or deleted or if text is added outside of the invisible marker, including:
- Incomplete cross-references
- Duplicated content or anomalous content, such as a sentence fragment appearing inside of another sentence
- Errors resulting from missing cross-reference markers, i.e., unresolved reference errors
Incomplete References
If you add a word to the beginning or end of the heading, you may inadvertently add it before or after the invisible marker, which results in the cross-reference not picking up the change.
To avoid this issue:
1. Insert your cursor somewhere inside the existing text; for example, after the “I” or before the “e”.
2. Type the additional text.
3. Use the Backspace or Delete key to remove the superfluous characters.
For example, to change “Inserting a Variable” to “Inserting Variables”:
1. Highlight and delete the “a”. Since “a” is well inside the markers, no special care is needed for this edit.
2. Place your cursor inside the “e” in “Variable.”
3. Type “es”, resulting in “Variablese” and your cursor positioned between the “s” and the “e”.
4. Press Delete once to delete the extra “e.”
To fix this issue, delete and re-insert the cross-reference.
Another issue that you may encounter is the appearance of duplicated or anomalous content, which is also caused by disrupting the invisible markers in the destination. Next, I’ll explain this issue and how to avoid it.
Content Duplication or Anomalous Content
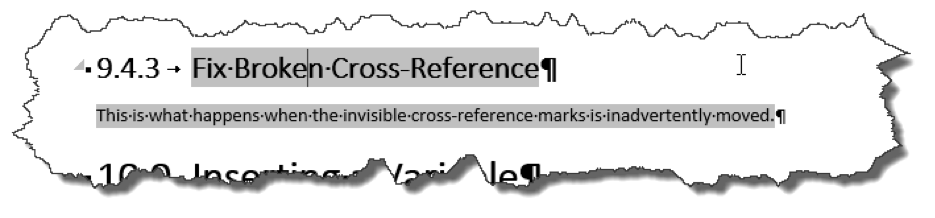
If you place your cursor at the beginning or ending of referenced text and press Enter, you may inadvertently move the cross-reference’s invisible opening or closing marker. This results in the new content showing up in your cross-reference. For example, the following illustration shows a cross-reference to the heading “Fix Broken Cross-References.”
Original Cross-Reference

I placed my cursor at the end of the “Fix Broken Cross-References” heading and I started typing. Because my cursor was inside the invisible cross-reference markers, everything I added became part of the referenced item. After I updated dynamic items, the original cross-reference (shown above) now looks like what is shown below.
Updated Cross-Reference after Marker is Inadvertently Moved
Also, notice that the format of the paragraph containing the cross-reference changed from body text to a heading. This is because the referenced text now contains a carriage return, so the cross-reference reflects the styles of the paragraphs being returned. This particular situation causes a duplication of the heading in the navigation pane, as the cross-reference now includes a heading.
This error can be hard to detect if your Word option for field code shading is set to the default or disabled altogether. The default behavior is to only shade field codes when selected. If you suddenly see repeated content, click on it. If it turns gray, then you know you have encountered this issue. If, however, you change your Word options to always shade field codes, you will see this problem right away.
To avoid this problem, either:
1. Place your cursor at the beginning or end of an unreferenced paragraph above or below the item you are referencing and then press Enter to start the new paragraph; or
2. Click to the right of the paragraph symbol at the end of the referenced text to position the cursor after the marker, and then press Enter. (I covered editing symbols in Part 1.)
Cursor Positioning Tactic to Avoid Cross-Reference Corruption
To fix this problem, you have to delete and re-create the cross-reference.
You can highlight the entire reference and press Delete. However, if the reference spans multiple pages, this method is somewhat tedious and error prone.
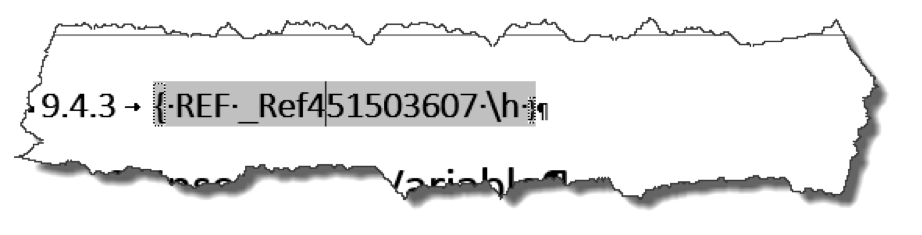
Another option is to right-click on the highlighted reference and select Toggle Field Code. The reference converts to a single-line field code, which makes selecting and deleting the reference much easier.
Field Code for Erroneous Cross-Reference
There is one more error you may encounter, the unresolved cross-reference.
Unresolved Cross-References
If you insert a cross-reference, then delete the referenced text, Word cannot resolve the cross-reference, so it returns an error.
Error Returned for an Unresolved Cross-Reference

This situation is particularly likely when copying and pasting content from another document.
Cross-references are resolved when dynamic updates occur, either when you press Ctrl + A and then F9 or if you are prompted to update while printing.
To detect and correct unresolved cross-references:
1. Update dynamic items by pressing Ctrl + A and then F9.
2. Search your document for “Error!”
3. Highlight the entire error message, and press Delete.
4. Recreate the cross-reference.
While there are potential error scenarios that can happen with cross-references, the value of the dynamic references is worth the risk of encountering easily remedied errors. Learning how to avoid the actions that cause these errors can help reduce this risk and fixing these errors is pretty simple. However, you may want to consider a Word Add-On that makes creating and maintaining cross-references a whole lot easier.
Consider the Cross-Reference Manager Add-On
Word’s built in cross-reference feature makes it pretty easy to help your readers by directing them to other relevant content. However, the dialog that is used to insert cross-references can be a bit tedious. It doesn’t allow you to filter the list of items so finding the topic you want to reference can be annoying. Having to insert three references to build one cross-reference is another pain point. And it sure would be nice if Word’s cross-references worked like Adobe FrameMaker’s so you would never encounter incomplete references or content duplication issues. But alas, there is a solution!
I found a great cross-reference manager add-on that is very reasonably priced tool and remedies most of these annoyances. This tool:
- Allows you to filter the list of referenceable items so it’s easier to find the item you need.
- Supports building cross-reference formats (called Custom Texts) so that you can quickly insert one reference that returns all the necessary elements, such as the paragraph number, paragraph text, and page number, as well as the surrounding text and punctuation.
- Has an option for automatically fixing the invisible bookmarks when pressing Enter, which helps to prevent the content duplication or anomalous content error that I described earlier.
- Provides user-friendly tools for finding and fixing errors quickly and easily.
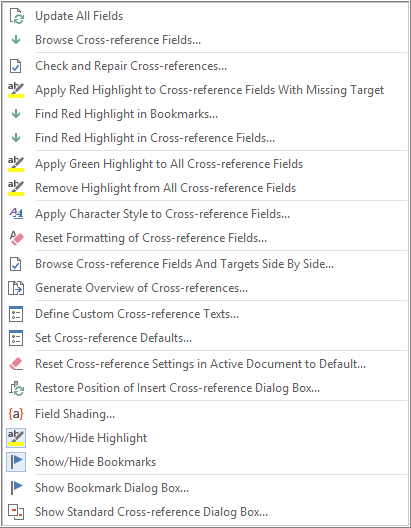
And these are only some of the cool things this tool offers. Checkout this illustration of the extras menu. This tool, in my opinion, is worth every penny.
User-Friendliness is the Key to Great Documents
Have you ever gone to the Help in a software application and been instructed to complete a task from a specific screen, but you can’t find that screen, nor a topic that explains how to get to that screen? Did you get frustrated? Did you abandon the Help and turn to Google or ask someone in the office for help?
Whether you are writing user’s guides, project management plans, proposals, or some other complex documents that parse information into topics, helping your readers find the information they need with well-placed cross-references is the difference between your readers feeling helped or frustrated. While you may not hear someone praise your document when it’s user friendly, you certainly will hear them complain when it isn’t.
Make sure you check out the rest of the Harnessing the Power of Microsoft Word series:
Other recent posts:

Kunz, Leigh and Associates (KL&A) Announces the Retirement of KL&A Co-Founder John Leigh
OKEMOS, MI, April 11, 2023 – Kunz, Leigh and Associates (KL&A) announces the recent retirement of KL&A Co-Founder John Leigh as of March 31, 2023. Mr. Leigh began his career as a developer working on large mainframe systems before moving…

Team Building in a Remote Environment
Blog Barista: Dana Graham | June 15th, 2022 | Culture | Brew time: 5 min
Let me start by saying I don’t care for the term “work family.” I have a family I love, and they have absolutely nothing to do with my career. I want my work life to be its own entity. I like boundaries (and the George Costanza Worlds Theory). Certainly, I want to enjoy and trust my coworkers, and I want to feel supported and cared for…
0 Comments