Blog Barista: Jessica Davis | October 24, 2019 | Productivity | Brew time: 15 min
Welcome to Part 3 of the Harnessing the Power of Microsoft Word series. In the last post, I covered how to create and access templates. Today’s post will walk you through paragraph and character styles. Although you can use these concepts at the document level, defining styles in your templates will make them available to anyone creating a document based on your templates.
Before explaining what paragraph and character styles are and how they can help you, take a few minutes to ask yourself the following questions:
Have you ever found yourself scrolling through a document and applying the same formatting over and over again?
Have you ever had a page break roll onto a new page creating a largely blank page in the middle of your document? Then had to go through the document deleting and re-inserting page breaks?
Have you ever tried to indent a single list item and had the entire list move? Then found yourself fighting with Word to get your indentation just the way you want it?
Have you ever noticed extra space at the top of a page and weren’t really sure why it was there?
Have you ever received a document from another writer and found formatting that wasn’t consistent with your house styles? Or worse, formatting that was inconsistent within the document?
If you answered yes to any of these questions, you’ll be happy to hear that there is a way to eliminate these issues and the frustration that goes along with them. The solution, paragraph and character styles. They can be a huge time saver, reduce your frustration, and ensure consistent formatting throughout your documents.
Paragraph and character styles are pre-configured formatting rules that you can apply to paragraphs or selected text. These styles provide several benefits including:
- Much faster formatting—simply select the items to be formatted and click the applicable style;
- Ability to mass update—change all paragraphs of a specific style at once by modifying the style attributes;
- Numbering control—numbering controlled by styles will not misbehave;
- Indentation control—indentation controlled by styles will not misbehave either;
- Pagination control—avoid orphaned bullets or text by using the keep-with-next paragraph attributes;
- Paragraph spacing control; and
- Consistency in the look of all content throughout the document.
The rest of this post will show you how to:
- Plan for style creation based on your formatting needs
- Create paragraph and character styles
- Modify paragraph and character styles
- Display, configure, and use the Styles pane
- Apply the styles to your content
Consider Your Style Needs
Before I get into the mechanics of creating and using styles, I’d like to suggest taking a little time to think about the formatting elements and the content types you need in your documents so that you can figure out what styles you will need to create. Here are some questions to consider and the implications of various choices:
Do you want your headings to appear at the left edge of your documents to maximize page real estate or do you want each heading to be indented to show hierarchy?
Indenting headings will require more styles because you will need content styles that align with the indentation of each heading level. For example, if all headings are left-justified with no indentation, you need only one or two styles for body text; if your headings are indented, then you will need a body text style that aligns with each level of indentation that your headings use. You will also need multiple levels of styles for bullets, numbered items, etc. As you can see, this approach can lead to a very long list of styles, making it a little harder to work with your styles list.
Also, indentation can eat up a lot of page real estate. If you have an 8.5” page with 1” margins, your usable real estate is 6.5”. If you indent each heading .5”, content under a Heading 5 will have only 4.5” of real estate. This may not be an issue if your documents are mostly text, but if they contain illustrations, you may want access to as much real estate as possible.
Do you want numbered or unnumbered headings?
Numbered headings will help to communicate hierarchy so you don’t need to indent subheadings.
Do you want captions on your figures and tables? And do you want them before or after the figure or table?
Captions allow you to cross-reference a figure or table from elsewhere in the document and they can be used to generate a list of figures or a list of tables.
If you want captions, you’ll need a style to hold an inline figure or table and a style for the caption. These styles will automatically set the position of the figure or table and its caption. For example, if you want your figures left justified but indented a .5” you can create a style called Figure with these properties. When you insert a figure into a paragraph that uses the Figure style, it will automatically appear left-justified with the appropriate indentation.
In a style, you can tell Word what style to apply to the next paragraph, which comes into play in this example. Say you want your captions to appear above your figures or tables. You would create a style for the caption, something like “Figure_Caption,” and set it to return the Figure style as the next paragraph. When you’re working, you will insert your dynamically-numbered caption (discussed in a later post), apply the Figure_Caption style and then press Enter. The new paragraph will automatically be set to Figure so you can quickly insert your graphic with no additional style-application steps or positioning required.
Finally, notice the example naming convention Figure and Figure_Caption. These styles denote their purpose making them intuitive to other authors in your organization and they will appear right next to each other in your styles list so you don’t have to scroll around the styles list when you applying these styles to existing graphics and captions.
What elements do you want to keep together on a page?
Word offers a keep-with-next property that you can use to control pagination so you don’t have to insert page breaks and deal with the issues that can arise from using page breaks, such as, half-empty pages in the middle of your document and time spent on removing and reapplying page breaks.
Likely you will want to keep a figure and its caption together on a page. Continuing the figure example, if you set the Figure_Caption style to keep-with-next, the caption and figure will always remain together.
You may also want bulleted lists to stay together on a page. You can achieve this by creating two styles, such as Bullet1_KWN (KWN denotes keep-with next) and Bullet1_Last ( _Last denotes that it should be applied to the last bullet in the list).
If you also want to keep the sentence that introduces the list with the list, you could create a Body_KWN style.
How many levels of bullets do you want? And do you need different spacing options?
If you need three levels of nesting with your bullets, you’ll need at least three styles—one for each level of nesting. For example:
- Bullet1
- Bullet2
- Bullet3
- Bullet2
If you want the option of controlling whether the list can break across pages, you’ll need two styles per list level—one KWN style and one _Last style for each level of bullets.
- Bullet1_KWN
- Bullet1_Last
- Bullet2_KWN
- Bullet2_Last
- Bullet3_KWN
- Bullet3_Last
If you want various spacing options, you’ll need additional styles. For instance, you may want one style for short-item lists that has no space between the list items and another style for long-item lists (i.e., items that span lines) with space between for easier readability.
I like to keep list items together on a page so readers do not have to flip back and forth or scroll up and down to see the entire list. I use three styles for each level of nesting:
- Bullet1_KWN (for long-item lists, produces 8 points of white space after each item)
- Bullet1_Comp_KWN (for short-item lists, produces no space between items—Comp is short for compressed)
- Bullet1_Last (for the last item in any Bullet1 list, does not keep-with-next, and produces 8 points of white space after to return to the standard paragraph spacing after the list)
I replicate this pattern for each level of nesting required.
Do you need any auto-labelled styles?
You can use auto-numbering to create automatic labels. For example, you may want a style for notes that automatically produces the word “Note:” in bold text, while the text you type into the note is not bold and has a hanging indent that aligns the text next to the label, as shown below:

You can use this approach for all sorts of things, such as question and answer pairs, where the auto-number produces the appropriate “Question:” or “Answer:” label. I’ll get into the specifics of how to accomplish this in a later post. For now, it’s important for you to know the option exists and to identify whether you need this type of element in your styles list.
What are your formatting conventions for selected text?
You may want to consider some standard formatting conventions for selected text to ensure consistency. For example, you may want authors to italicize or bold a term that is being defined in a given sentence or, if you are writing a user’s guide, you may want screen names, menu items, and buttons to appear with specific formatting. These conventions take the guesswork out of formatting for you and your authors and they help your readers consume content more quickly.
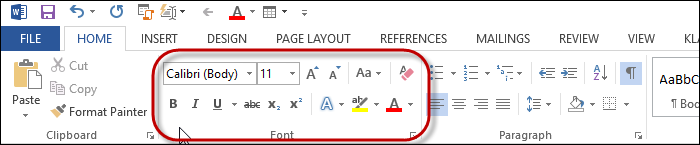
Think through the situations in which you use the controls in the Font group of the Home ribbon and then try to establish rules for when you would apply a given type of formatting.
Once you have the rules figured out, then you can create a character style for each rule. Continuing with the user’s guide example, you might create a character style for screen names, buttons, menu items, definitions, emphasis, etc.
When you name your character styles, select names that are indicative of the style’s purpose, rather than its attributes. This will help your authors know what each style is used for and it will allow you to change attributes without affecting the meaning of the style’s name. I also recommend applying a prefix to your character style names so that they will be grouped in the styles list and easily differentiated from the paragraph styles. For example, I prefix my character styles with c-.
In addition to quick formatting, character styles provide mass update capability, just like paragraph styles. That is, changing the attributes of a character style will update all instances bearing that style. So, if you wanted to convert screen names from bold text to underlined text, you could do so in just a couple of clicks.
Do you want to minimize the learning curve for your template users?
Your organization may use a variety of document types and the formatting of each document may vary; however, the style names can be the same across all templates to minimize the learning curve for your authors. This also supports content reuse.
For example, say you have a product description that is used in a marketing document and in a user’s guide, but the fonts and colors are completely different for these two documents. If your templates use the same style names, you can apply the applicable template to the document containing the content and voila! Or you can copy the content into the applicable document using the Merge Formatting paste option and it will automatically reformat the content to match the style definitions in the destination document.
Now that you’ve given some thought to the formatting and layout elements in your document, you can begin creating styles.
Create Styles
To create a new paragraph or character style:
1. Open the Styles pane by clicking the launcher in the Styles area of the Home ribbon.
2. At the bottom of the Styles pane, click the New Style button.

3. On the Create New Style from Formatting dialog:
a. Complete the fields on this screen. See the field definitions following the screenshot.
b. Use the Format drop-down to access additional attributes, such as font, paragraph, tabs, borders, numbering, and more.
c. When you are done formatting, click OK.
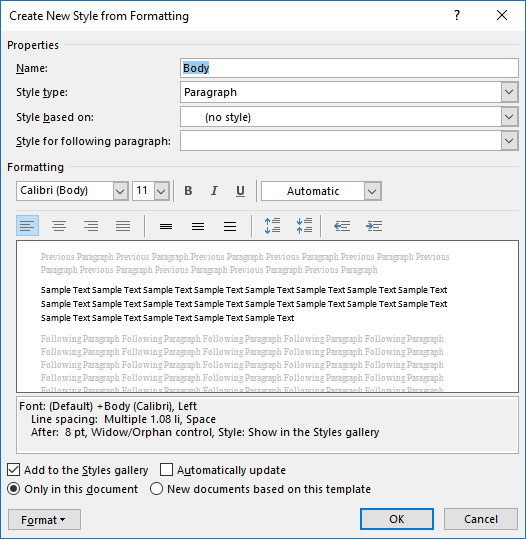
There are a lot of options on this screen, some of which may be intuitive and others not so much. The following expandable table defines each field or control on this screen and provides some useful tips that can help you avoid some of the pitfalls that I’ve encountered when building styles.
Name
A name for the style.
Tip: Specify a name based on the purpose, rather than the attributes, as attributes may change. For example, if you are creating a format that italicizes terms that are being defined within sentences, consider calling the style something like “Term” instead of “Italic,” as you may decide to change the attributes from italicized text to bold text in the future.
Also, consider sort order when naming styles so that they are grouped nicely in the Styles pane. For example, you might create Bullet1, Bullet2, and Bullet3 for various nesting levels of bullets and these styles will appear together in the Styles pane.
Style type
The type of style you are creating.
- Paragraph
- Character
- Linked (both character and paragraph)*
- List
- Table
*This allows you to apply formatting to a paragraph or text within a paragraph. This is useful, for example, to apply a heading style to the first sentence of a paragraph so that the heading will be picked up by the generated Table of Content (TOC), but the rest of the paragraph will be omitted from the TOC.
Tip: I like to prefix my character formats with “c-” so that I can easily differentiate them from the paragraph styles and so that they appear grouped in the Styles pane when the pane is configured to list styles alphabetically.
Style based on
Another style on which to base the new style. This sets all the characteristics of the new style to the same as the based-on style, so that you only need to change a subset of attributes. It also provides some mass-update capabilities.
For example, if you base several styles on a style called “Body,” changing the font of “Body” will automatically change the font of all styles that are based on “Body.”
Style for following paragraph
The style to automatically apply to the next paragraph after this paragraph type is used. For example, your figure numbers come before your figures, you could set the style for your captions to return the style that will hold your inline figures.
Formatting
A group of controls to apply various formatting, such as font, color, alignment, etc.
Add to Styles Gallery
Adds the style to the gallery that appears on the Home tab.
Automatically Update
Automatically updates the style when you make changes to a paragraph of this type.
Tip: If you leave this unchecked, you can apply overrides to a paragraph without affecting the underlying style. Also note, that after overriding a paragraph’s attributes, you can quickly apply those changes to the style by right-clicking the style name in the Styles pane and selecting Modify <stylename> to Match Selection.
Only in this document / New documents based on this template
A radio control to stipulate whether you want to add this style to only the current document or to the document and the underlying template. By adding it to the underlying template, you will be able to use the style again when you create new documents based on the template.
If you save it in the document, you can always create a template from the document by using Save As and selecting the .dotx or .dotm formats.
Formats
A drop-down list to access other attributes, including font, paragraph, tabs, borders, language, numbering, shortcut keys, and text effects. Paragraph is the option you’ll likely use most often. It contains indentation and space before/after settings, as well as keep-with-next settings which were discussed earlier in this post.
Tip: Keep-with-next is a very useful attribute that allows you to automatically control document pagination through the use of styles, as opposed to using page breaks. To set the keep-with-next attribute, select the Formats drop-down, then select Paragraph. Next select the Lines and Breaks tab, and check Keep with Next and Keep Lines Together.
Admittedly, creating styles can be a bit time-consuming, but once they are created, you will be able to apply complex formatting with two clicks of a mouse. But before I get into how to apply styles, let’s first take a look at how you would tweak a style definition.
Modify a Style
As you are working with your new styles, you may find that the attributes are not quite right. Don’t worry. There are two ways to modify styles:
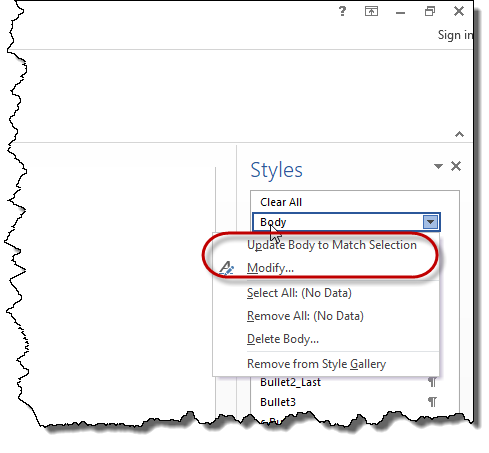
- Right-click the style in the Styles pane and select Modify. This will take you to the same screen that you used to create the style. From there you can tweak the applicable attributes.
- Apply the necessary tweaks through overrides, then right-click the style in the Styles pane and select Update <style name> to Match Selection.
The second option can help you to visualize the changes and it can be easier than finding the applicable settings in the various styles screens. For example, say you want to adjust the indentation of a paragraph to tweak alignment with surrounding paragraphs. With the first option, you would have to figure out the correct indentation value, then access the style’s Paragraph settings to change it. Alternatively, you could use the ruler to adjust the indentation of a single paragraph, then update the style to match that paragraph.
Now that you know how to create and modify styles, you need to know how to apply them. There are multiple ways to apply styles, but I find the easiest method is to open and dock the Styles pane, which I will discuss next.
Display, Configure, and Use the Styles Pane
The Styles pane allows you to choose which styles display in the list. You can select to display:
- All styles available in the current document;
- All styles available in all open documents and loaded templates;
- All styles that are set to recommended; or
- All styles currently in use in the current document.
You can use the Styles pane to:
- Quickly apply styles to selected paragraphs or text;
- Inspect currently applied styles and overrides for selected text and remove styles and/or overrides;
- Create new styles; and
- Access the Manage Styles dialog to perform a variety of style management tasks.
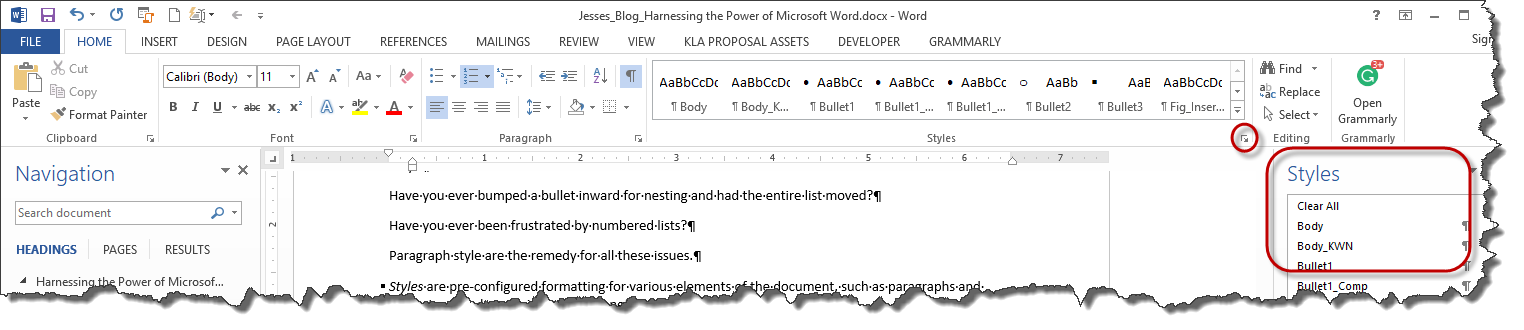
As you can see, you can do a lot of things with the Styles pane. The following illustration explains some of what’s included on the Styles pane.
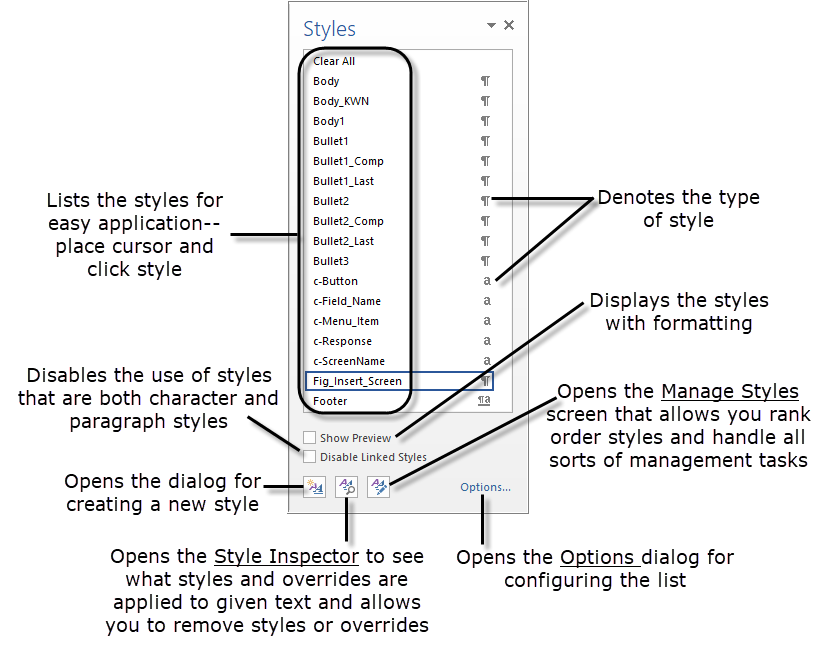
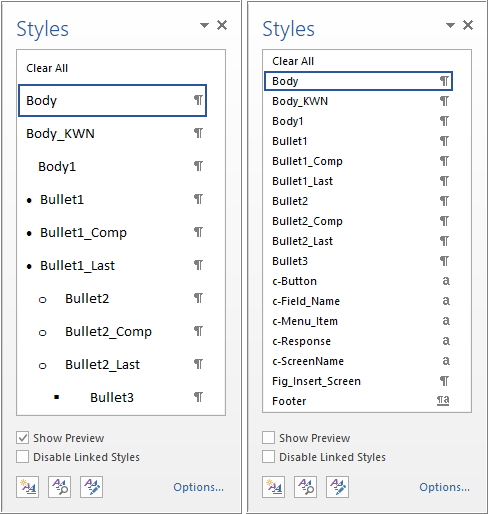
You can configure the Styles pane to display styles in a variety of ways. For example, you can set it to show styles in alphabetical order or you can apply a “recommended” ranking to each style that controls the order in which they are displayed. You can have it show you a preview of the style (left screenshot below) or just the style name in plain text (right screenshot below). And these are only a few of the display options.
To open and configure your Styles pane:
1. Open the Styles pane by clicking the launcher in the Styles area of your Home ribbon.
If the Styles pane is floating, you can optionally dock it on the left or right side of your Word window by dragging it to the desired edge of the screen until it snaps into place. Docking the pane prevents it from obstructing your view of your document.
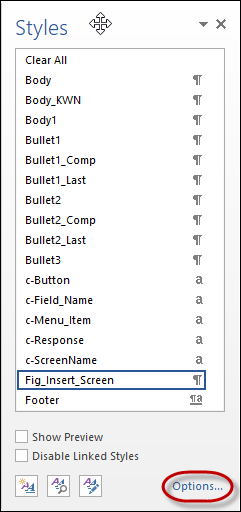
2. At the bottom of the Styles pane, click Options.
3. On the Options dialog:
a. Make your selections. See the table below for field definitions.
b. Click OK.

To make referencing information easier, the following expandable table defines each field or control on this screen and provides some useful background information.
Select styles to show
Selector for defining which styles to show in the list. You can show:
- All styles available in the current document;
- All styles available in all open documents and loaded templates;
- All styles that are set to recommended; or
- All styles currently in use in the current document.
Most of this time, I prefer to see the styles available In current document, which come from the underlying template. However, there are times when you may want another option. For example, if you have two documents open and there is a style available in one, but not the other, you could set to All Styles so that you can use all the styles available in both documents regardless of which document you are in.
Select how list is ordered
Selector for defining the sort order of the list. Try various settings to see which is best for you.
If you set this to As Recommended, you’ll want to use the Manage Styles button (bottom right button) to set recommended ranking for each style.
Style based on
Select whether or not you want formatting information shown next to the style name when there are overrides applied in the document. This can help you see whether or not there are overrides in the document, along with a high-level description of the override.
For example, say you have a paragraph style called Body that is left justified. If you use the button at the top of the screen to center a Body-styled paragraph and you select Paragraph level formatting, the list would show:
- Body
- Body + Centered
This option can be used to find the overrides and get rid of them, as you can right-click a style to select all instances, then reapply the style, apply a different style, or update the style to match the overridden style.
I generally leave these options unchecked for a cleaner style list, but will enable them if I’m hunting for overrides.
Select how built-in style names are shown
Show next heading when previous level is used hides lower-level heading styles until you’ve used the style one level higher. For example, Heading 4 will not appear until you use a Heading 3.
Hide built-in name when alternate name exists shows the names you apply to built-in styles. For example, Footer is a built-in style. However, I use the Footer style so infrequently that I wanted to force it to the bottom of the list, so I renamed Footer to z-Footer in my templates and then I enabled this setting so that it appears at the very bottom of the list.
Only in this document
This option applies the configuration to the styles list only in the current document.
New documents based on this template
This option applies the configuration to the underlying template, in effect setting the default configuration for anyone who uses the template.
Now that you know how to display, configure, and use the styles list, you are ready to begin applying styles to the text in your documents.
Apply Styles to Your Content
There are many ways to apply a style. You can:
- Use the Styles gallery that appears in the HOME ribbon;
- Use the shortcut keys assigned to the styles, if configured; or
- Use the Styles pane.
I prefer shortcut keys so that my hands don’t leave the keyboard, however, shortcut keys may not be configured for your styles or you may not know the configurations. The Styles pane provides the list of styles that you can configure any way you like (as previously discussed).
Applying a style is as simple as selecting the desired content and clicking the applicable style name.
- For character or linked styles (if enabled), you have to select the text to which you want to apply the style.
- For paragraphs, text selection is not required, unless you need to apply a paragraph style to multiple paragraphs at once. Simply place your cursor in the paragraph and then click the style name.
Now you know how to create and modify styles; display, configure and use the Styles pane; and apply styles to the content in your document.
Worth the Effort
At first, this may seem like a lot of work, but I promise the return on investment is well worth the effort. Once you’ve set up your templates with your styles, creating new documents becomes fast and easy and formatting becomes almost effortless. On top of the time savings, I think you will be pleased with the consistency that the styles afford.
Make sure you check out the rest of the Harnessing the Power of Microsoft Word series:
Other recent posts:

Kunz, Leigh and Associates (KL&A) Announces the Retirement of KL&A Co-Founder John Leigh
OKEMOS, MI, April 11, 2023 – Kunz, Leigh and Associates (KL&A) announces the recent retirement of KL&A Co-Founder John Leigh as of March 31, 2023. Mr. Leigh began his career as a developer working on large mainframe systems before moving…

Team Building in a Remote Environment
Blog Barista: Dana Graham | June 15th, 2022 | Culture | Brew time: 5 min
Let me start by saying I don’t care for the term “work family.” I have a family I love, and they have absolutely nothing to do with my career. I want my work life to be its own entity. I like boundaries (and the George Costanza Worlds Theory). Certainly, I want to enjoy and trust my coworkers, and I want to feel supported and cared for…
0 Comments