Blog Barista: Jessica Davis | November 6, 2019 | Productivity | Brew time: 8 min
Welcome to Part 5 of the Harnessing the Power of Microsoft Word series. In case you missed it, the last post explained how to add multilevel numbering schemes to your paragraph styles to create styles for writing instructions, to build numbered headings, or to apply auto-labels to commonly used types of content, such as notes.
Today’s post explains how to create, manage, and use custom properties which primarily supports content reuse.
When reusing content, you may have information that you want to change each time you use the content. For example, at KL&A we reuse certain content in our proposals, such as descriptions of our processes and past experiences. However, we tailor this content with specific information for the given proposal, such as the client’s name, the project name, and the RFP number.
To avoid the error-prone and time-consuming task of finding and replacing these pieces of information each time you use a content asset, you can use custom file properties. After defining a custom property, you then insert a field code into the content that returns the value of a specified custom property. Finally, whenever you change the value of a custom property, you need to refresh the field codes that return that property’s value.
This post explains how to:
- Define a custom property
- Insert a custom property field code
- Refresh field codes
- Resolve errors
- Change the field code shading option
Defining Custom Properties
To define a custom property:
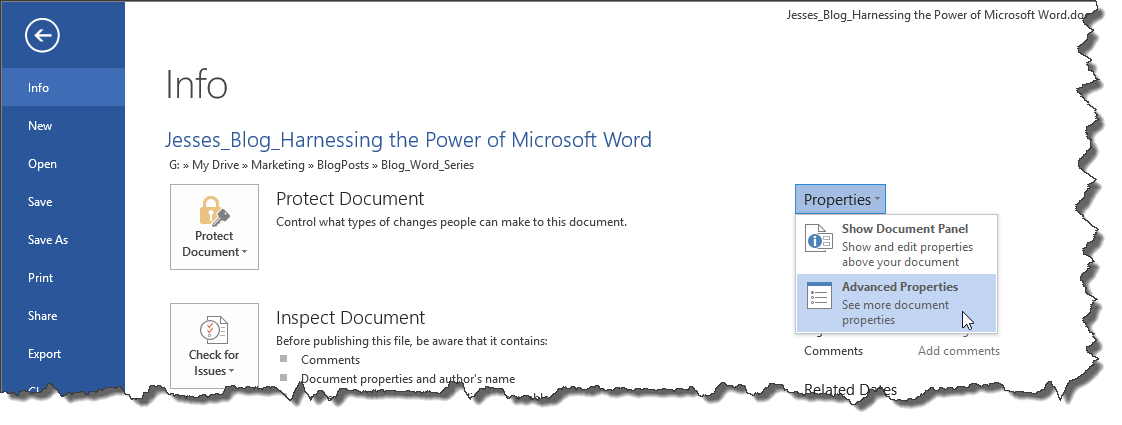
1. Select the FILE ribbon.
2. On the Info screen, select Properties > Advanced Properties.
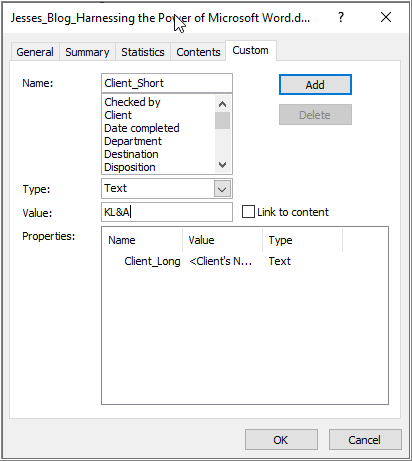
3. On the Advanced Properties dialog:
a. Select the Custom tab.
b. Enter a Name for the custom property.
c. Select the Type of property—in most cases, Text is the desired type.
d. Enter the Value of the property.
e. Click Add.
f. Repeat steps b – e for any additional properties needed.
g. Click OK to close the dialog.
Notes:
- If you are editing an existing value, the Add button changes to Modify.
- If you are editing an existing value, you must first select the property from the Properties box at the bottom of the dialog screen. Then you can modify the Value and click Modify.
- Be sure to always click Add or Modify, depending upon the operation. If you forget to click the Add/Modify button before clicking OK, your work will not be saved.
Now let’s take a look at how to insert a field code that will return the value of the property.
Inserting Custom Properties Field Codes
Word offers all sorts of field codes, called Quick Parts. Field codes help you by returning specific information. For example, page numbers and tables of contents are produced by field codes that return the applicable information.
For this particular blog post, we’re only interested in the DocProperty field code that returns the values of the specific custom properties that you defined earlier.
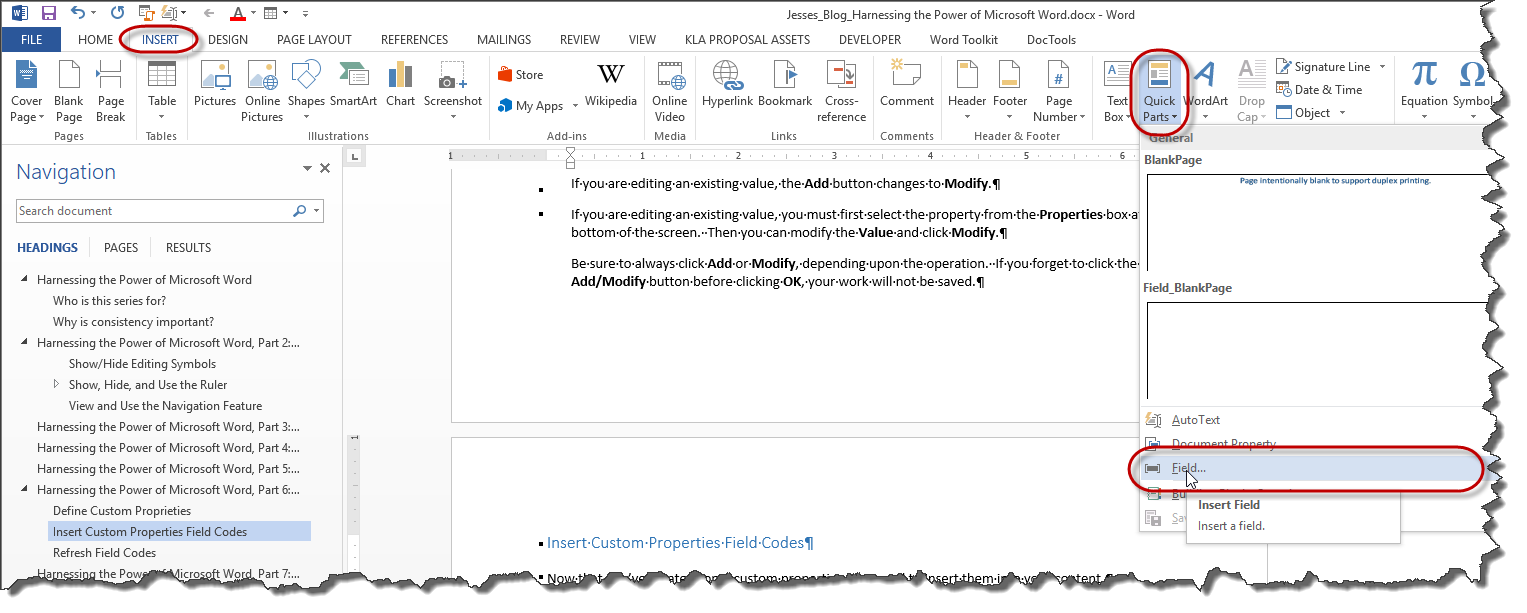
To insert a custom document property field code:
1. Place your cursor at the desired insertion point, then click the INSERT ribbon and select Quick Parts > Field. Alternatively, you can press Alt + N + Q + F.
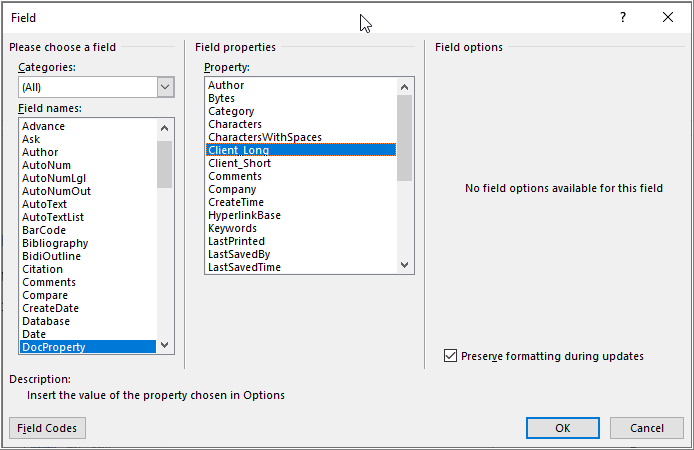
2. On the Field dialog:
a. In the Field names list, select DocProperty.
b. In the Property list, select the custom property that you want to insert.
c. Click OK.
Voila, the current value is displayed in the document.
By default, fields turn gray when you hover the mouse over them in your document. Later in this post I’ll show you how to change it so field codes are always shaded for easy identification.
Now you know the basics, but there’s more. In addition to knowing how to define and insert custom properties, you also need to know how to refresh your field codes when you change a property’s value.
Refreshing Field Codes
If you change the value of a custom property, you will need to refresh the field codes that return that property. For example, you may have an asset that contains a “Client_Name” property. After plugging that asset into your current document, you will need to refresh it to reflect the Client_Name property that you defined in the current document.
To refresh a single field code:
1. Right-click on the field in your document.
2. Select Update Field.
To refresh all field codes in a document:
1. Press Ctrl + A to select all the content in your document.
2. Press F9 to refresh dynamic items.
3. Perform a Print Preview to refresh field codes that exist in the page headers and footers.
So far, so good. But what happens if you insert content that includes a DocProperty field code, but that property doesn’t exist in the document? You will be greeted with an error. So, I’ll explain how to resolve this type of error next.
Resolving Errors
If you insert an asset that contains a custom property field code that does not exist in the current document, when you refresh the field code, it will return an error.
To correct this situation, you need to create the respective custom property. But first, you will need to know the name of the custom property that you need to define. This can be found by right-clicking on the error and selecting Toggle Field Codes.
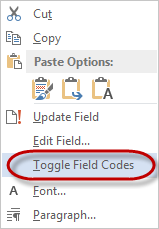
The displayed field code will then show the property name in the middle of the field. For example, the following field code indicates that the field is supposed to return the value of the Buyer_Name custom property.
Tip: You can highlight the custom property name and copy it, then paste it into the custom property dialog to avoid any typing errors.
After you’ve defined the property, refresh all field codes to ensure the error has been corrected.
While you can find errors by searching for “Error!” in the document, you might also find it helpful to change the view options in Word so that all field codes always appear shaded, which I will explain next.
Changing the Field Code Shading Option
By default, fields turn gray when you hover the mouse over a field. However, you can optionally change this setting to never highlight fields or always highlight fields. Being able to see field codes can help you avoid overwriting them, as well as help you troubleshoot issues such as seeing unresolved document property errors.
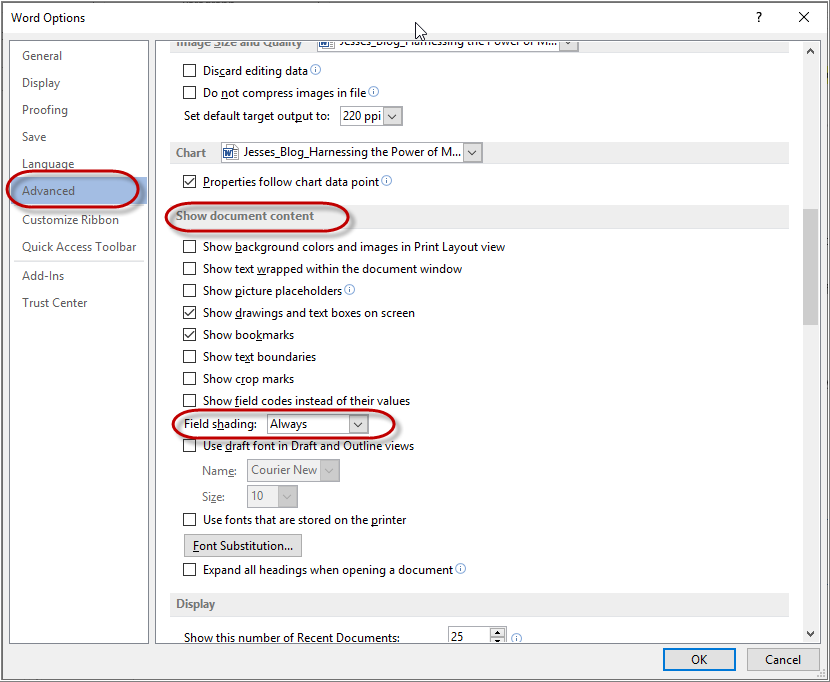
To change your field code shading option:
1. Select File > Options.
2. On the Word Options dialog:
a. Select Advanced in the left navigation pane.
b. Scroll down to locate the Show document content settings.
c. Select your desired shading option in the Field shading drop-down menu.
d. Click OK to save your changes.
Now that you know how to use Word’s built-in functionality to use custom document properties, you may find some functionality a bit cumbersome, especially if you use a lot of properties like I do. Next, I’ll talk about an Add-On that has made my life easier.
Consider the DocPropertyManager Add-On
At KL&A, we have perfected the art of content reuse as it relates to proposal development. We have a huge repository of content assets (over 500 assets), which has resulted in a substantial list of document properties. The scale of our application started making this very useful feature a bit of a handful to manage. The small dialog used for defining and maintaining custom properties is somewhat restrictive for handling long lists of properties, and there is no built-in feature for transferring properties from one template or document to another. Also, deleting multiple properties can be tedious and annoying.
I started writing macros to deal with some of my issues, but I’m still a newbie when it comes to writing VBA, so I went in search of a solution. I found a wonderful document property add-on that works for most PC versions of Word and is relatively inexpensive. (No, this is not a paid endorsement, just knowledge sharing.) The tool allows me to:
- Export, modify and import properties;
- Find and fix unresolved properties; and
- Add, delete, edit, and insert properties from a single dialog.
Not to mention, the creator of the add-on has been very responsive to my communications too.
Revolutionary Velocity Improvement
Efficiency improvements tend to be evolutionary. With content reuse, you can revolutionize your velocity improvement by eliminating substantial redundancy. Just think about how fast you could produce a document if 70 or 80 percent of it could be dropped in from a library of assets.
Now that you understand how to use custom properties to maximize the benefits of content reuse, you can start building your own library of assets. Later in the series we’ll take this concept to the next level. Imagine being able to plunk in an asset from a ribbon in Word.
In the next post, I’ll discuss how to use dynamic cross references.
Make sure you check out the rest of the Harnessing the Power of Microsoft Word series:
Other recent posts:

Kunz, Leigh and Associates (KL&A) Announces the Retirement of KL&A Co-Founder John Leigh
OKEMOS, MI, April 11, 2023 – Kunz, Leigh and Associates (KL&A) announces the recent retirement of KL&A Co-Founder John Leigh as of March 31, 2023. Mr. Leigh began his career as a developer working on large mainframe systems before moving…

Team Building in a Remote Environment
Blog Barista: Dana Graham | June 15th, 2022 | Culture | Brew time: 5 min
Let me start by saying I don’t care for the term “work family.” I have a family I love, and they have absolutely nothing to do with my career. I want my work life to be its own entity. I like boundaries (and the George Costanza Worlds Theory). Certainly, I want to enjoy and trust my coworkers, and I want to feel supported and cared for…
0 Comments