Blog Barista: Jessica Davis | October 30, 2019 | Productivity | Brew time: 11 min
Welcome to Part 4 of the Harnessing the Power of Microsoft Word series. So far, I’ve covered some often unknown but immensely helpful editing and navigation features and explained how to create and access templates and how to create and apply paragraph and character styles. Today’s post will take your paragraph style creation to the next level. It explains how to build auto-numbered styles for complex, multilevel lists. This can be used to auto-number headings or to create styles for ordered lists used within your documents.
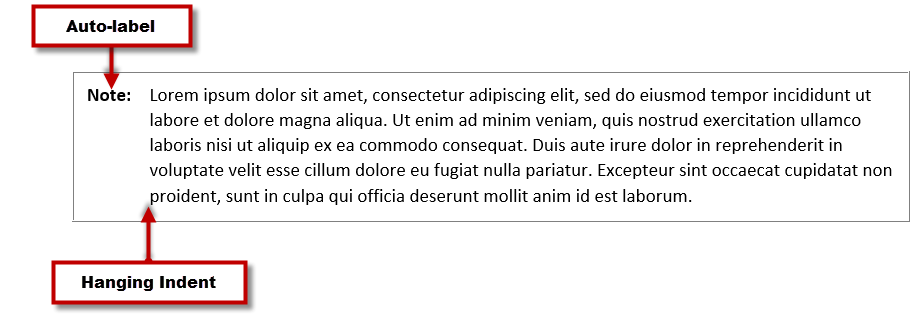
You can also use auto-numbers to automatically produce text labels. For example, you can create an auto-number for notes that produces the word “Note:” with a hanging indent (as shown below), so that you don’t have to type “Note:” each time you insert a note.
This approach can be used to create labels for all sorts of elements, such as a style that produces the word “Chapter” followed by a dynamic chapter number or the word “Appendix” followed by a dynamic alpha value. You can even use a symbols font in your auto-number scheme to create a graphic label. For example, say you want to include troubleshooting tips that are labelled with a target icon. As soon as you apply the paragraph style, the icon will appear and all you have to do is type in the tip.
In addition to saving you time with content creation, this approach, as opposed to using the list options on the HOME ribbon, will resolve any frustrations you’ve encountered when creating or updating a numbered list. You’ll never have to restart numbering and you won’t have problems with achieving the desired indentation for nested items.
The rest of this post explains how to:
- Create multilevel list styles for things like writing instructions;
- Create numbered headings to provide context information for your readers; and
- Create auto-labels to automatically label and format certain kinds of information.
Please note that each sub-topic builds upon the preceding topics, so it’s important to read through each sub-topic.
Create Multilevel List Styles
To create auto-numbered, multilevel list styles:
1. Create a style for each nesting level you may want to include in a numbered list, including the sentence that introduces the list. For example, create the following styles:
NumList_Into (for intro sentence)
1. NumList1 (for first level numbered items)
a. NumList2 (for second level, nested items)
i. NumList3 (for third level, nested items)
Refer to Part 3 of this series for instructions on creating paragraph styles. Also, consider selecting the New documents based on this template option when creating the styles so that these new styles are available in all documents that are created from the underlying template.
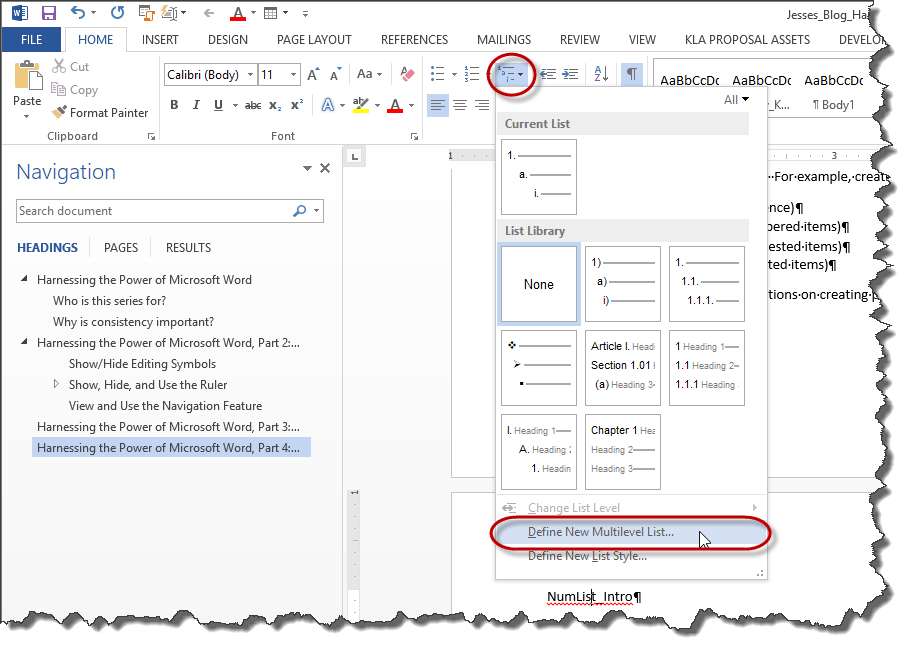
2. On the HOME ribbon, select the Multilevel List drop-down and select Define New Multilevel List.
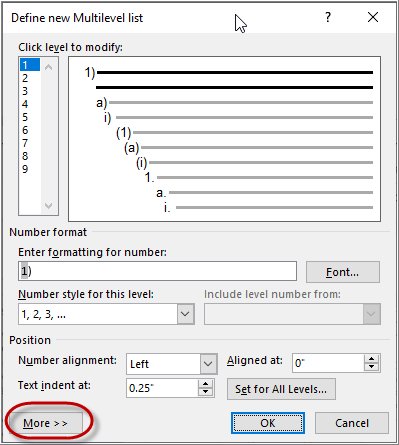
3. On the Define new Multilevel list dialog, click More. The dialog will expand to show more fields.
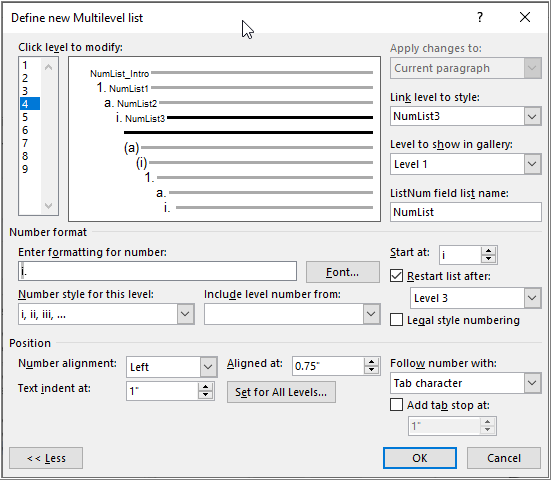
4. On the expanded Define new Multilevel list dialog:
a. Click the first line and set the following fields:
i. Link level to style—select the style you defined for a list’s introduction sentence.
ii. Number style for this list—set to (none) to suppress numbering of the intro sentence.
iii. Aligned at—set the value to match the alignment of your body text. If your body text is not indented, then set this value to 0.
iv. Follow number with—set to Nothing.
v. Text indent at—set to the same value as Aligned at.
b. Click the next line and set the following fields:
i. Link level to style—select the style you defined for the first level of the list. In this example, you would select NumList1.
ii. Number style for this list—set to the desired numbering style, such as numeric or alpha.
iii. Enter formatting for the number—apply any characters you want to include such as a period or a closing parenthesis after the number.
iv. Restart list after—make sure this field shows the list level of the previous item. This resets the numbering after the previous level is applied to a paragraph.
v. Aligned at—set the indent value for the number. For example, .25 would indent the number a quarter inch from the margin.
vi. Follow number with—set this as you wish. A tab that aligns with the hanging indent value results in clean, aligned lists, so you may want to set it to Tab Character, check Add tab stop box and set a value for the tab stop. For example, if you indented the number to .25, you probably want the tab stop set at .5.
vii. Text indent at—set to desired hanging indent value. This value should match the value of the tab stop so that the text aligns when items of this style wraps lines.
c. Repeat step b for each level of your list scheme, increasing the values of the alignment, text indent, and tab value in a uniform fashion. For example, set the intro style to 0, 0, Nothing; the first nested level to .25, .5, .5; the second level to .5, .75, .75; and so on.
When you apply these styles to your paragraphs, the paragraph will automatically indent to the appropriate level and have the correct numbering. To demonstrate, the following list indicates which paragraph style is applied to each paragraph.
NumList_Intro:
1. NumList1
a. NumList2
b. NumList2
i. NumList3
2. NumList1
The Define new Multilevel list dialog has a lot of fields, some of which I didn’t cover in this particular set of instructions. Next, I’ll explain how to create numbered headings, which requires using additional fields.
Create Numbered Headings
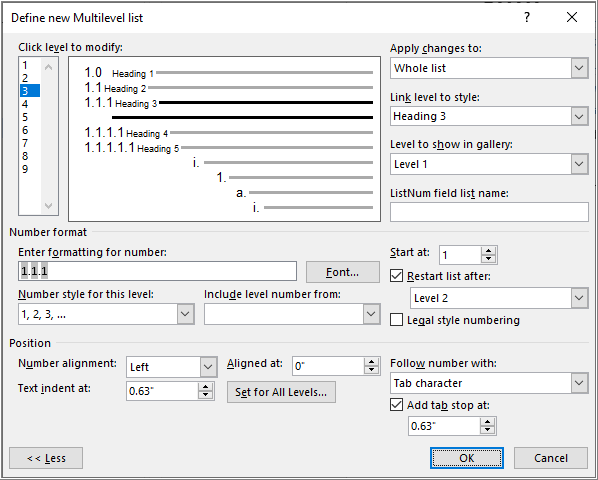
Creating numbered headings is very similar to the previous set of instructions with a few minor differences because you need to replicate the auto-numbering from previous levels of the scheme. To clarify, in the following example, notice that Heading 2 numbering begins with the same value as the parent heading, Heading 1. Heading 3 replicates the numbering from both Heading 1 and Heading 2.
The following example color-codes the counters so that you can see the replicated numbering. The blue node of the numbering scheme is the Heading 1 auto-number counter which is replicated in lower levels. The red node is the Heading 2 auto-number counter, and the green node is the Heading 3 auto-number counter.
1.0 Heading 1
1.1 Heading 2
1.1.1 Heading 3
1.2 Heading 2
1.2.1 Heading 3
2.0 Heading 1
2.1 Heading 2
2.1.1 Heading 3
To replicate the numbering of parent headings in the child headings, you will need to use the Include level number from field on the Define new Multilevel list dialog. For example, when building the numbering scheme for Heading 2:
1. Use the Link level to style field to map Heading 2 to the second level of the list.
2. Make sure the Restart list after box is checked and Level 1 is shown. This makes the Heading 2 numbering restart after each Heading 1. Each subsequent level should include the level before, so Heading 3, would restart after Level 2 and so on.
3. Make sure the Enter formatting for number field is empty so that you can build your numbering scheme. Word typically inserts a default value that may not be correct for your purpose.
4. Use the Include level number from field and select Level 1. The level 1 auto-number appears in the Enter formatting for number field.
5. After the auto-number, type a period and then use the Number style for this level field to select the auto-number element for Heading 2. A corresponding auto-number will show up in the Enter formatting for number field.
For Heading 3, you will use the Include level number from field twice, selecting Level 1 the first time and Level 2 the second time. Then you’ll use the Number style for this level field to insert the Heading 3 auto-number. Repeat this pattern for each heading level you expect authors to possibly use.
The following illustration shows what the dialog looks like for numbered headings up to Heading 5.
If your template requires chapters or sections, you can insert the word “Chapter” or “Section” before the Heading 1 auto-number counter in the Enter formatting for number field. You can also click the Font button and define special formatting that will apply to the auto-number only. For example, you might want the auto-number to appear in a different font, weight, and/or color.
Chapter 1: Editing Your Documents
Finally, you can also create an appendix scheme that produces the title with an alpha counter, followed by appendix headings that replicates the parent counter(s), similar to that shown below. You would use the same approach, but instead of mapping heading styles to the levels, you’ll need to create paragraph styles for the appendix title and each level of heading you need and map those to the list levels.
Appendix A: Appn_Title
A.1 Appn_Heading1
A.1.1 Appn_Heading 2
Now that you know all there is to know about auto-numbers, let’s look at how to use this feature to create auto-labels.
Create Auto-Labels
Notes are a common element used in almost every type of document so they make a great example of how to use Word’s auto-numbering features to create auto-labels. If you like to think outside the box, you can probably figure out all sorts of uses for this feature. For example, you could create a style for troubleshooting tips that produces an icon from the Symbols or Wingdings fonts.
Below is the Define new Multilevel list dialog showing the configuration for my notes auto-numbering. I always want my notes to align with the text to which they apply, so I needed four paragraph styles for notes. One to align with body text, one to align with bullet or step text, and two more that will align with two levels of nested bullets or steps.
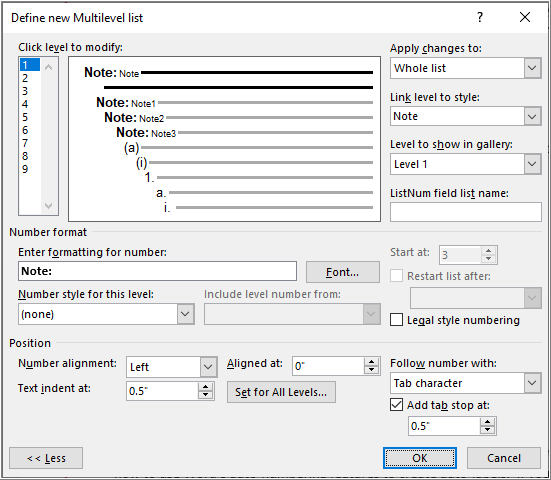
Notice the naming convention. The Note style would be used under body text, while Note1 would be used under Bullet1 or Step1 and Note2 under Bullet 2 or Step 2 and so on. This naming convention helps KL&A’s authors to know which style to use based on what type of element precedes the note.
To create your own auto-labels:
1. Create one style for each type of paragraph that you want to auto-label.
2. If you want to use a symbol, figure out which font and character produces the desired symbol. Symbols and Wingdings are two commonly available fonts containing symbols and you can use Google to view all the symbols in the selected font.
3. On the HOME ribbon, select the Multilevel List drop-down and select Define New Multilevel List.
4. On the Define new Multilevel list dialog, click More. The dialog will expand to show more fields.
5. On the Define new Multilevel list dialog:
a. Use the Link level to style field to map the first style to the first level of the list. Note you may have only one style to map.
b. Set the Number style for this level field to (none).
c. In the Enter formatting for number field enter the text for your auto-label. If you want to use a symbol, type in the character that maps to that symbol.
d. Optionally use the Font button to format the auto-number. When using a symbol, you’ll need to select the font containing the desired symbol.
e. Use the Position fields to define alignment and optionally insert a space or tab after the auto-number. Looking at the first level in the illustration below, the word Note: is left aligned with no indent. It is followed by a tab character with a tab stop at .5”. Notice that the Text indent at matches the tab stop value, which produces a hanging indent.
f. Repeat these steps for any additional auto-label formats.
g. When you are all done, click OK.
Automation is the Key to Efficiency
Now that you know how to create styles and how to use the Multilevel List feature to produce auto-numbers or auto-labels, you can build some comprehensive templates that will make producing professional documents faster and easier for you and everyone else in your organization.
In the next post, I’ll discuss how to use variables, known as custom properties, to make easy work of content reuse.
Make sure you check out the rest of the Harnessing the Power of Microsoft Word series:
Other recent posts:

Kunz, Leigh and Associates (KL&A) Announces the Retirement of KL&A Co-Founder John Leigh
OKEMOS, MI, April 11, 2023 – Kunz, Leigh and Associates (KL&A) announces the recent retirement of KL&A Co-Founder John Leigh as of March 31, 2023. Mr. Leigh began his career as a developer working on large mainframe systems before moving…

Team Building in a Remote Environment
Blog Barista: Dana Graham | June 15th, 2022 | Culture | Brew time: 5 min
Let me start by saying I don’t care for the term “work family.” I have a family I love, and they have absolutely nothing to do with my career. I want my work life to be its own entity. I like boundaries (and the George Costanza Worlds Theory). Certainly, I want to enjoy and trust my coworkers, and I want to feel supported and cared for…
0 Comments