Blog Barista: Sam Nadarajan | March 25, 2020 | Developer Tools | Brew time: 11 min
Welcome back. We’ve made it to our last part of the Jira 201 series! In today’s post, we will take a closer look at how to set up your Jira Service Desk project.
After making the business decision to use Jira Service Desk for its Service Desk operations, your organization has tasked you with being its first Jira Service Desk Project Administrator. We have already provided an overview of the mechanics of Jira Service Desk but in this post, we will explore how you can make adjustments to your Jira Service Desk project to better fit your organization’s business processes.
Note: All screenshots included in this post are from Jira Service Desk Server 4.5.1. Your appearance may differ based on your organization’s version.
Configurations
Because Jira Service Desk is another project type in the Jira ecosystem, as a project administrator, you will be able to perform administrative functions similar to other Jira projects as we covered in this post. Concepts such as components, project roles, workflows, and others still apply to Jira Service Desk operations. Because Jira Service Desk is unique in terms of how it operates, Jira provides an extensive list of additional administrative functions available to Jira Service Desk projects.
Queues
Queues can be configured by project administrators to identify and organize Service Desk issues. All queues are driven by JQL queries that you can generate. Here is an example of a queue for unassigned issues:
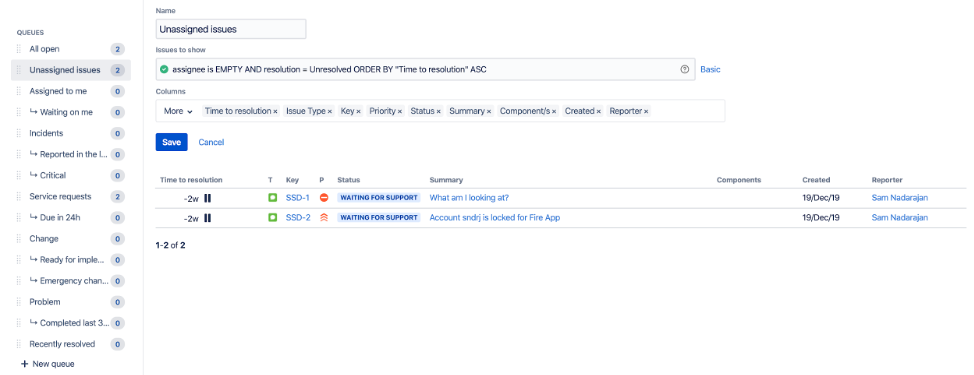
You have the ability to change the name of the queue, the query that defines what issues fall into the queue, and the columns that should appear in the list view of the queue. By default, Jira will create a sample set of queues upon the creation of a new Jira Service Desk project that you can use as a starting point. It is up to you to configure these queues to meet your organization’s needs.
A common question asked regarding queue configuration is the ability to sort on different columns. For simplicity’s sake, and because you have the ability to define multiple queues that highlight different buckets of information, you are unable to sort columns for a queue. The only sorting you can add to a queue is the addition of an “ORDER BY” clause in the queue’s JQL.
Reports
Like queues, reports can be configured by project administrators to highlight Service Desk issues. Similar to sprint reports on a sprint board, Service Desk reports can display information from average time to resolution, number of SLAs met v. breached, and number of created v. resolved issues, among others. Jira will automatically provide a few meaningful reports that you can further adjust based on organizational needs. Here is an example of creating a new report:
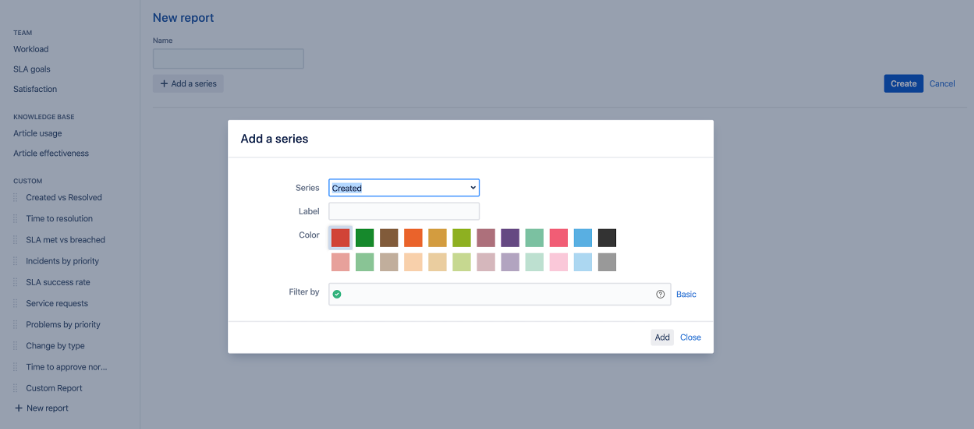
Note: Each report needs at least one series (set of data) to graphically display the report.
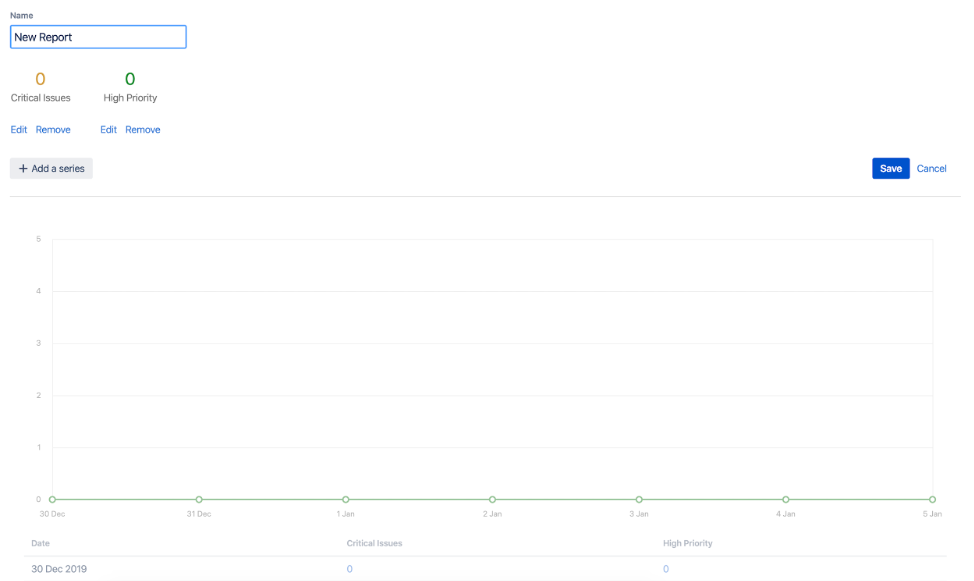
Series represent different data sets available within a report. Here is an example of a report that highlights all critical priority issues and high priority issues. Note that these are two different series included within the same report:
Jira Service Desk provides users with more report configuration than Jira Core or Jira Software. In addition to this functionality, you can always search for issues, export them to excel, and generate advanced reports as needed.
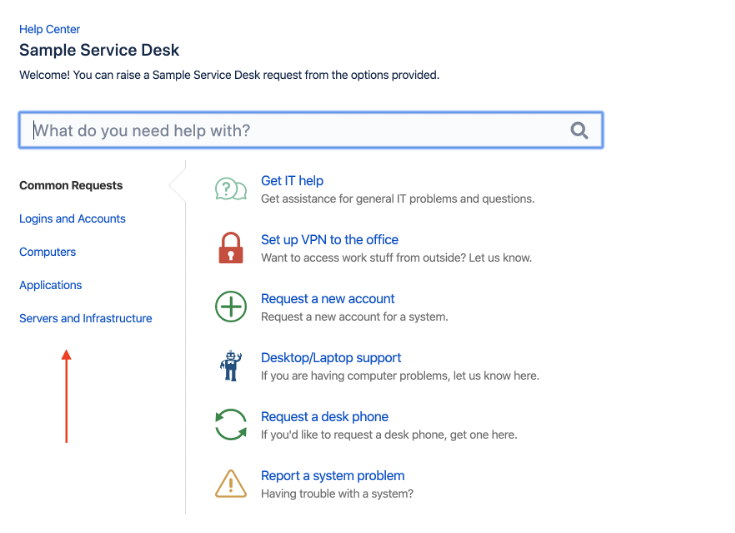
Request Types
Request types for the customer portal can be configured to increase interactivity and clarity for customers. Here is an example of the request types configuration page:
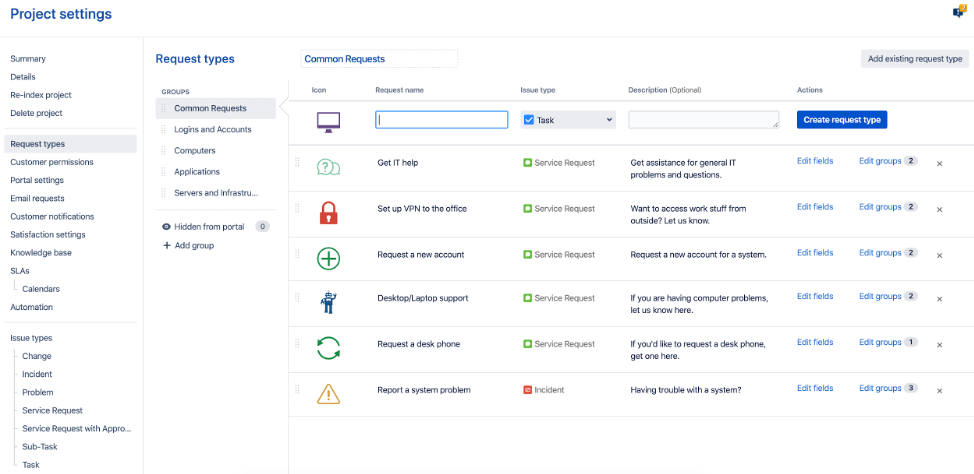
For each request type, you can configure the following:
- Add an icon for quick visual recognition
- Add a title and description. A best practice to follow is to make these scenario-based and as descriptive as possible so customers can clearly understand the purpose of certain request types.
- Map the request type to an issue type. Remember that issue types in Jira represent different types of issues for the project. Multiple request types can be assigned to a specific issue type, and they will display on your issue detail view as illustrated:
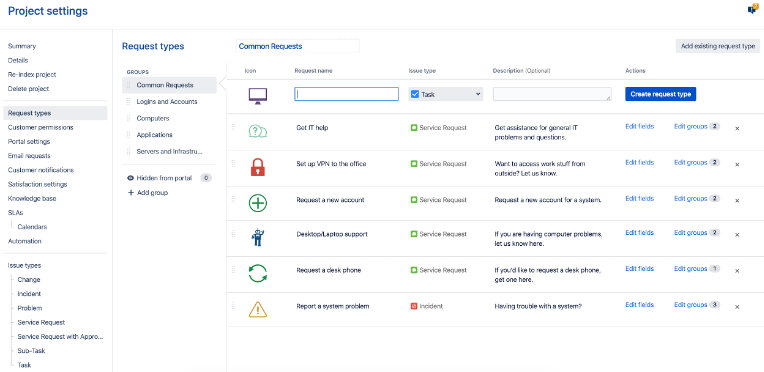
- Determine the fields available for each request type. You can limit the number of fields available for a certain request type to reduce confusion and make the customer portal easy to use for your customers.
- Modify the group(s) that the request type is a part of. You can group the same request type into multiple groups if certain scenarios apply across multiple groups. This is another configuration that makes the customer portal easier to use, as illustrated below:
Customer Permissions
Customer permissions allow you to specify who can raise requests in the portal and who those requests can be shared with:

Customer permission management can be broken down into three levels of configuration:
- Manual – you control who can create and/or share requests at the user level
- Organization – anyone with access to your Jira instance can create and/or share requests
- Public – make your customer portal public and not restricted to anyone in particular
Portal Settings
Portal Settings allow you to control the look and feel of the portal, as illustrated below:
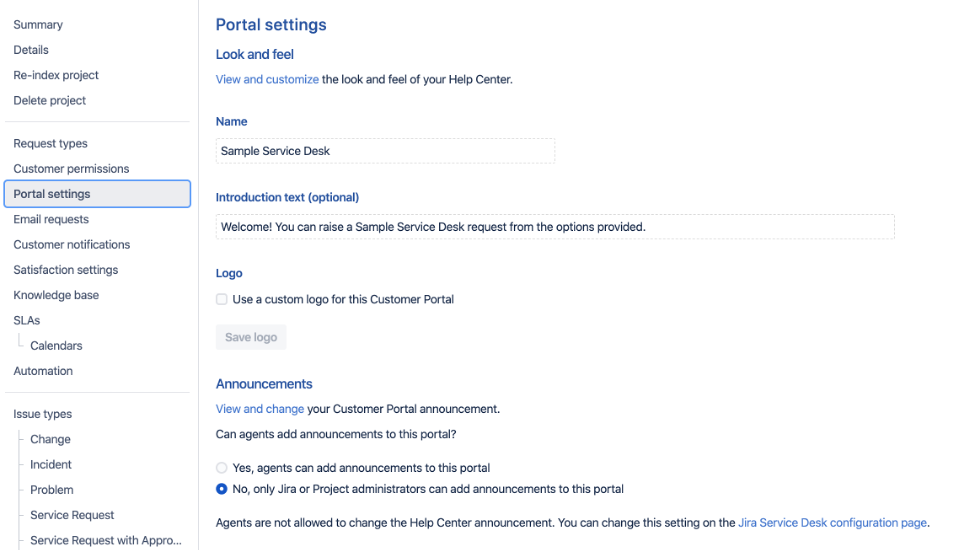
Aside from the name, introduction, and logo, you can also determine if agents can add announcements to the portal or if it should be restricted to just administrators.
Email Requests
Your Service Desk may have provisioned a number of different ways to raise requests for customers. Jira gives you the flexibility to create requests via email. You can set up dedicated email addresses that will either create requests or add comments to requests, streamlining the request creation process and making it easier for your customers to interact with your Service Desk.
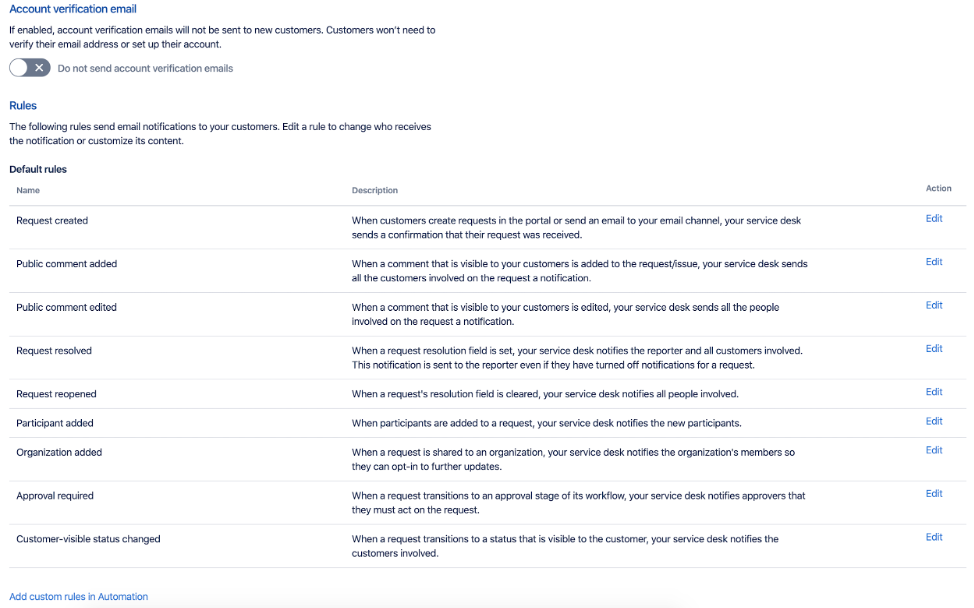
Customer Notifications
You can control the email templates for notifications that are sent to customers based on certain issue events. Here is an example of the different customer notifications that can be configured:
Here is what the adjustments for a particular customer notification look like:
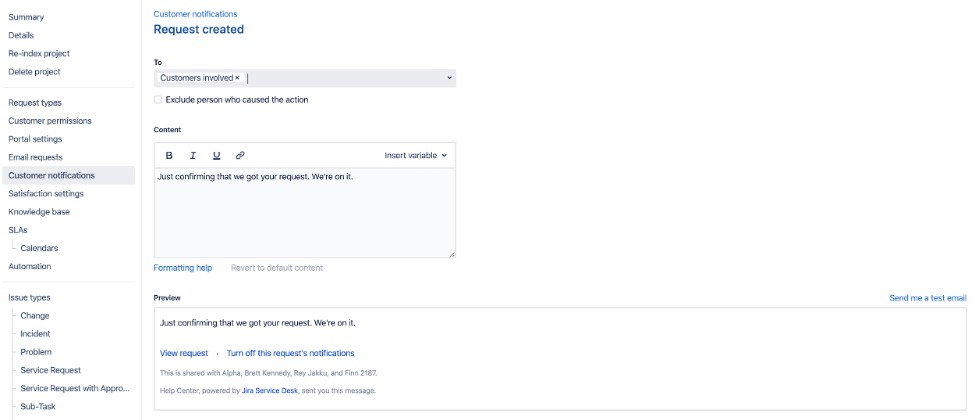
Adjusting customer notifications give you finer control over what customers should see based on certain events. Note that you cannot adjust the email footer for customer notifications here.
Knowledge Base
You can potentially reduce the number of requests flowing through your Service Desk operations with a tightly integrated knowledge base of information. Jira Service Desk allows you to link your project with a dedicated Confluence space, as described here. Service Desk agents can populate the Confluence space with how-to articles and guides that can assist users in finding solutions without the need of an agent.
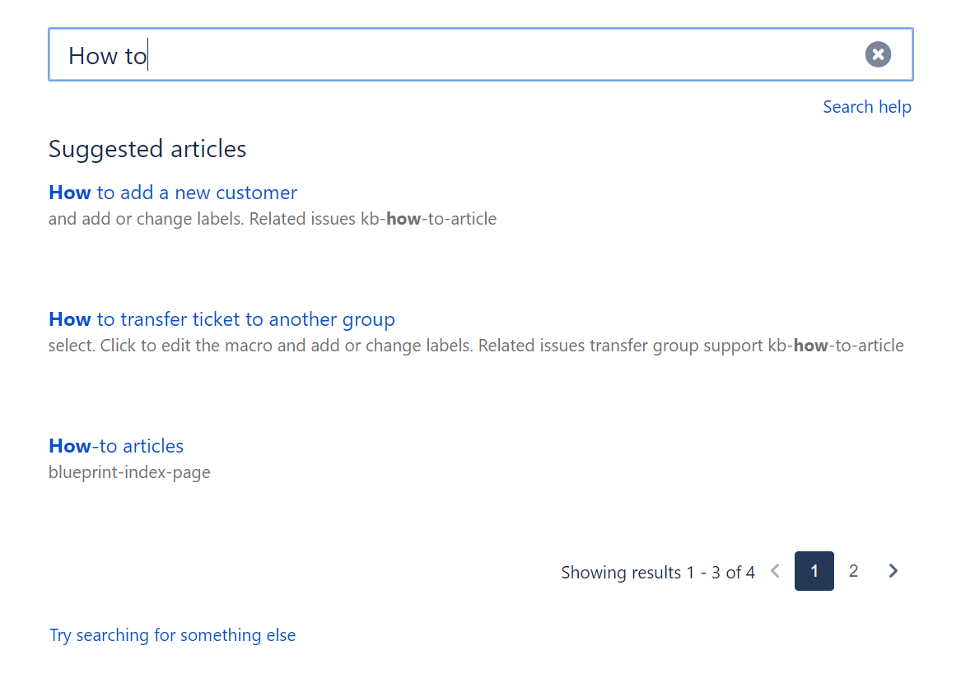
Once you have linked your Jira Service Desk project with a Confluence space, articles in that space can easily be referenced in Service Desk operations. Customers can query for articles in the customer portal, and agents can reference Confluence articles directly within issues. Below is am illustrated scenario of searching for Confluence articles in the customer portal:
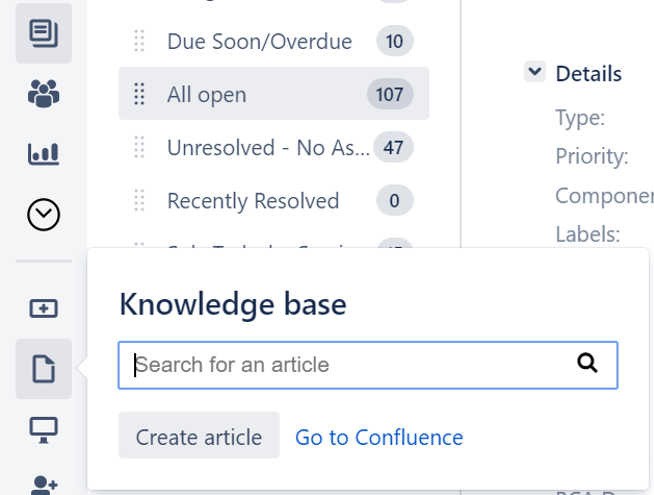
Below is another example of searching for Confluence articles within a Jira issue:
Service Level Agreements (SLAs)
Service Level Agreements (SLAs) can be configured for each Jira Service Desk project based on an organization’s predefined agreements. Within your Jira Service Desk project settings, select “SLAs” on the left side to see existing SLAs and add new ones:

Note: Above is the configuration for the SLA for “Time to first response.” The first response occurs on a Jira issue when a comment for customers is added, when the status changes to ‘Waiting for Customer’, or when a resolution is set on an issue after an issue is created. For Incident issue types, the goal is to respond within 2 hours, and Service Requests/Service Request with Approvals within 4 hours.
In the above example, there are four SLAs configured for this project. Administrators can specify when to start the clock (e.g. when an issue is created, updated, etc.), when to pause the clock, or when to stop the clock. All time based goals are merely JQL queries. Order matters for the goals; therefore, all issues will be checked against the list of goals and given a time target based on the first matching JQL query.
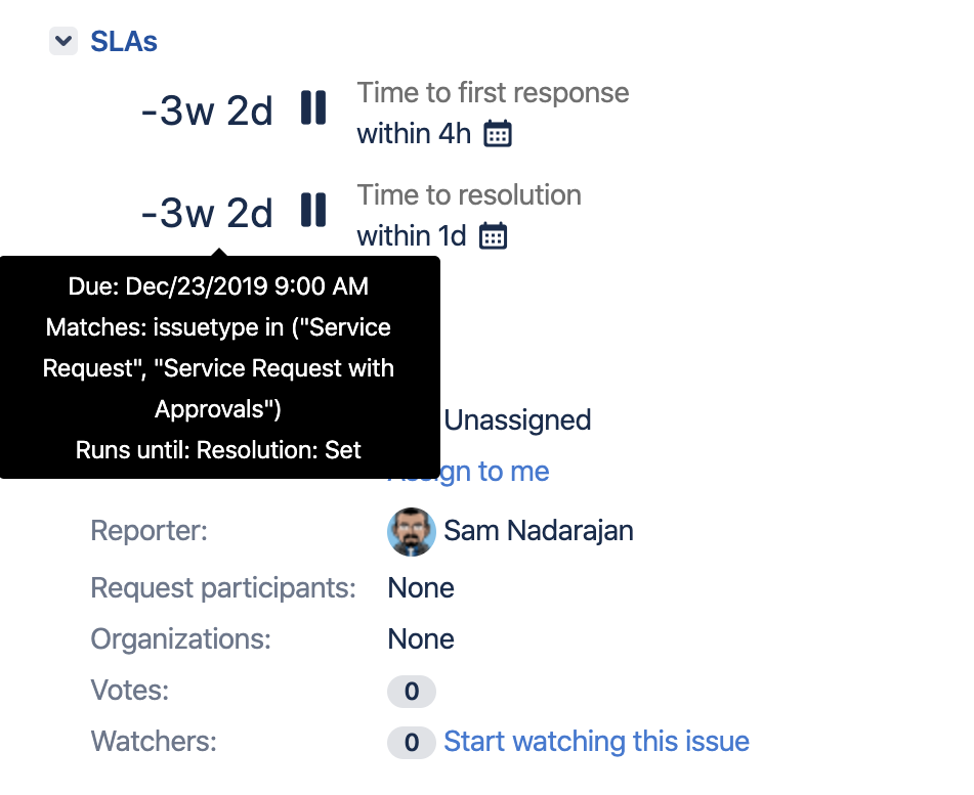
Because SLAs are important metrics to meet, all SLAs will appear on an issue in the top right section for better visibility. Hovering over the SLA will indicate the criteria that maps the issue to a particular SLA, as illustrated:
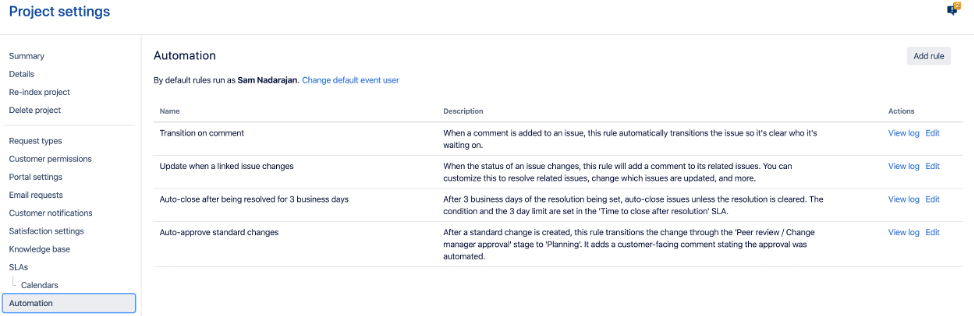
Automation
Automation in a Jira Service Desk project allows you to automate tasks that would otherwise need to be done manually. As an administrator, you can specify automation rules that will be executed when specific conditions are met. You can access automation rules in your project settings, as illustrated below:
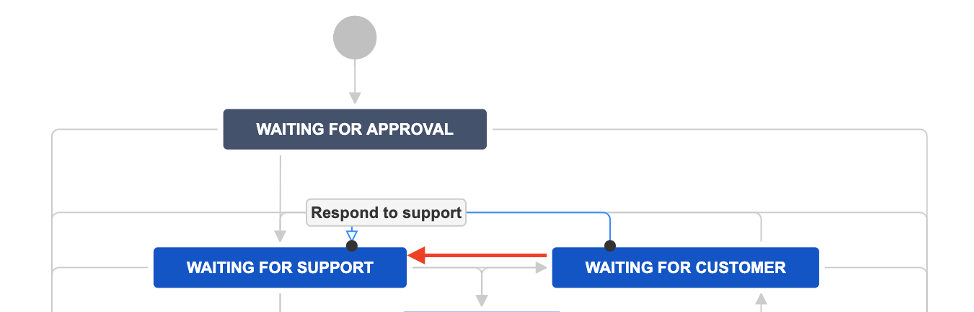
When could an automation rule be useful? Let’s examine a common scenario that occurs within your Service Desk: responding to customers. Correspondence between an agent and customer, will typically happen through a comment on the issue. When a comment is added to an issue, that means either an agent or a customer has addressed a concern on the issue. To clarify issues that are waiting on an agent or a customer, you may have a workflow that looks like this:
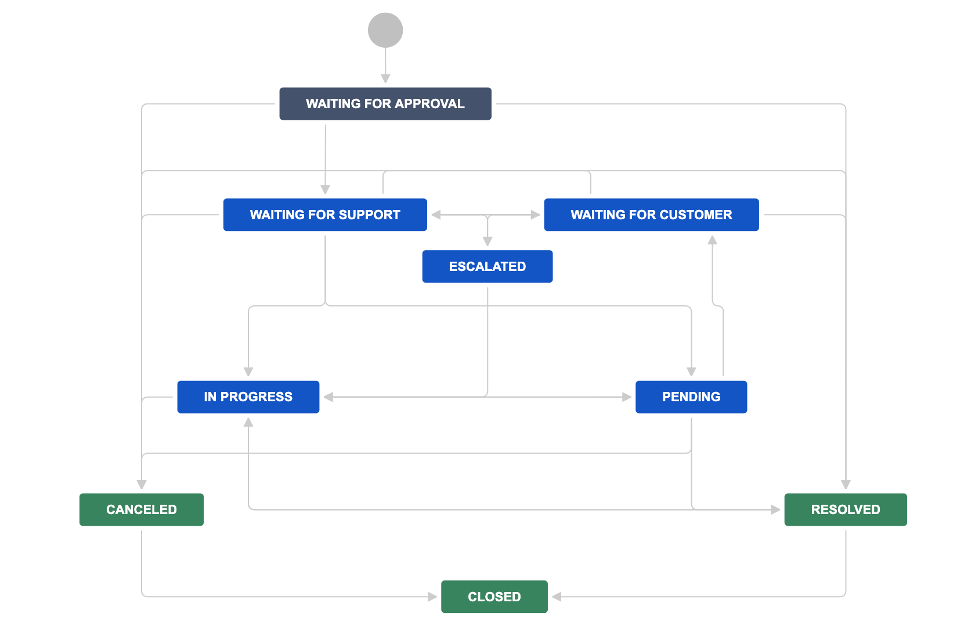
Note: Above there are two statuses: Waiting for Support and Waiting for Customer. These statuses indicate which party needs to respond to continue the issue through to resolution.
As an agent, when you respond to a customer, you may choose to add an external comment that the customer can see. However, your organization mandates that you change the status to indicate that the issue is now in the customer’s hands. At this point, responding to a customer involves two steps: adding a comment and transitioning to a status.
Automation rules can make this two-step process a single step! Here is an example of an automation rule that addresses this scenario:
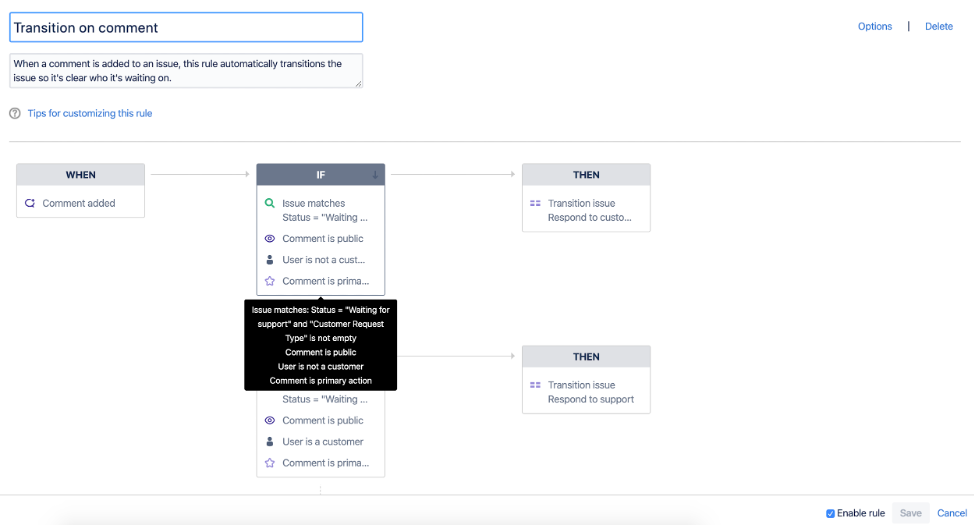
Note: when the issue is ‘Waiting for support’, and a comment is added by someone that is not a customer, execute the “Respond to Customer” transition, as illustrated below in the workflow:
Note: when the above automation rule meets certain conditions, the issue will automatically change status from “Waiting for support” to “Waiting for customer.”
Now, when an agent adds an external comment to an issue, the issue will automatically change statuses, making it clear to the organization that this issue is now the responsibility of the customer.
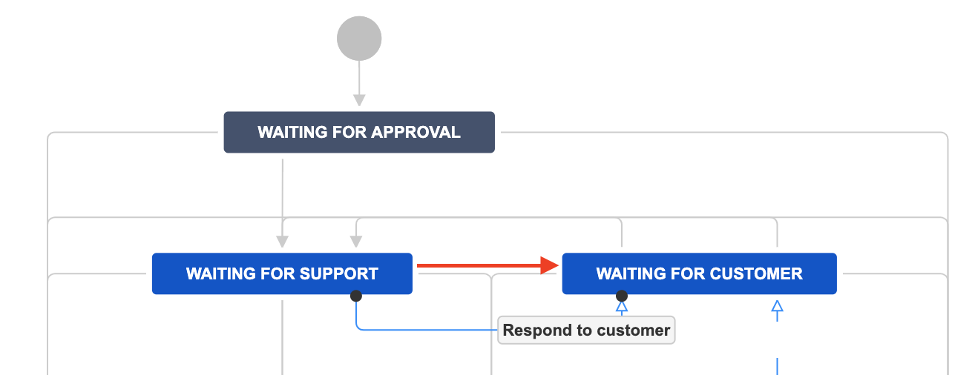
Similarly, the automation rule is configured to work the other way! A customer can respond to an agent’s comment and the issue will automatically change the status to “Waiting for support.” This part of the automation rule is illustrated below:
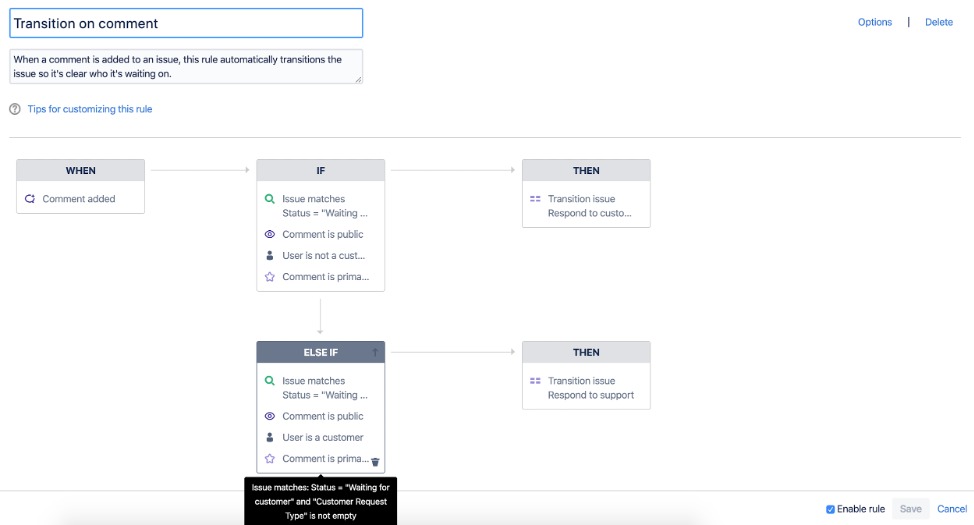
Note: when an issue has a status of “Waiting for Customer” and a customer adds a comment, the issue will transition from a “Waiting for customer” status to a “Waiting for Support” status, as illustrated below:
Note: when the above automation rule meets certain conditions, the issue will automatically change status from “Waiting for customer” to “Waiting for support.”
Think about how this automation rule improves visibility. If you have a queue for issues that are in a “Waiting for support” status, then your agents will know that any issue in that queue has more information and necessitates a response. Your agents can work against that queue for any issue that falls into that status. When a customer responds to an agent’s comment, the automation rule will automatically change the issue status to Waiting for support, and the issue will now appear in the “Waiting for support” queue. Because of the automation, you can worry less about manual mistakes, because the system is taking care of certain behaviors automatically – allowing agents to focus on their queues of work and making the correspondence between agents and customers as seamless as possible.
The Tailored Tool
We have covered a number of Jira Service Desk specific project configurations, designed to easily tailor the tool to meet organizational objectives. These configurations, on top of your standard project configurations, make Jira Service Desk a useful tool for your Service Desk operations. Seamless integrations with Confluence for a knowledge base and Jira Software (if your organization’s development team(s) use this tool) keep all your managed work under one roof, making work easier for your team, your organization, and yourself.
So that’s it for the Jira 201 series! Make sure you check out the rest of the Jira 201 series if you haven’t already:
Make sure to check back in the following weeks for the rest of the Jira 201 series:
Other recent posts:

Kunz, Leigh and Associates (KL&A) Announces the Retirement of KL&A Co-Founder John Leigh
OKEMOS, MI, April 11, 2023 – Kunz, Leigh and Associates (KL&A) announces the recent retirement of KL&A Co-Founder John Leigh as of March 31, 2023. Mr. Leigh began his career as a developer working on large mainframe systems before moving…

Team Building in a Remote Environment
Blog Barista: Dana Graham | June 15th, 2022 | Culture | Brew time: 5 min
Let me start by saying I don’t care for the term “work family.” I have a family I love, and they have absolutely nothing to do with my career. I want my work life to be its own entity. I like boundaries (and the George Costanza Worlds Theory). Certainly, I want to enjoy and trust my coworkers, and I want to feel supported and cared for…
0 Comments