Blog Barista: Sam Nadarajan | March 24, 2020 | Developer Tools | Brew time: 8 min
Welcome back to the Jira 201 series! In Part 3, we walked you through everything you can do as a Jira Project Administrator and how you can keep your project running smoothly. In today’s post, you’ll learn everything you need to know about Jira workflows.
Jira workflows are one of the more powerful artifacts in the Jira ecosystem. Every issue in Jira runs through a workflow, which can be configured to be as simple or as complex as your project(s) may demand. Workflows in Jira can do much more simply just transitioning between statuses. Let’s dive in, so we can look at all of the different functionality that workflows provide.
Note: All screenshots for this post are from Jira Server 8.5.1. Your configuration may appear differently depending on your Jira license type and version. Functionality covered in this post reflects functionality available in a native Jira installation, it does not include extended functionality available through add-ons.
Parts of a Jira Workflow
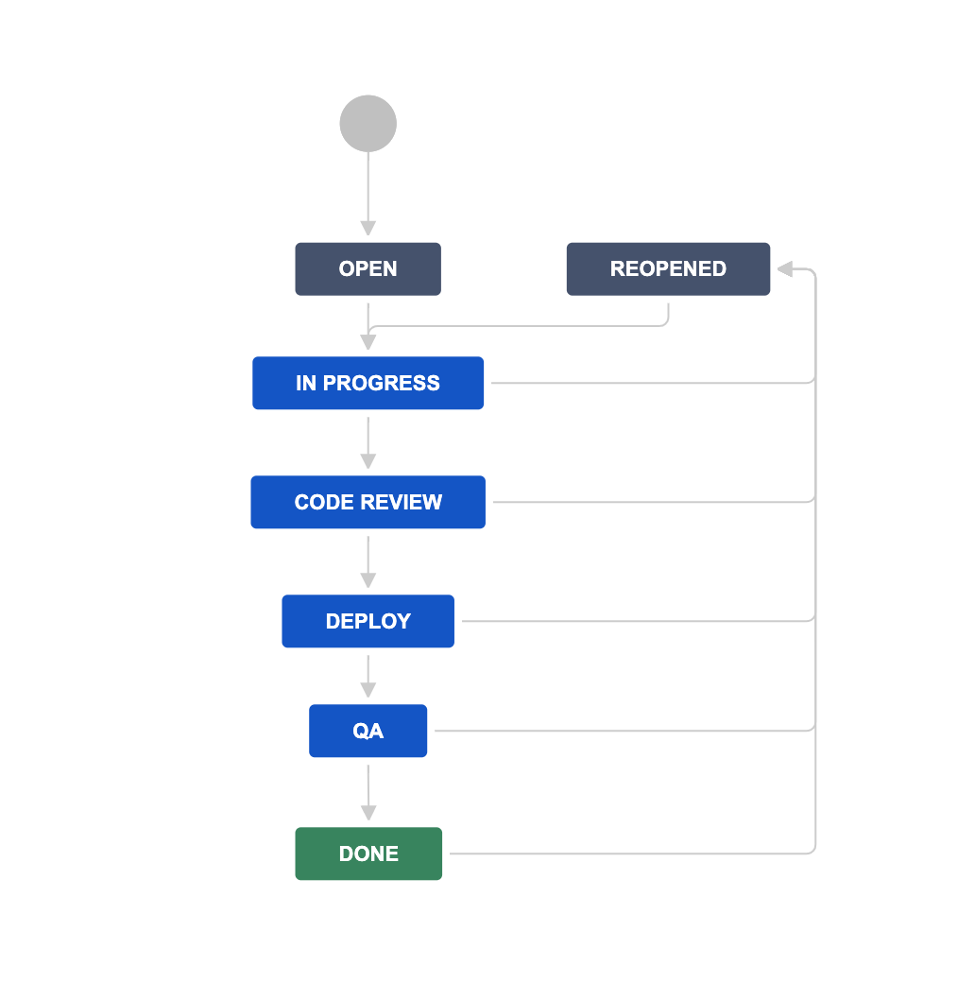
At its core, a Jira Workflow is composed of statuses and transitions. Here is an example of a simple workflow in Jira where blocks represent statuses and arrows represent transitions:
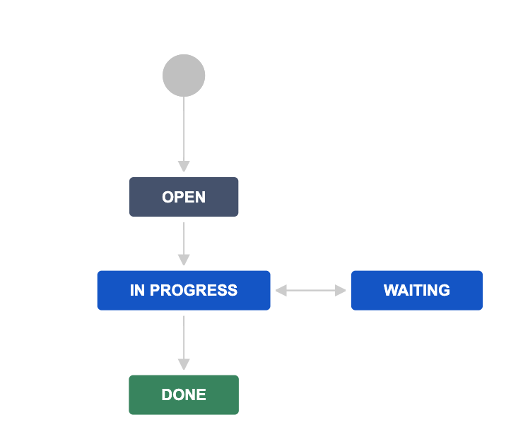
Statuses
Statuses represent the state that a Jira issue can transition from or to. Upon installation of Jira Software or Jira Service Desk, a number of statuses will initially be available for you to use. Administrators can add statuses to their organization as needed.
Additionally, each status is given a category: To Do, In Progress, or Done. These categories are reflected in your Jira workflow with different colors to help you easily visualize start and endpoints for your workflow. In the above example, the “Open” status is categorized as “To Do”, “In Progress” and “Waiting” represent “In Progress” categories, and “Done” represents a “Done” category. When configuring these workflows, a good practice is to follow this order for your statuses in your workflow.
Transitions
Transitions represent the bread and butter of your Jira workflows, as most of the workflow power is found within transitions. Transitions allow you to change the status of an issue, and certain transitions can be set up in your workflow to ensure workflows through a specified path.
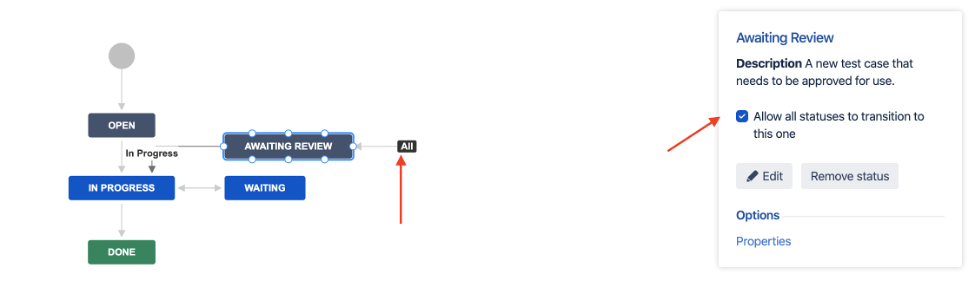
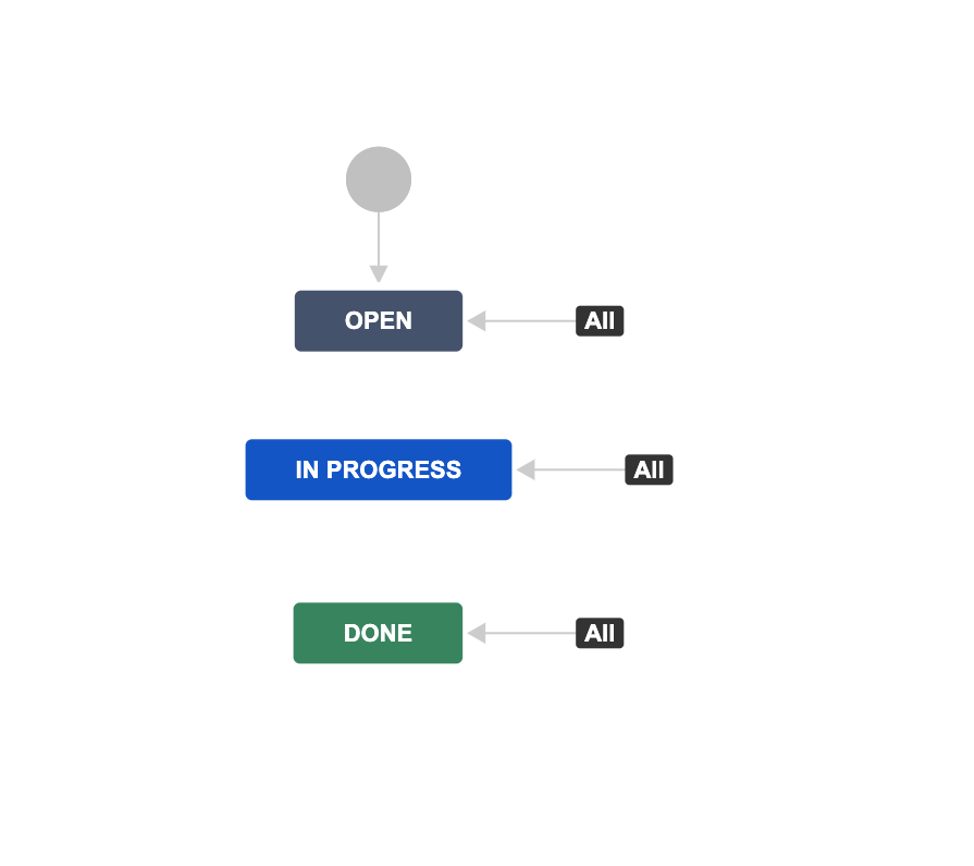
We have already illustrated an example of transitions between statuses above, but it would be cumbersome to draw many arrows if you want to allow all statuses to transition to a particular status. Luckily, Jira has optimized this process by allowing you to specify an “all statuses to one status” configuration as illustrated below:
Functionality in transitions goes beyond changing one status to another. When you select the transition, a dialog will appear showing each of the functions discussed below:
Screens
For each transition, you have the ability to trigger a screen upon transition. Remember that a screen is a collection of fields. At some point in your workflow, you may want users to add additional information to the issue.
To add a screen to a workflow transition, click on a specific workflow. In the edit mode, select a transition in the workflow:
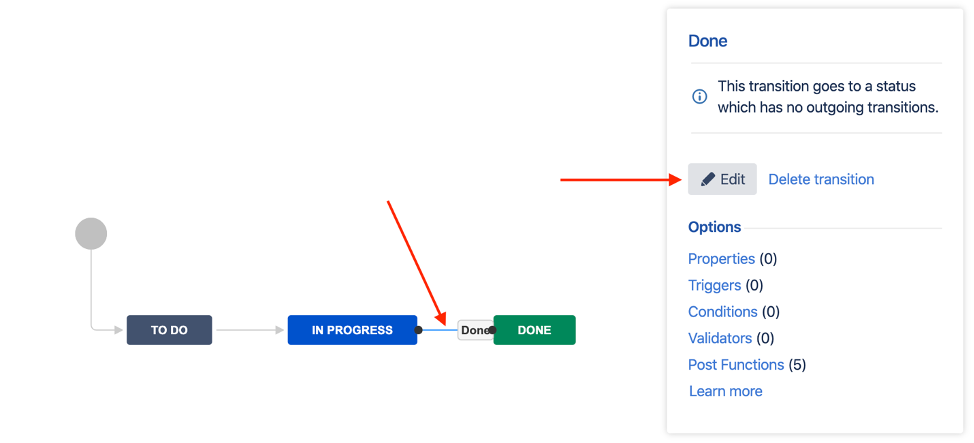
Here is an example of how to add a screen to the “In Progress” -> “Done” transition (using the same workflow illustrated above):
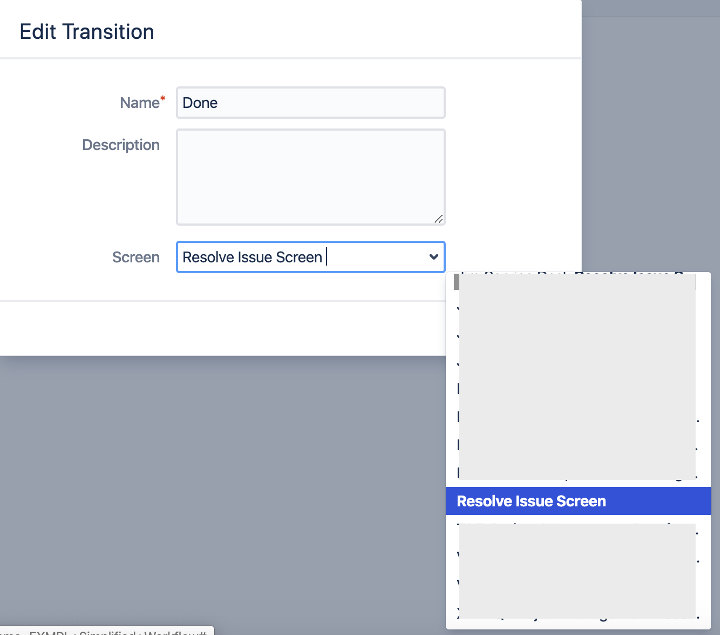
If a screen is added to a transition, when that transition occurs, either through a drag and drop across a board or changing the status on an issue, the designated screen will appear in a dialog, prompting you to add additional information.
Properties
You can use properties within a transition to set certain values. Examples include excluding certain resolution values, changing the action button name, or changing the title. Properties are set in key and value pairs, as illustrated:

While this feature is seldom used, it can add some value to your transitions. For example, a transition to a status of “Cancelled” could include a property to exclude the “Fixed” resolution from the dropdown. This approach brings clarity to your Jira issues by preventing a scenario where the status of a ticket is “Cancelled” and the resolution is set to “Fixed.”
Triggers
Triggers in workflows specify events that will automatically execute when a transition occurs. Mostly used with development tools (e.g. code repository), your tool of choice can drive transitions once certain actions occur. Examples include executing a transition when a pull request has been merged, a branch has been created, or a code review has been rejected. To access triggers in a Jira workflow, select a workflow, click on a transition, and then select the “Triggers” link, as illustrated:
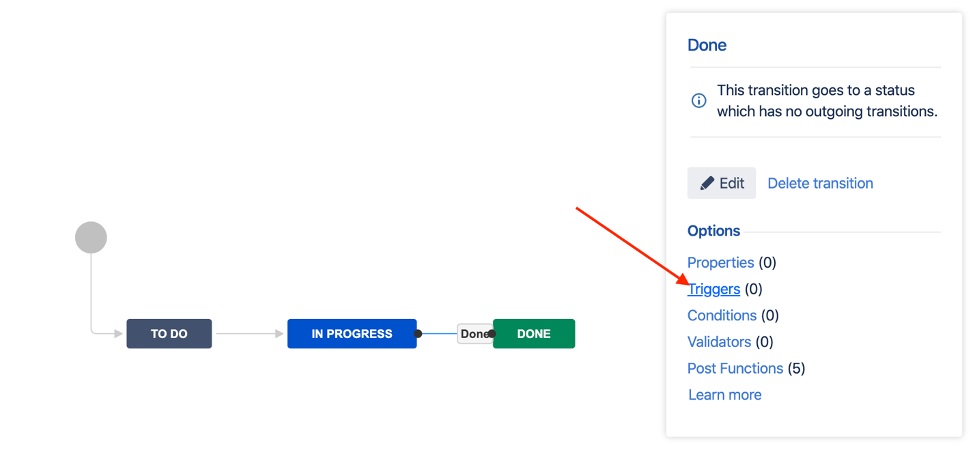
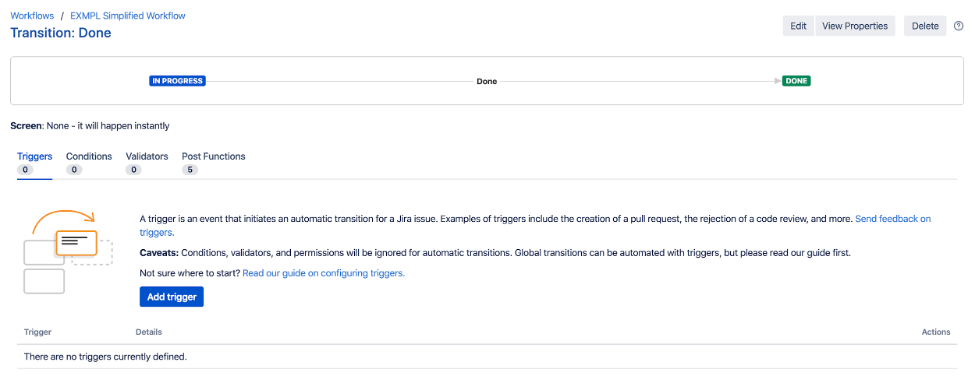
Here is an example of how this looks in Jira:
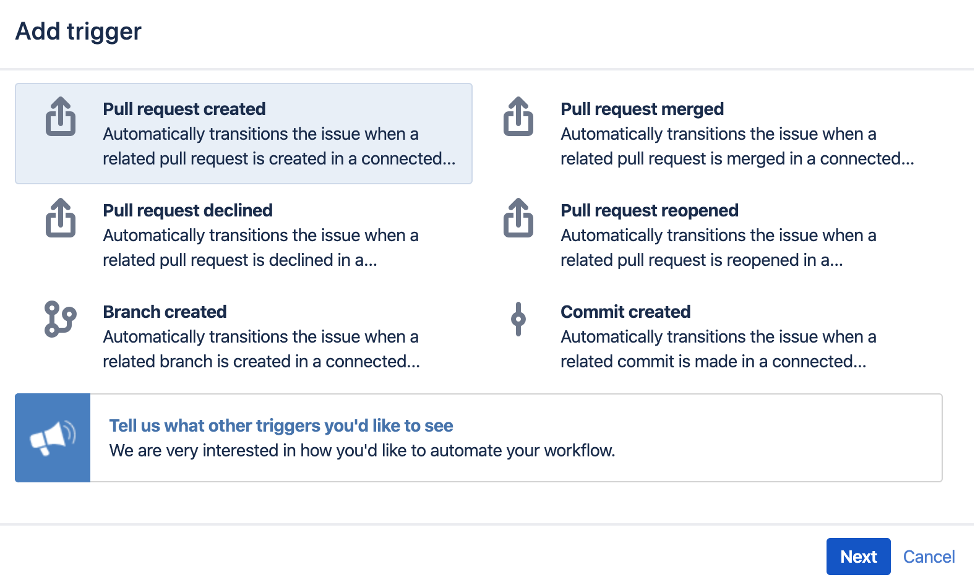
Below is an example of the different triggers available for an automatic workflow transition:
Conditions
Workflow conditions restrict the ability to execute a transition to a user meeting the condition criteria. Examples may include restricting a transition to an approved status by the Business user project role, restricting a transition to the reporter of an issue, or restricting a transition out of code review to the code-reviewers user group. Here is an example of the different conditions you can add to a transition:
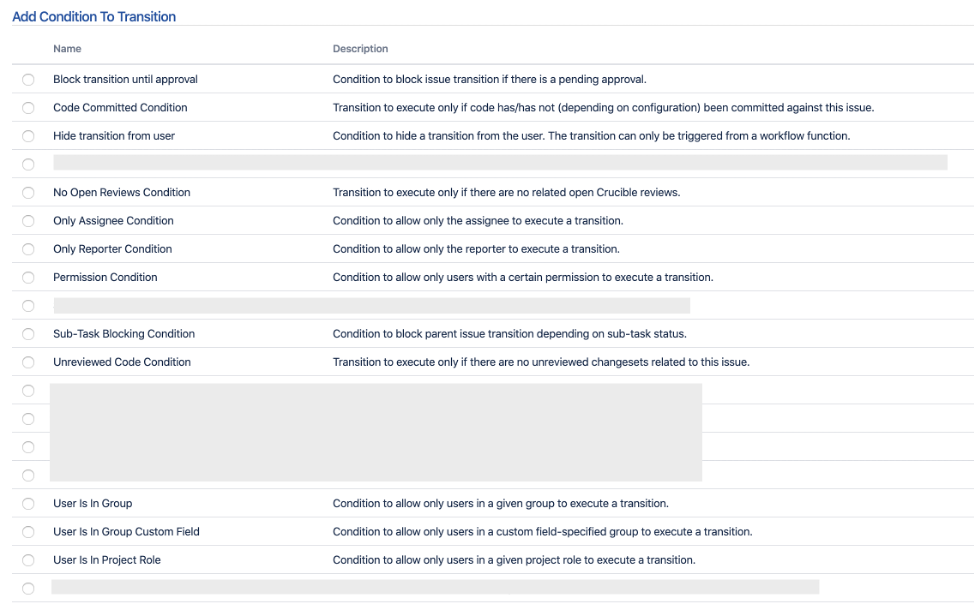
Note: The greyed-out areas represent additional conditions that are included as part of an add-on.
Validators
While workflow conditions ensure that only valid users can execute the transition, workflow validators ensure certain data is valid in order to execute the transition. You may choose to validate the data on a screen that was included in a transition before advancing to the next status.
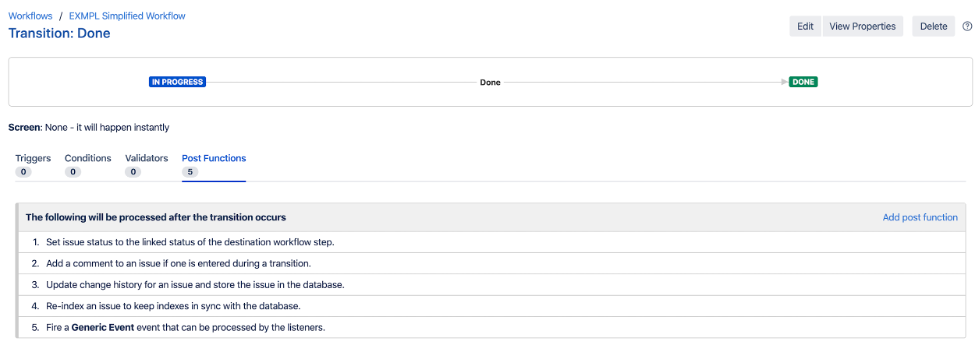
Post Functions
Post Functions represent the effects that occur after a transition has been executed. By default, each transition in a workflow will have a set of post functions that will execute, including updating the issue change history, firing a system event, and setting the issue status. This is illustrated below:
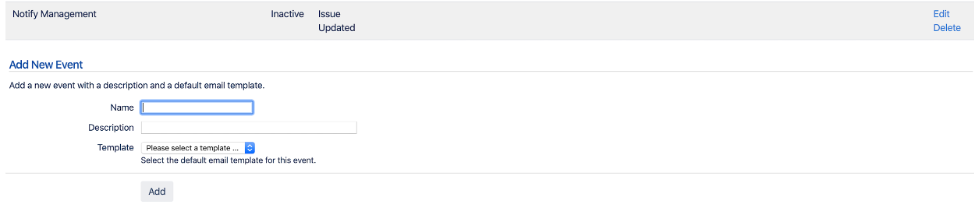
You have the ability to change the event that is fired after a transition. You may choose to create an additional event (e.g. Notify Management) or add a notification group to a notification scheme. Here is what the process would look like:
Additionally, you can modify the “In Progress” to “Done” transition to fire the newly created “Notify Management” event.

You will also be able to notify users in the Management project role by modifying a notification scheme.
In the above example, whenever an issue moves from In Progress to Done, the “Notify Management” event will be fired, resulting in a notification sent out to users in the Management role. Additionally, if you have a scripting add-on installed, ScriptRunner or JSU Automation Suite for Workflows. you could write custom scripts that will be executed automatically.
Jira Workflow Applications
Now that you are aware of the additional functionality available for Jira workflows, here is how you can set up workflows for your project(s).
Different Workflows for Different Issue Types
You are not limited to one workflow per project. Jira gives you the ability to set up different workflows for different issue types in Jira. A common use case for multiple workflows may involve setting up a simple workflow for tasks and a more robust workflow for user stories. This allows your team to create tasks that do not have to go through all the statuses that a user story would go through. Here is an example of two workflows configured for user stories and tasks, specifically for a User Story Workflow for the EXMPL Jira project:
Here’s what the Task Workflow would look like for the EXMPL Jira project:
Applying the scheme to a project
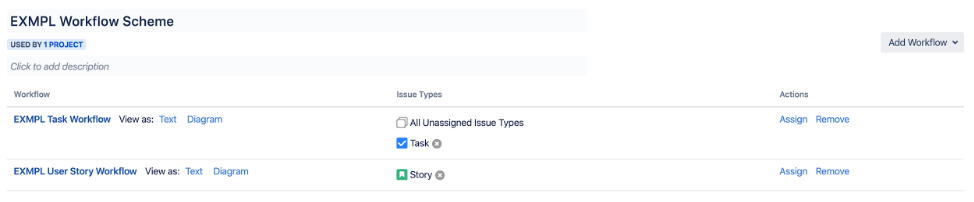
Once you create the workflow(s) needed for a Jira project(s), you will need to associate these workflows to a workflow scheme, which is then applied to a project. Here is an example of the EXMPL Workflow scheme that contains the workflows illustrated above:
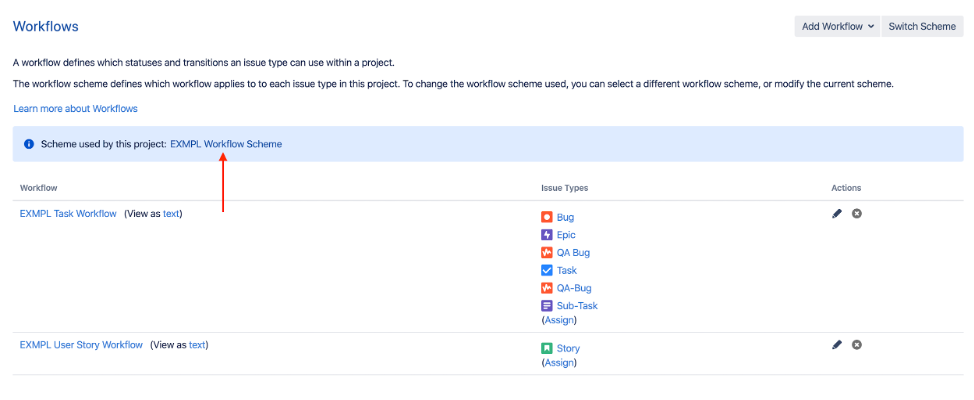
In your Jira project, simply switch the workflow scheme to use the new scheme you just created:
Active/Inactive Workflows
Workflows and workflow schemes are considered inactive until they are assigned to a project. If you are scrolling through your workflows in Jira administration and do not see your newly created workflow, scroll to the very bottom and click on the “Inactive” header.

Note: You must click on this header to view the inactive workflows.
When workflows and workflow schemes are active (associated with Jira projects), you cannot modify the name. You would have to temporarily associate a different workflow scheme to the project(s) before modifying the name, then re-associate the workflow scheme to the project(s). You also cannot delete active workflows and workflow schemes. In order to delete a workflow or scheme they must first be removed from all projects.
Improving Project Processes
Workflows can greatly enhance your project processes when configured properly. The additional features Jira provides beyond statuses and transitions can help with traceability, change control, and automation of certain tasks. Maximize the benefits Jira provides through workflows to save your organization time and money, while delivering features at a faster and more efficient rate.
In the next post, we’ll show you how to easily set-up your Jira service desk.
Make sure to check back in later this week for the rest of the Jira 201 series:
Other recent posts:

Kunz, Leigh and Associates (KL&A) Announces the Retirement of KL&A Co-Founder John Leigh
OKEMOS, MI, April 11, 2023 – Kunz, Leigh and Associates (KL&A) announces the recent retirement of KL&A Co-Founder John Leigh as of March 31, 2023. Mr. Leigh began his career as a developer working on large mainframe systems before moving…

Team Building in a Remote Environment
Blog Barista: Dana Graham | June 15th, 2022 | Culture | Brew time: 5 min
Let me start by saying I don’t care for the term “work family.” I have a family I love, and they have absolutely nothing to do with my career. I want my work life to be its own entity. I like boundaries (and the George Costanza Worlds Theory). Certainly, I want to enjoy and trust my coworkers, and I want to feel supported and cared for…
0 Comments