Blog Barista: Sam Nadarajan | March 11, 2020 | Developer Tools | Brew time: 11 min
Welcome to the 201 Jira series! This series will focus on different features and intermediate functionalities that you can use in Jira (the collaborative online tool for managing projects from Atlassian). By the end of this post, you will understand different configurations that will be extremely useful to you!
Jira offers an abundance of configurations that can be set up by designated Jira administrators. This post will go over the different configurations that can be made for issues. Before you read further, check out our post on basic concepts of Jira to have a solid understanding of what can be configured.
Note: The screenshots provided are for Jira Server 8.5. Your Jira instance may look slightly different depending on your version, but the configuration principles still apply.
How Jira Issue Configurations Work
The goal of any Jira issue configuration is to associate it with a Jira project. In most cases, this is accomplished through a “scheme.” Instead of individually associating configurations to a Jira project, schemes allow you to package configurations of a certain type and apply all of those configurations to a Jira project. For example, if I had a recipe for vegan butternut squash soup, I could include the same recipe in a book about soups, a book about fall recipes, or a book for vegans. The recipe itself would be the “scheme,” and the different books I could use it in represent Jira projects.
When a new Jira project is created, by default it will receive its own unique set of configurations. If your Jira projects represent unique enough projects within your company, it may be beneficial for you to allow each project to have its own set of configurations. However, if you are trying to enforce a company-wide standard, you may want to share a set of configurations across multiple Jira projects.
Jira Issue Configurations
The configurations we will discuss here are found under the Jira Administrator > Issues menu. While this is not the only location for configurations, most of the adjustments a Jira administrator will make will occur here. Issue configurations apply to the context of issues, so any project or global configurations will not necessarily occur here.
Issue Types
Issue Types categorize the Jira issue at a high level. Common examples include Epics, User Stories, Tasks, and Bugs. Configured issue types for a Jira project provide additional functionality in other issue configuration areas listed below. When installing Jira, common issue types will be provided by default; however, Jira administrators have the ability to add additional issue types if necessary.
Issue type schemes allow administrators to package certain issue types and apply them as one unit to one or more Jira projects. For example, an organization may choose to specify two schemes, a business issue type scheme and a development issue type scheme. In the business scheme, the only issue types that may be included are tasks. In the development scheme, epics, stories, tasks, and bugs may be included (see below).

Now, when new development projects are created in Jira, they can take advantage of the development issue type scheme. If an additional issue type needs to be applied to all development projects, it can be added to the appropriate issue type scheme and it will automatically be available for the Jira projects that utilize the scheme.
Workflows
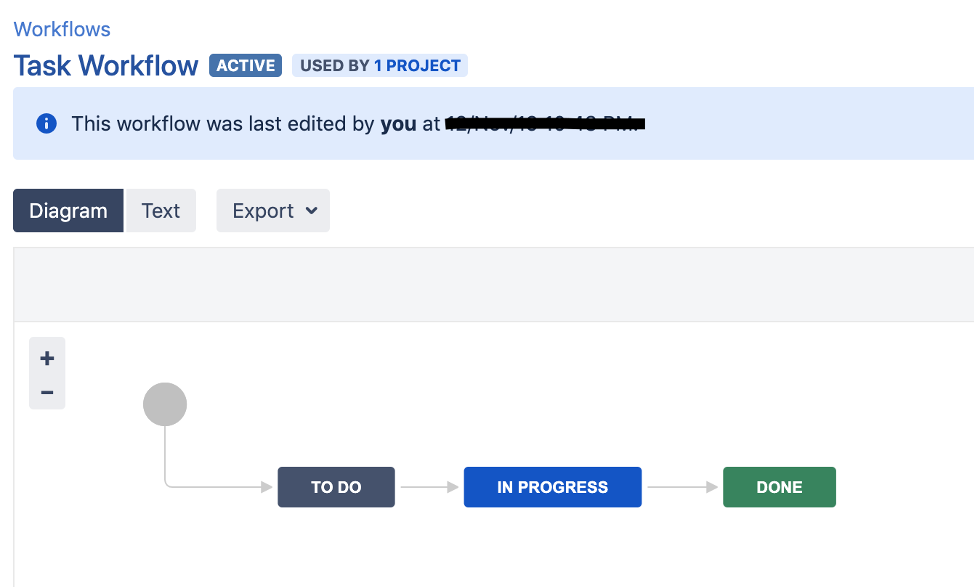
Workflows represent the process that a Jira issue can flow through to move from open to closed. Jira workflows pull from a global status list to determine which statuses an issue can move through. Configuring a workflow can be as simple as choosing the statuses that apply and drawing arrows between the statuses. Workflows have many levels of functionality to warrant its own blog post—so they will not be discussed in depth here.
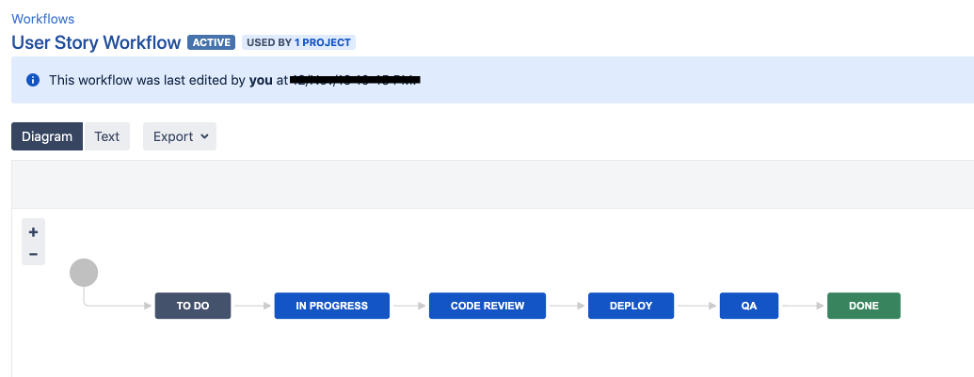
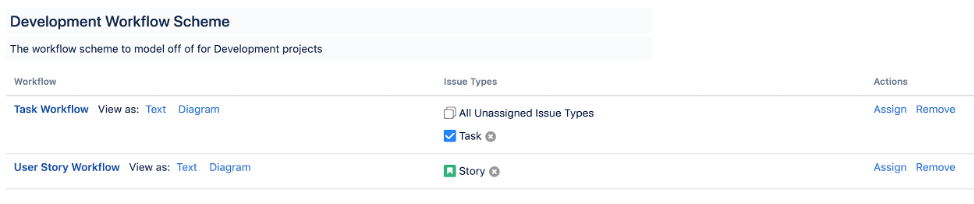
Workflow schemes allow one or more workflows to be applied to a Jira project. Workflows can depend on issue types if desired. For example, in a development project, your team may decide that tasks should follow a simpler workflow than user stories. Separate workflows can be configured and applied to each issue type in the workflow scheme, which is then applied to the Jira project. Below are a few different examples of workflow schemes.
Task Workflow
User Story Workflow
Development Workflow Scheme
Custom Fields
If the issue fields provided by Jira are not sufficient, administrators have the ability to add more fields and specify the field type (text, date, user picker, etc.). You may notice as you peruse the list that some fields can be slightly modified, while other fields are locked. Locked fields cannot be modified since they are a part of Jira’s core functionality and would break your Jira instance if tampered with.

Field Configurations contain every field in your Jira instance by default but allow administrators to set additional properties on fields. Here, an administrator can set certain fields as required, specify which screens the fields will appear on (see below), and specify how the field is rendered on an issue screen.
Field Configuration Schemes associate a field configuration with a Jira project. Generally speaking, once you associate a Field Configuration Scheme to a project, you’ll mostly spend your time making changes in the Field Configuration.
Screens
Screens represent an arrangement of fields that are displayed in different contexts in Jira, such as creating or editing an issue, or transitioning through a workflow. Screens display fields for issues based on the issue’s operation and/or type. To avoid overwhelming users and to draw attention to the most important information, screens allow you to limit the displayed fields.
Screens can be broken down into three areas: Displayed Fields, Issue Operations and Issue Types:
Displayed Fields
The “Screens” link in Jira Administration displays a master list of all the different screens available in a Jira organization:

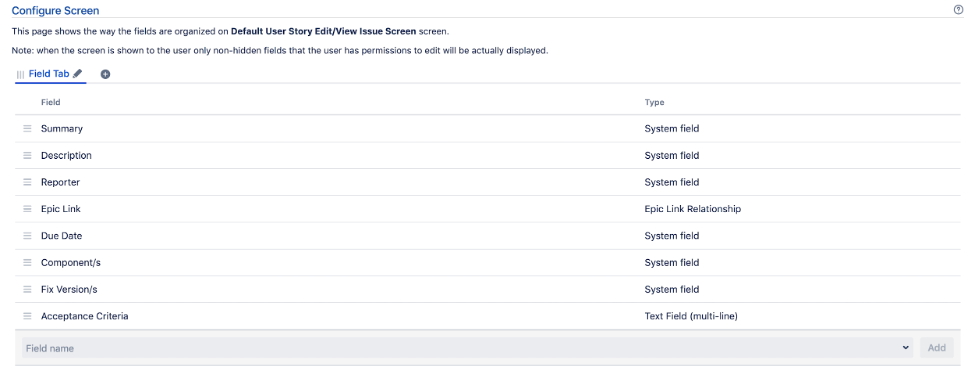
Configuring a screen involves adding or removing fields for the particular screen. When you click on a particular screen, you will see a list of fields for that screen as illustrated below:
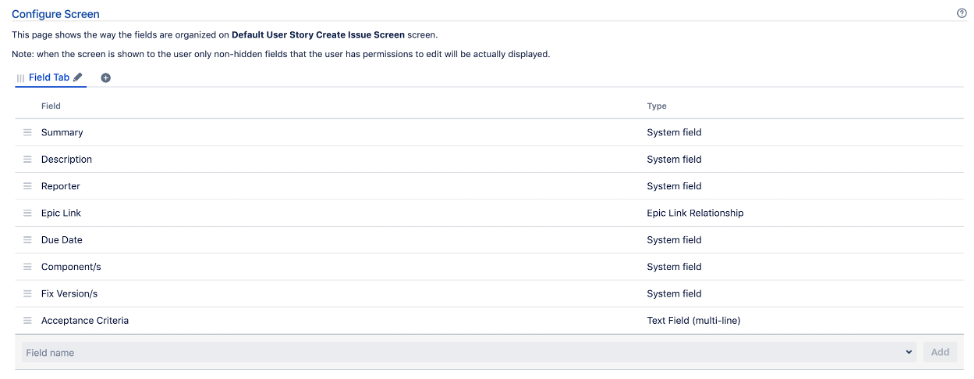
Below is an example of what you would see when editing or viewing user story issues.
Issue Operations
You can associate different screens with different issue operations. The issue operations are:
- Create Issue
- Edit Issue
- View Issue
This association between screens and issue operations lives within a “screen scheme” – a package of different screens for different issue operations.
For example, you may run into a situation where you don’t want to assign an issue to an individual when you’re creating an issue, choosing instead to let your team members pull issues to work on. In this case, make a screen for creating issues (e.g. Default User Story Create Issue Screen) and exclude the assignee field. Make another screen for viewing or editing issues (e.g. Default User Story Edit/View Issue Screen) and include the assignee field. Associate these screens with the create/edit/view issue operations in your screen scheme.
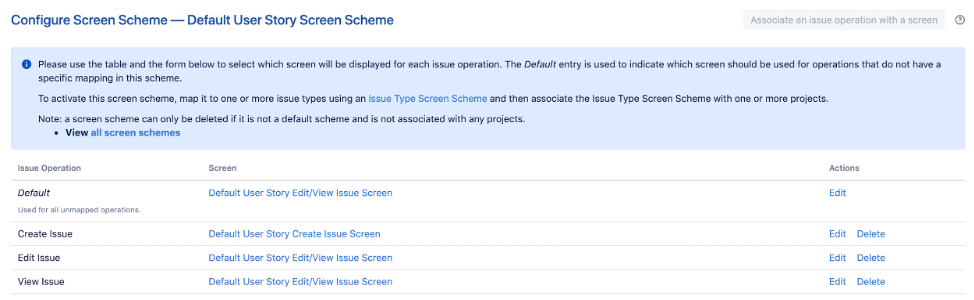
Note: You would not have to specify a screen for the edit and view issue operations if the default is set to the edit/view screen.
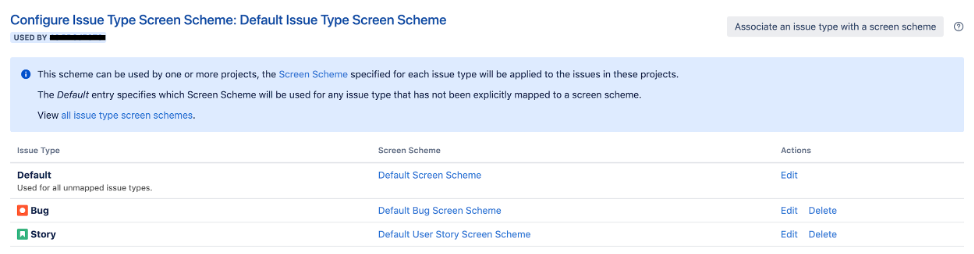
Issue Types
You can specify which screens appear for which issue types. This association is found at the issue type screen scheme level. For example, you can configure a user story to contain more fields than a bug. Each issue type at this level can be associated with a screen scheme, and if no association is specified then the screen scheme will be applied to all issue types. Below is an example of different screen schemes mapped to different issue types. Screens for bugs will appear differently than screens for user stories.
Screens can also be configured to appear at certain transitions in a workflow. We will cover that in a dedicated workflow post.
Priorities
Similar to issue types, priorities can be added on top of the default list provided by Jira.
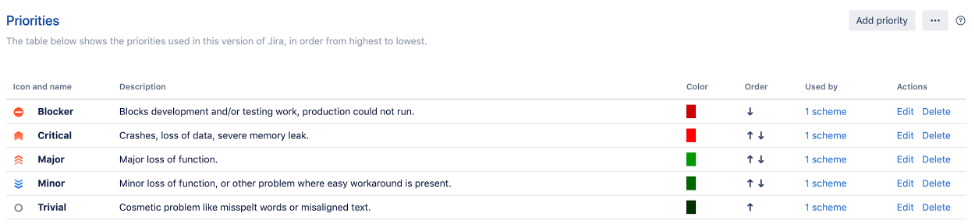
These priorities can be packaged in any combination in a priority scheme, which can then be applied to a Jira project.

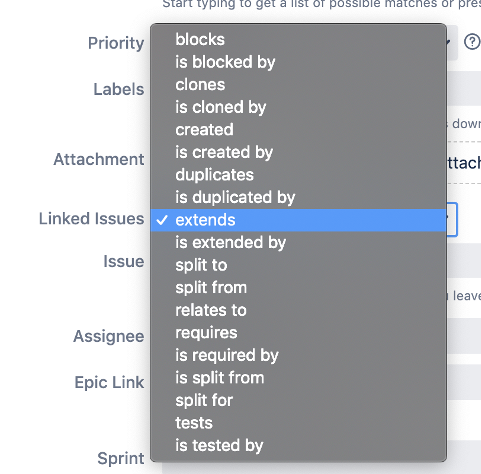
Issue Linking
Issues can be related to one another in Jira by specifying a relationship type. These relationship types are configurable in the Issue Linking section. For example, if you wanted to allow your organization to extend an issue, instead of merely relating to an issue, you can specify an extension relationship here and choose it when linking issues in Jira.

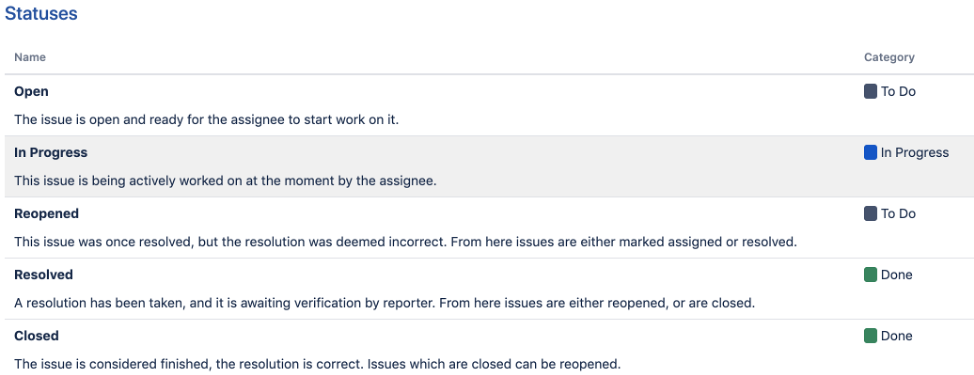
Statuses
Statuses represent the nodes that an issue can move through in a workflow. Instead of having status schemes, statuses are applied to a workflow, which is then applied to a Jira project.
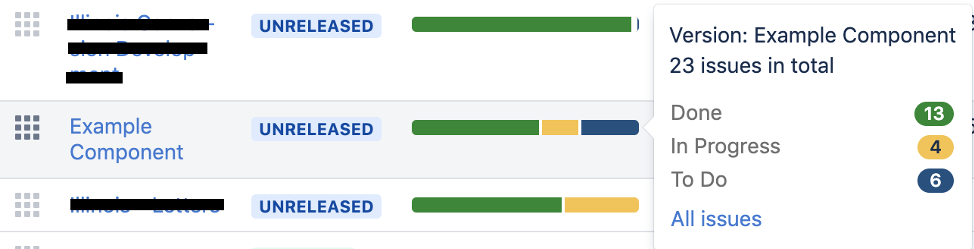
Statuses fall into three, Jira-defined categories, To Do, In Progress, and Done. These categories serve as visual indicators when viewing workflows or progress bars for components, releases, and sprints. At a glance you can see how far along an issue is based on the issue’s status.
The image below illustrates progress indicators based on status category for fix versions.
As shown below, progress indicators based on status category for active sprints can also be seen in the backlog view.
111 story points worth of work have been completed, 13 are in progress, and 8 have yet to be picked up.
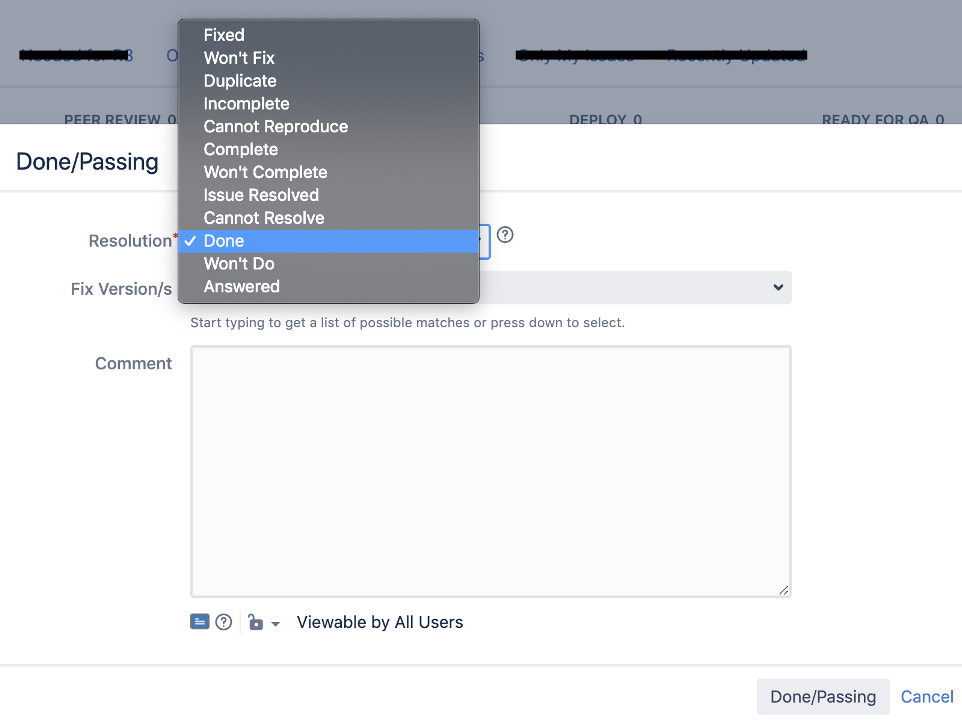
Resolutions
Resolutions are the different reasons for why an issue is resolved in Jira. Below is a list of resolutions.
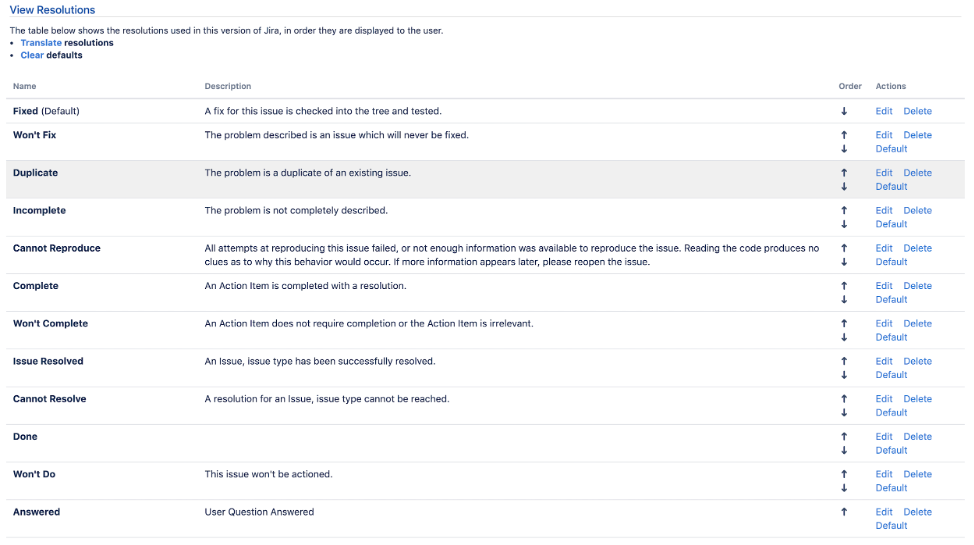
The options configured here will be available in the resolution field dropdown.
Issue Security Schemes
Issue Security Schemes allow different issues within the same project to be visible to different users. Jira administrators can specify the different security levels and designated users can set the security level on issues to show or hide them. For example, security levels may be configured for business users and developers. Issues of a sensitive nature can be exposed to the business users and developer team issues can be exposed internally, preventing one group from seeing issues in the other group.

Note: You must be a member of the user/group/project roles defined in your issue security scheme to see the corresponding security level.
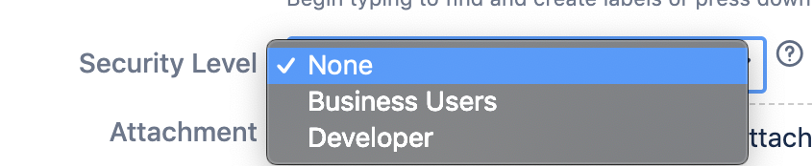
Issue security applies to the visibility of the entire issue. It does not apply to individual fields or actions that can be taken within issues.
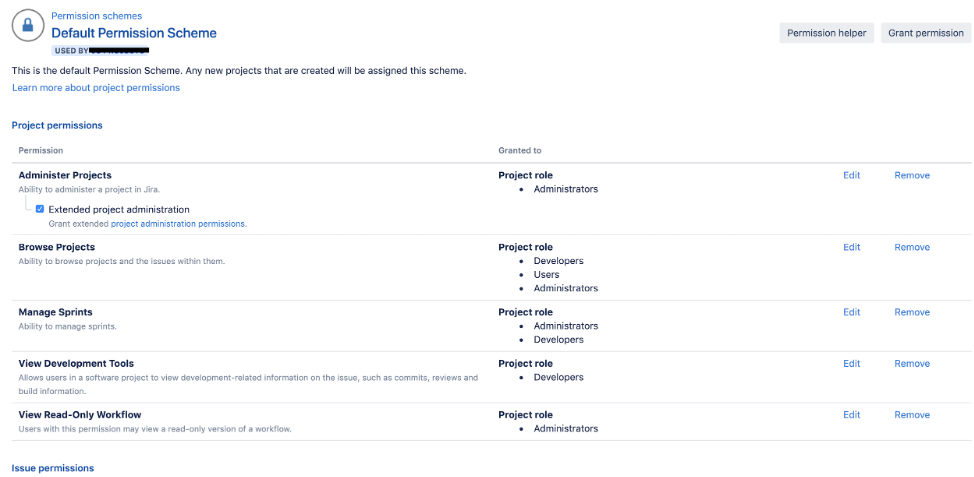
Permission Schemes
Permission schemes control permission functionality for the Jira project. While issue security schemes address access controls at the issue level, permissions live above issue security. Jira identifies several default permission areas at the project, issue, comments, attachments, voters and watchers, and time tracking levels.
When configuring permissions, you can control access to the action based on project roles (you can designate User A as a Business Analyst within PROJ), user groups, application access, or individual users. Permission schemes apply to the projects associated with them. For example, instead of letting anyone make administrative changes to your project, you can restrict this to just project administrators in your permission scheme, where permissions can be granted to specific areas. You may also choose to prevent anyone from deleting comments on an issue and restrict it to certain project roles or groups.
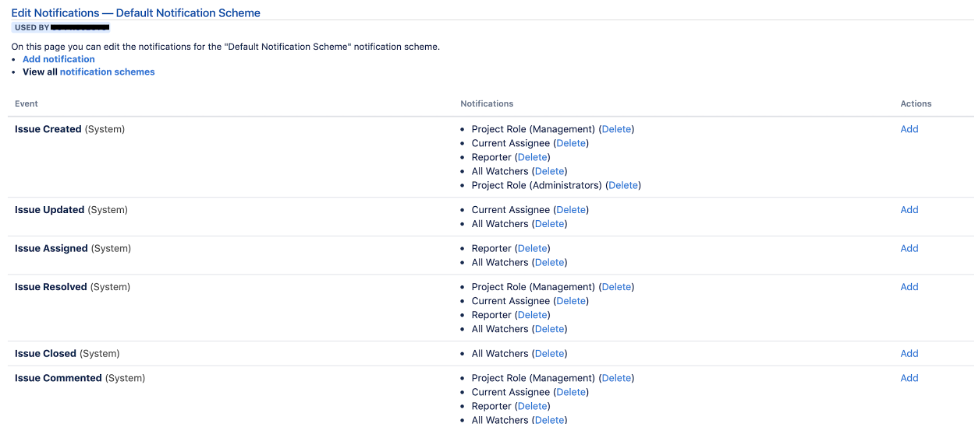
Notification Schemes
Notification schemes identify who should receive notifications for certain Jira events. For example, you can configure notifications to send to issue creators, issue assignees, and issue watchers every time an issue is closed, but only send notifications to watchers whenever a comment is added. This provides some control over the countless emails that may be generated from continual updates to issues within a project and restricts them to the events and the recipients that will benefit the most from them.
Long-term Sustainability
If you have made it this far, congratulations! We covered a lot of information in this post. Jira allows an extensive level of configuration to occur for its projects, giving organizations the flexibility necessary to configure Jira to fit its processes. Keeping configurations to a minimum where possible and organizing configurations in a way that is intuitive and understandable will ensure long term sustainability of your Jira instance.
In the next post, we’ll take a closer look at how to configure boards that work for your team’s needs.
Make sure to check back in the following weeks for the rest of the Jira 201 series:
Other recent posts:

Kunz, Leigh and Associates (KL&A) Announces the Retirement of KL&A Co-Founder John Leigh
OKEMOS, MI, April 11, 2023 – Kunz, Leigh and Associates (KL&A) announces the recent retirement of KL&A Co-Founder John Leigh as of March 31, 2023. Mr. Leigh began his career as a developer working on large mainframe systems before moving…

Team Building in a Remote Environment
Blog Barista: Dana Graham | June 15th, 2022 | Culture | Brew time: 5 min
Let me start by saying I don’t care for the term “work family.” I have a family I love, and they have absolutely nothing to do with my career. I want my work life to be its own entity. I like boundaries (and the George Costanza Worlds Theory). Certainly, I want to enjoy and trust my coworkers, and I want to feel supported and cared for…
0 Comments