Blog Barista: Sam Nadarajan | January 14, 2020 | Developer Tools | Brew time: 7 min
Welcome back to the Jira 101 series. In Part 1, we discussed the differences between the different Jira products and their shared core concepts so that you have a better understanding of the Jira ecosystem and the core terminology that will be used throughout this series.
In today’s post, we’ll take a look at the different elements of the standard issue layout and the different actions that can be taken so that you know exactly where to find certain information. It may also shed some light on some of the odd behavior that you may begin to notice as you start viewing more Jira issues.
Note: The figures included in this post illustrate the appearance of Jira for Jira Server 8.5. Your view may be slightly different depending on your organization’s configuration, but the principles still apply.
Principles of the Issue View
When you navigate to an issue to view more detail, you’ll see the following layout:
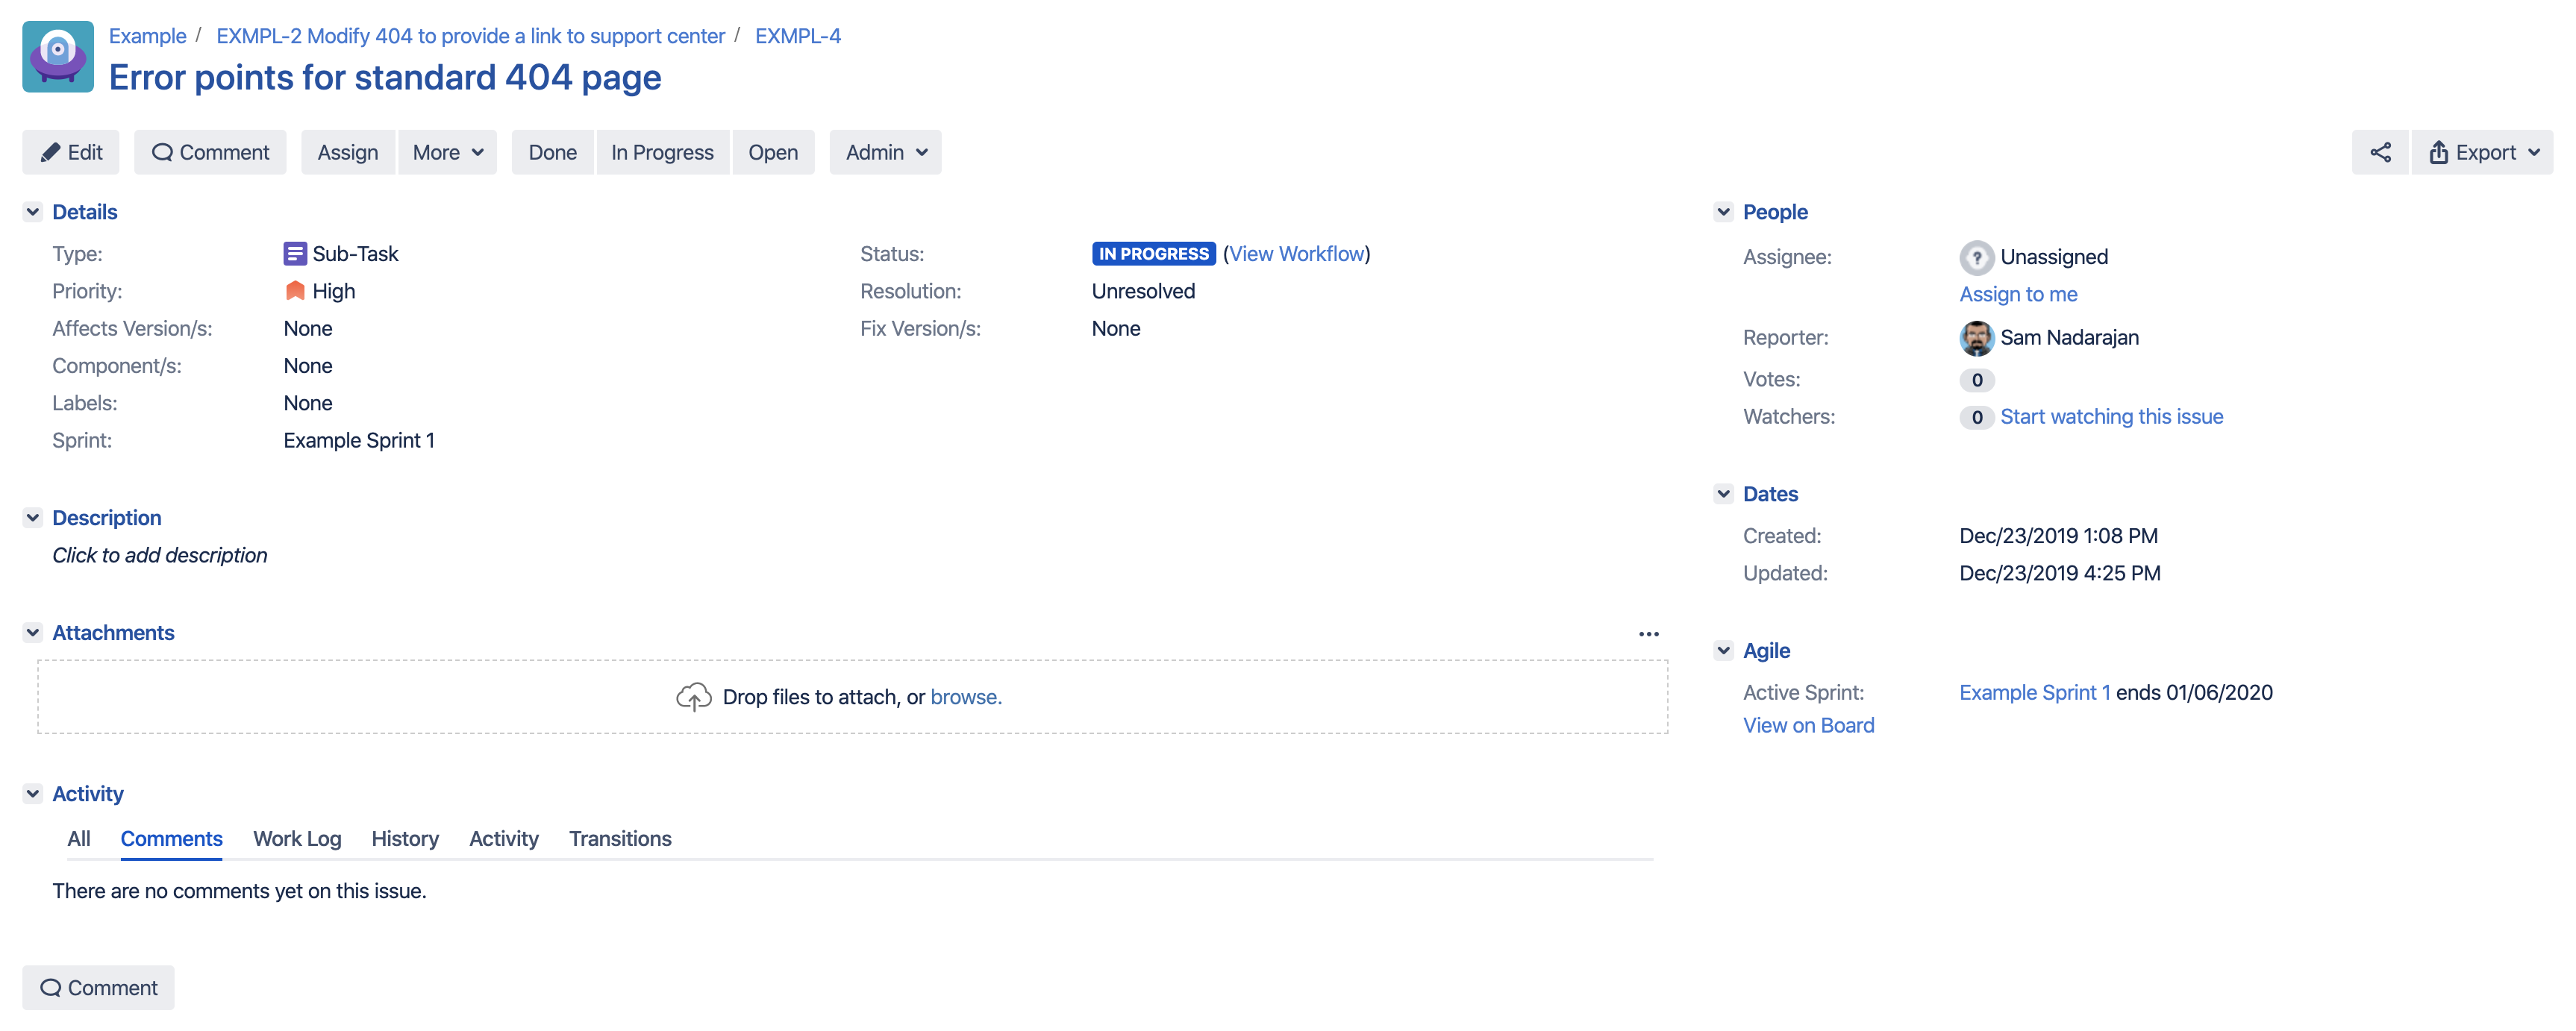
There are two principles that you need to be aware of when you are viewing issues in the detail view:
1. Only fields that have data will display on the screen. Issues with blank or empty values for fields will not be displayed. This prevents the interface from becoming cluttered, allowing you to focus on relevant information.
2. Field information is organized by type. This approach makes efficient use of the available space, ensuring a basic level of consistency as you navigate between different issue types that may contain different information. Certain issue types can be configured to display different information, but the general location of fields will remain consistent.
Issue Sections
Below is a screenshot of the same issue illustrated above, but with boxes that highlight the different sections. We will go over these in greater detail below, starting from the top.
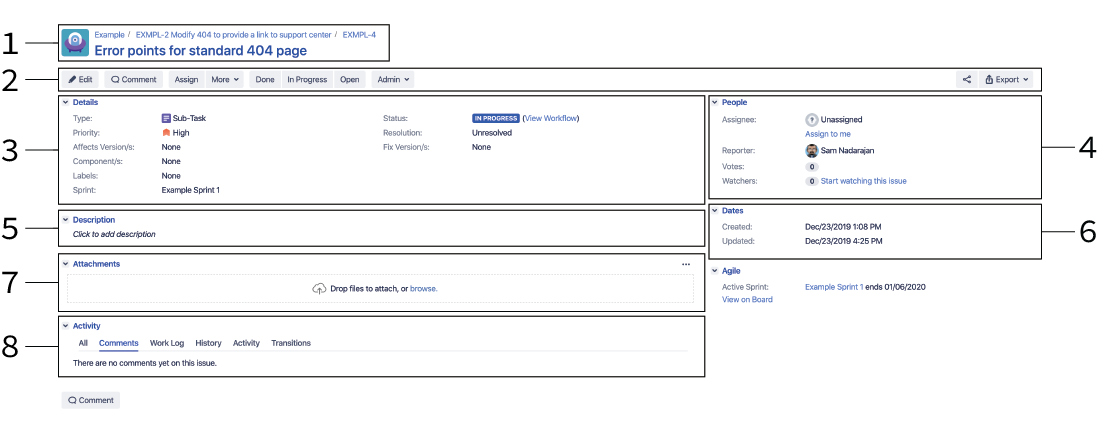
1. Header
A breadcrumb trail will be displayed with the project’s icon and the issue summary at the very top. If you are on a subtask, you will see the parent issue within the breadcrumb trail.
2. Action Bar
The action bar allows you to perform additional functionality on the issue. We will discuss these in greater detail below.
3. Details
This section displays any text-based fields pertaining to the issue. Here, you may see the effects of the first principle I mentioned above, as not all fields will be populated for each issue. Paging through issues will make this section larger or smaller, depending on the information. Text-based custom fields that your organization may add will appear here.
4. People
People-based fields will always appear in the people section. For instance, single user fields or group fields will always be located here.
Say your organization chooses to add a custom, user group type field called “Assigned to Group.” When the field is populated for an issue, you will find the value of that field in the People section. Since the people section contains different types of fields, separating it from the detail section prevents it from being buried with other information.
5. Description
The issue description will always appear below the Detail section. The most important information for the issue will oftentimes be located here.
6. Dates
Similar to the People section, the Dates section will show any date fields here. Any additional date fields your organization adds will appear in this section.
7. Attachments
Users that have the permission to create attachments will see a dedicated Attachments section to upload files. File size limits may be dictated by your organization’s Jira configurations, but most file types can be uploaded here.
8. Activity
The Activity section will always show audit information for your issue. While you may spend the majority of time viewing information under the comments tab, the other tabs may be useful in certain situations. Here is a brief overview of each tab:
| Tab | Purpose |
| All | Shows all updates made to an issue’s information, including the old and new values. |
| Comments | Shows all comments added to the issue. |
| Work Log | Shows all the different instances when time was logged against an issue. |
| History | Shows all issue field changes. |
| Activity | Shows recent issue field changes including changes made by external tools (if your Jira instance is connected to other external applications). |
| Transitions | Shows all status changes that occurred on the issue. |
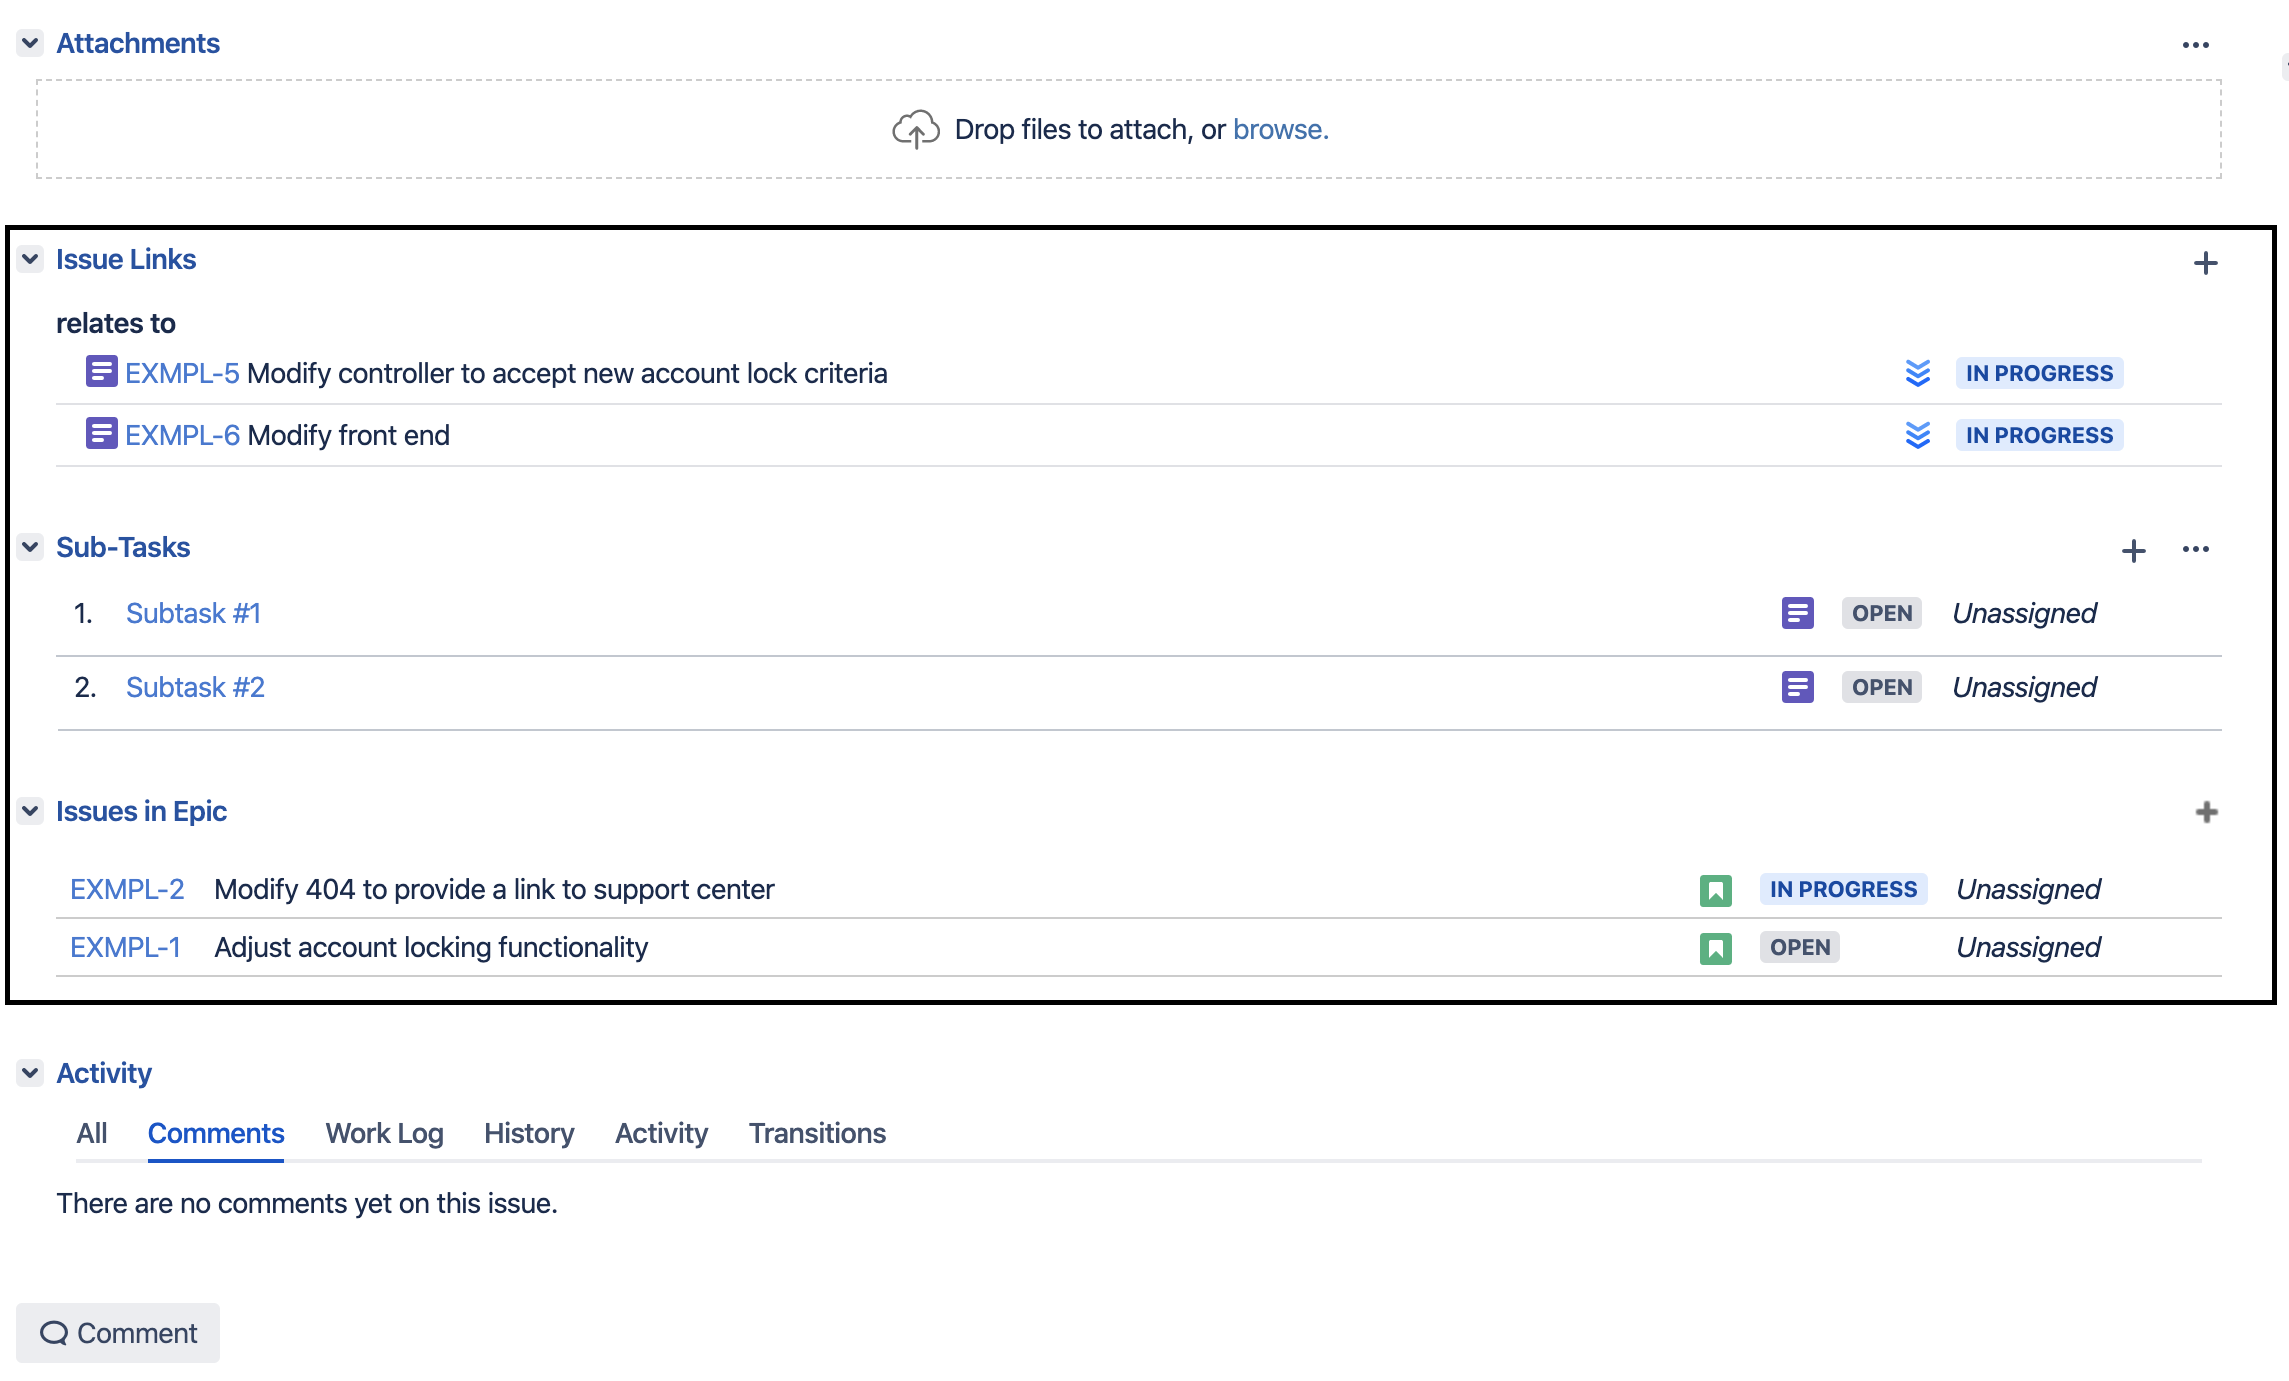
Conditional Sections
Conditional sections may appear for native Jira issues if data exists within those sections. For example, if subtasks are created as part of the issue you are viewing, if the issue is linked to other Jira issues, or if you are on an Epic, you will see additional sections appear that highlight that information, as illustrated below:
Additionally, if any work is logged on an issue, a dedicated Time Tracking section will appear on the right side of the screen, as illustrated below:
Additional sections may also appear for issues based on the add-ons installed for the organization. For example, should your organization install any Tempo add-ons, a dedicated Tempo section will appear on your issue.
Issue Actions
Near the top of the issue view, you will see a row of buttons that allow you to take additional actions on the issue. These can be divided between primary, advanced, and workflow actions.
Primary Actions
Primary actions exist for all Jira issues and allow you to edit, comment, assign, share, or export the issue.
Advanced Actions
Secondary actions are found in the More dropdown and provide advanced functionality for the issue. You may see the following options in the More dropdown, depending on if you have additional add-ons installed.
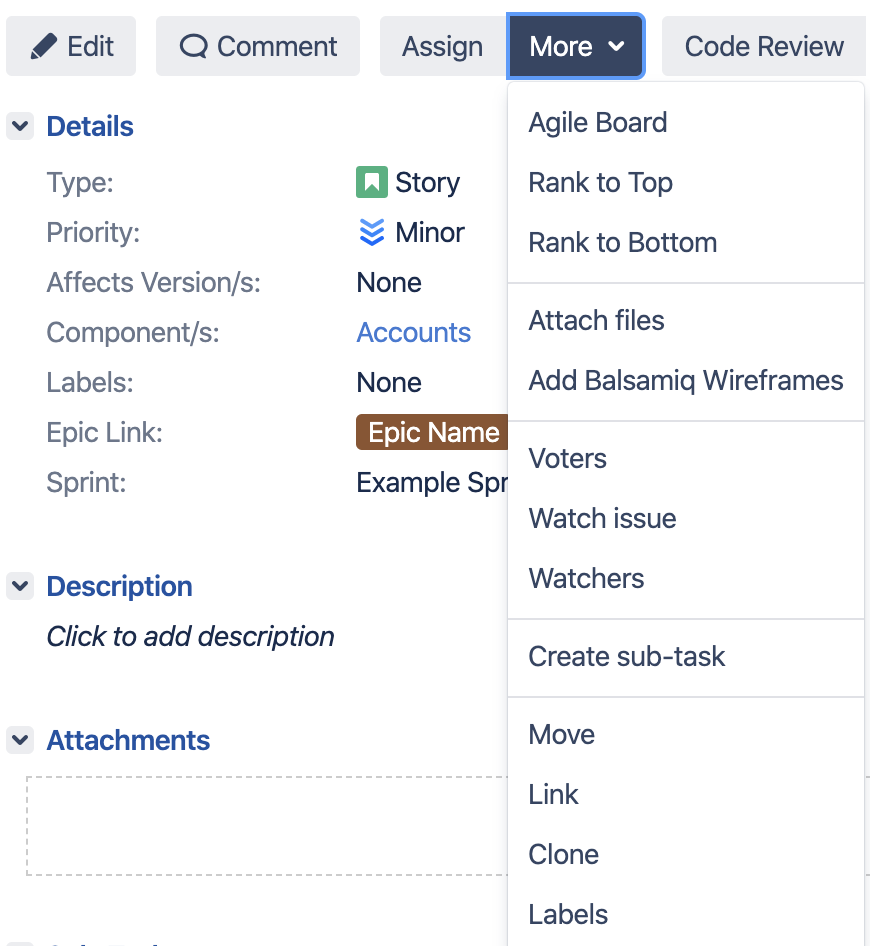
Here’s a brief overview of the actions available in this dropdown:
| Action | Description |
| Agile Board | Lists the board(s) that this issue appears on. |
| Rank to Top | Prioritizes the issue to the top of the issue list. |
| Rank to Bottom | Deprioritizes the issue to the bottom of the issue list. |
| Attach Files | Allows you to attach files to the issue. |
| Add Balsamiq Wireframes | Available through the Balsamiq add-on. |
| Voters | Shows the voters who have voted for this issue. Note that your organization may turn off voting for issues. |
| Stop Watching | Removes you as a watcher on the issue. |
| Watchers | Shows the watchers for the issue. |
| Create sub-task | Allows you to create a new task as a sub-task of the current issue. |
| Move | Allows the issue to be moved to a different Jira project. |
| Link | Allows the issue to be linked to other Jira issues within the Jira instance. |
| Clone | Clones the issue and its data, including subtasks (if specified) to a new issue. |
| Labels | Allows for the adding and removing of labels for the issue. |
| Delete | Deletes the issue if the user has permission to delete issues in the Jira project. |
Workflow Actions
In a separate button group lives a dynamic list of buttons that change based on the status of the workflow the issue is on. When in the issue view, you can change the status of issues by clicking any of the available buttons. The button labels are the names of the transitions specified in the workflow. Ask your Jira administrator for additional details on the transitions. The buttons will change as the status changes, and the only buttons that will display represent transitions that can be made from the current status. If there are too many transition options, additional workflow actions will appear in a Workflow dropdown.
Providing a Clear View
Jira’s issue view layout may seem different from other detail views; however, this helps manage the complexity of displaying configurable data for different issue types. Once you become familiar with the location of data within an issue, you will find yourself naturally drawn to specific parts of the page for the specific information you are looking for.
In the next post, we’ll dive into Jira Query Language (JQL) and filters so that you can quickly and confidently search for issues within Jira.
Make sure to check back in to catch the rest of the Jira 101 series:
1 Comment
Other recent posts:

Kunz, Leigh and Associates (KL&A) Announces the Retirement of KL&A Co-Founder John Leigh
OKEMOS, MI, April 11, 2023 – Kunz, Leigh and Associates (KL&A) announces the recent retirement of KL&A Co-Founder John Leigh as of March 31, 2023. Mr. Leigh began his career as a developer working on large mainframe systems before moving…

Team Building in a Remote Environment
Blog Barista: Dana Graham | June 15th, 2022 | Culture | Brew time: 5 min
Let me start by saying I don’t care for the term “work family.” I have a family I love, and they have absolutely nothing to do with my career. I want my work life to be its own entity. I like boundaries (and the George Costanza Worlds Theory). Certainly, I want to enjoy and trust my coworkers, and I want to feel supported and cared for…
Very cool article about the Jira administration.
If someone is looking for more extensive modification of the layout they should checkout Issuelayout (https://marketplace.atlassian.com/apps/1221618/issuelayout)