Blog Barista: Greg Antrim | Feb 27, 2019 | Internet of Things | Brew time: 7 min
In my previous post I showed you how to wire an ESP8266 module to your Arduino and connect it to your local Wi-Fi network. This allowed you to send web requests from your Arduino to the internet and send HTTP requests to your Arduino while on your local network. Which is a good start, but what if you want to receive requests from outside of your local network? Perhaps you want to integrate your device with an external service, or you’d like to be able to control things such as your lights when you are outside of your home. Whatever your use case may be, I’ve got you covered. In this two-part post, I will cover two different ways to control your Arduino outside of your local network. If you’re not sure which method is right for you, don’t worry I’ll be discussing the advantages and disadvantages of each method as well!
Here are the methods I will be covering:
1. Port Forwarding
2. Ngrok + Middleman Server
Hardware and Assumptions
This post assumes that you already have your Arduino wired up and connected to your local router. While the steps in this post should work with any such setup, it has only been tested with the hardware specified below, and the setup outlined in my previous post.
- Arduino Uno
- Standalone ESP8266 Module
- A router that supports port forwarding
Advantages
Port forwarding is the simplest way to make your Arduino accessible outside of your local network. It doesn’t require any extra hardware or software and it doesn’t require you to use a specific online service or to use a specific Wi-Fi library. Most users have admin access to their home network and the process for setting up port forwarding is similar for most routers which means this method will work for the majority of users.
Disadvantages
The biggest disadvantage to this method is security. When you open a port on your router, that port is accessible to anyone. Hackers often scan for open ports, so they could potentially gain access to data on your local network. Port forwarding can be perfectly safe if you follow the right practices, but implementing that security is outside the scope of this article and makes the setup more complex.
Another disadvantage is that you’d have to open a port for each device on your network, and you would need to send a separate web request to each device. If you are working with a one or two devices this isn’t a big deal, but it doesn’t scale well.
The final disadvantage is that you have to use an IP address to make requests. IP addresses aren’t very easy to remember, and your external IP can change for various reasons such as rebooting your modem or upgrading your equipment. If you were to create an app to control your devices, or if you wanted to use a service like IFTTT, you would need to recompile and redeploy your app or update all of your integrations every time your external IP changed. It’s also worth noting that some services won’t accept an IP as a valid URL.
If those disadvantages are deal breakers, and your willing to do a little more work, you can skip ahead to the second post in this series.
Preparation
Before we get started, you should have the following information ready:
- Your router’s IP Address. You can follow this guide to find that information. For reference, in the steps below, my router’s IP address is 192.168.10.1.
- Your router’s administrator username and password. If you aren’t sure, you can consult this list of default usernames and passwords.
- The local IP address of your Arduino. If you followed my previous post this information was printed in the Serial Monitor after uploading your sketch. For reference, in the steps below, my Arduino’s IP address is 192.168.10.136.
- The HTTP port that your Arduino uses to listen for requests. If you followed my previous post you can find this information on line 23 of your code. In the steps below, I am using port 80
- Your External IP Address. You can find this information using WhatsMyIp.org.
Please note: The steps and locations of these configuration pages will vary depending on your specific router. The values entered should be largely the same though.
Configuring Port Forwarding
Before we get started, you should have the following information ready:
1. Open your web browser and navigate to your router’s login page.
URL: http://<YOUR_ROUTERS_IP_ADDRESS>
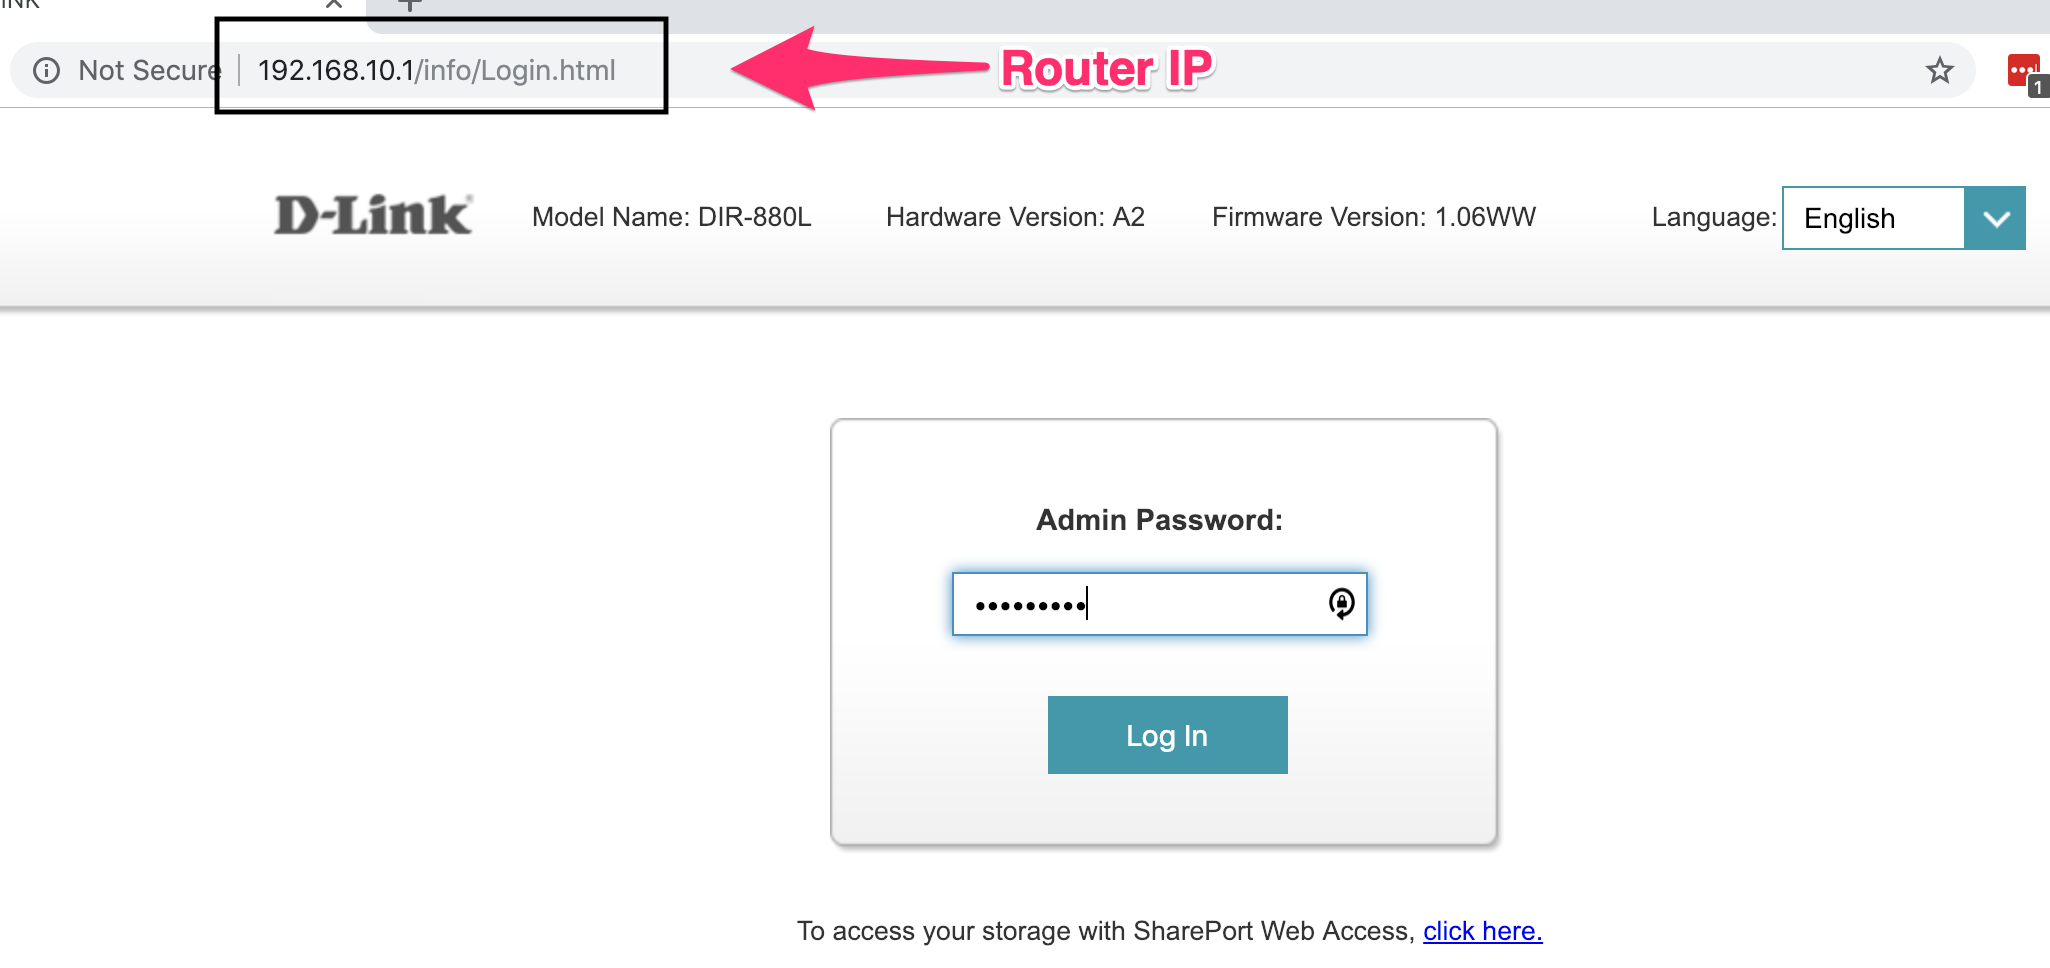
2. Log in to your router using the credentials from step 2 of the preparation section
3. Navigate to your routers port forwarding page. For me this was under Features -> Port Forwarding. I’ve also seen it listed under the Networking, WAN, and Applications/Games menus of other routers. If you can’t find it, I would suggest reading through the manual for your router.
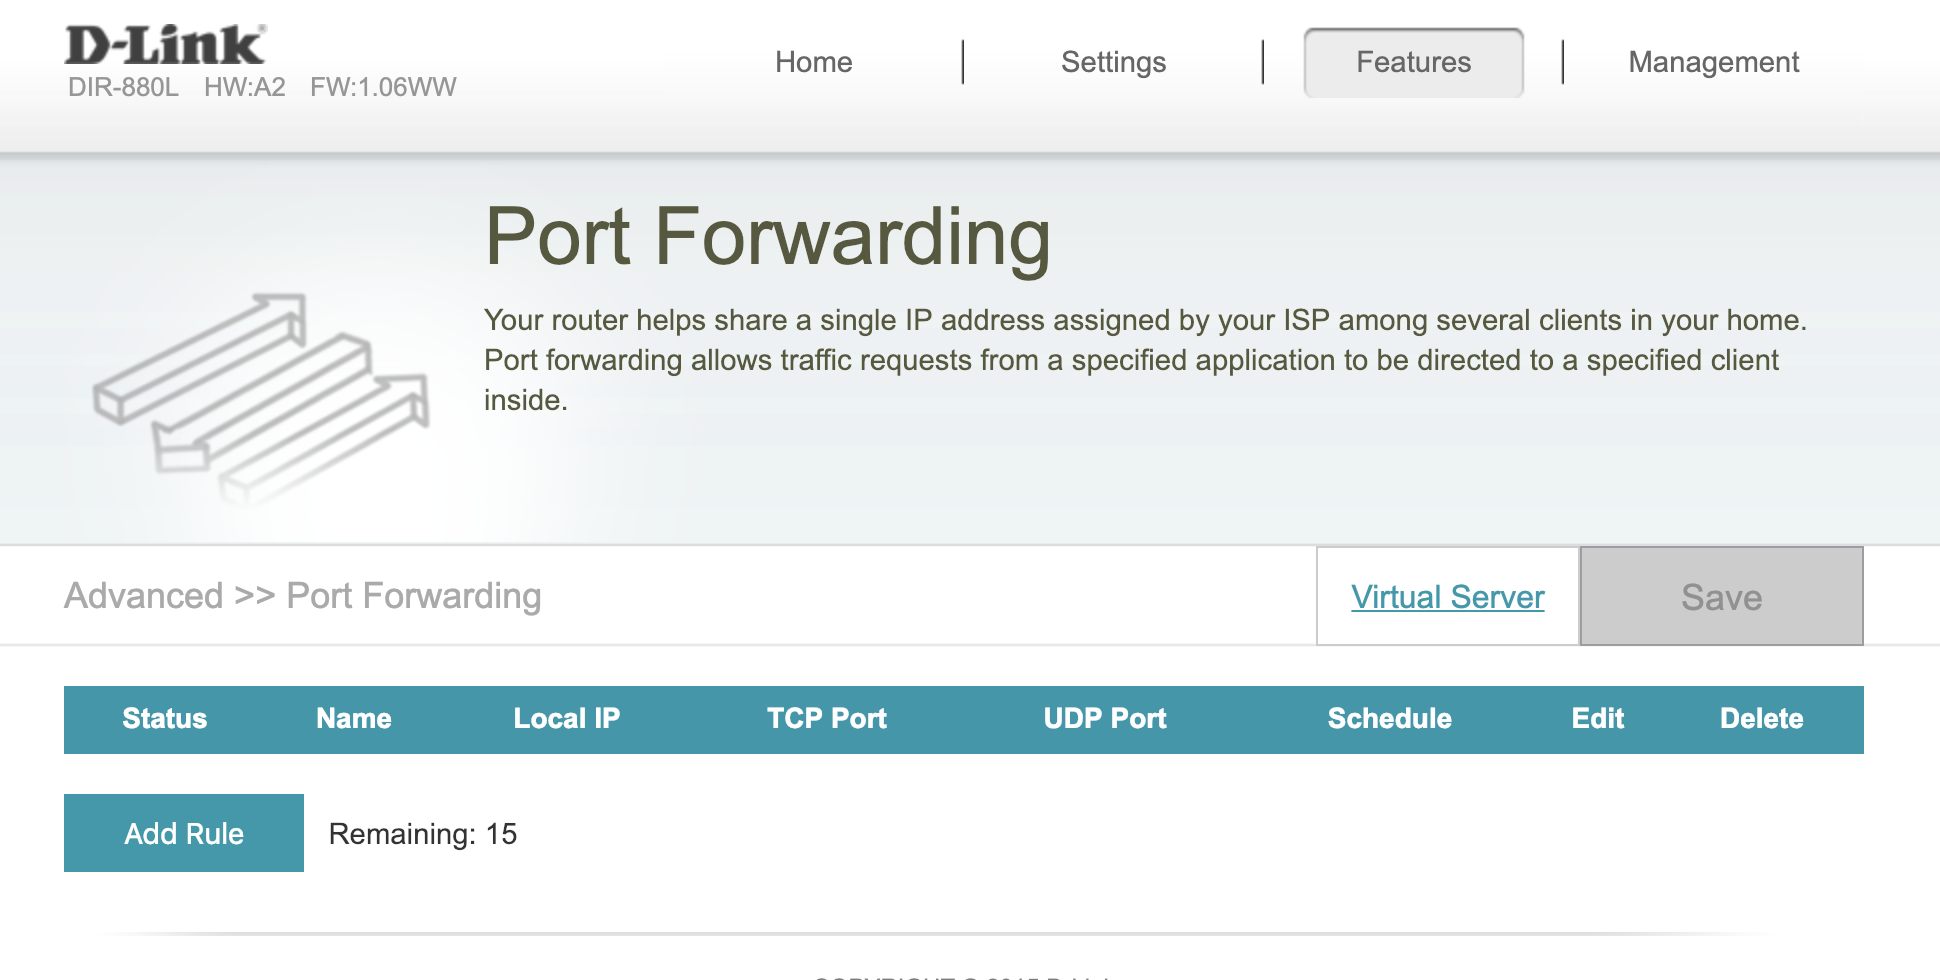
4. Add a port forwarding rule with the following settings.
Name: Enter whatever makes sense to you. This field may be optional.
Local IP Address: Enter the IP Address from step 3 of the preparation section.
TCP and UDP Port: Enter the port from step 4 of the preparation section.
Note: On some routers there may be only one input for the port number and a list of options for the port type. If this is the case, enter the port number and select “All” or “TCP and UDP” from the list of port types
Schedule: Select always. This field may or may not exist on your router.
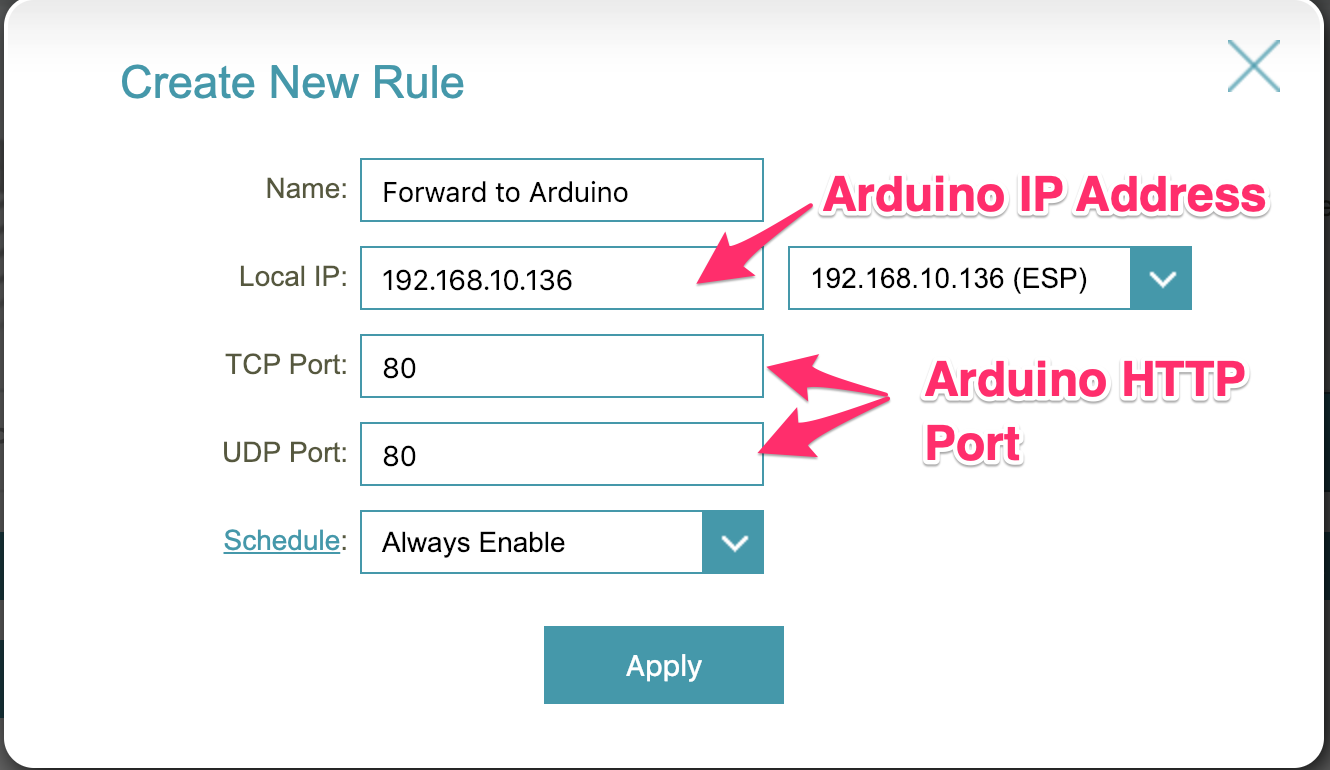
5. Apply and save your settings and wait for your router to reboot if necessary.
Testing It Out
With port forwarding set up, we can now send commands to our Arduino from outside of our local network. To make sure everything is set up correctly, let’s try sending a test command.
Open your favorite REST client (Insomnia is my personal preference) and create a request with the following data:
URL: http://<YOUR_EXTERNAL_IP_ADDRESS>:<PORT_YOU_USED_FOR_FORWARDING>
Headers:
Content-Type: application/json
Request Body:
{
“action”: “off”
}
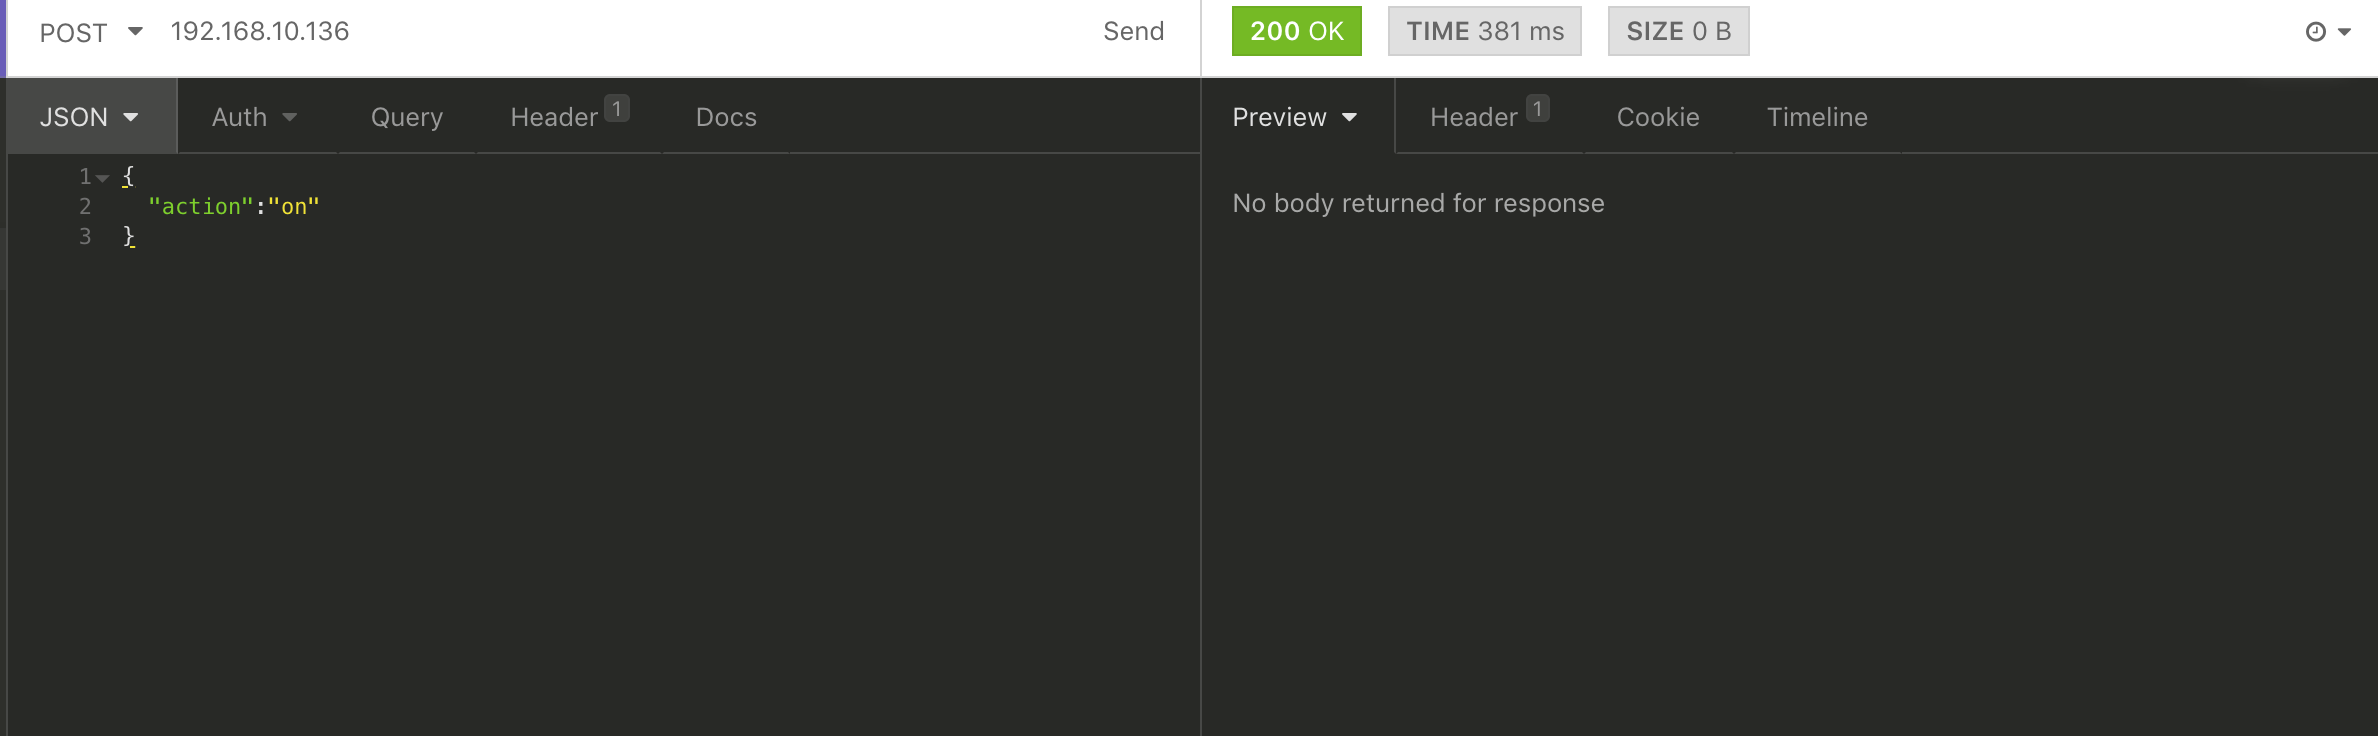
If everything is set up correctly, the request should succeed. Congratulations, you can now control your Arduino wherever an internet connection is available.
Next Time…
In Part 2 of this post I will cover a different method of making your Arduino accessible outside of your home. While that method is a little more work, it has several advantages over the port forwarding method including security, a user-friendly URL, the ability to route requests to multiple Arduinos the ability to perform more advanced routing logic.
Other recent posts:

Kunz, Leigh and Associates (KL&A) Announces the Retirement of KL&A Co-Founder John Leigh
OKEMOS, MI, April 11, 2023 – Kunz, Leigh and Associates (KL&A) announces the recent retirement of KL&A Co-Founder John Leigh as of March 31, 2023. Mr. Leigh began his career as a developer working on large mainframe systems before moving…

Team Building in a Remote Environment
Blog Barista: Dana Graham | June 15th, 2022 | Culture | Brew time: 5 min
Let me start by saying I don’t care for the term “work family.” I have a family I love, and they have absolutely nothing to do with my career. I want my work life to be its own entity. I like boundaries (and the George Costanza Worlds Theory). Certainly, I want to enjoy and trust my coworkers, and I want to feel supported and cared for…
0 Comments