Blog Barista: Michael O’Keefe | Feb 7, 2019 | Web Development | Brew time: 15 min
For Part 3 of this Firebase series, it would be beneficial to have some understanding of NoSQL data modeling which I will show you how to use with Cloud Firestore. This is the super fun, coding part of the series, and the beginning of setting up the meat of the application you’re building.
In this part, I will discuss what you need to know about Cloud Firestore and then I’ll walk you through the start of building out the application and developing your data model as you go.
Brief Review
In Part 2, I showed how you can set up authentication in the app using email/password, Google OAuth2 and anonymous login options. After completing Part 2, the application supports user authentication through three different methods, supports upgrades with anonymous accounts and listens to the authentication state of the user. If you are just joining us, go ahead and clone this repository from GitHub and checkout the firestore branch. You will have to follow Part 1 to get your environment set up and connect to Firebase using your credentials, but the code will be at the same place where we left off in Part 2. If you have already completed the previous parts there is no need to checkout any other branch.
What is Cloud Firestore?
It is a NoSQL (Not only SQL) document-oriented database. Data is stored in Collections of Documents, which hold data as key-value pairs. If you are familiar with MongoDB (or similar solutions) this will be very familiar to you. If you only have a background in Relational Data modeling, I encourage you to think of our NoSQL data model in a different light than the Relational Data model. I’d also encourage you to check out MongoDB’s comparison of NoSQL and relational databases.
One of the really cool things about Firestore and related NoSQL databases is that we do not have to define our data model before we start storing data. This allows a lot of flexibility and adaptability when creating an application, especially if the requirements are complex and not clearly defined when starting. Similarly, for the application we are developing in this series, we will discuss the data model as we go to get used to the idea that this is a flexible thing and show how easy it is to change it to fit evolving needs.
Enabling Firestore
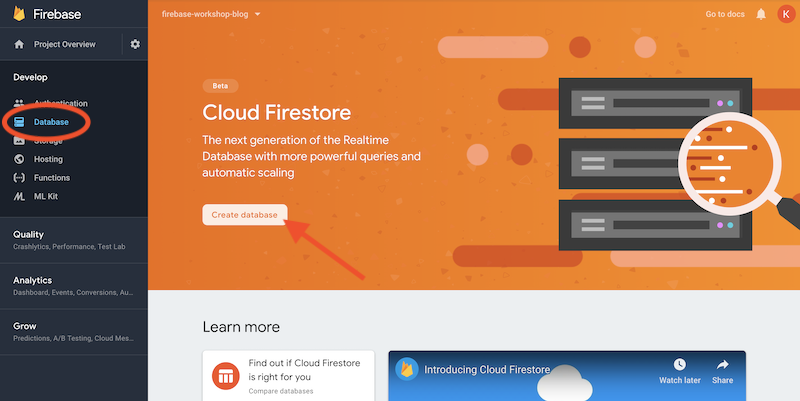
The first thing we need to do is enable Firestore. Go to the Firebase console and select your application. Click the Database link in the menu on the left side of the screen and then click the Create Database button.
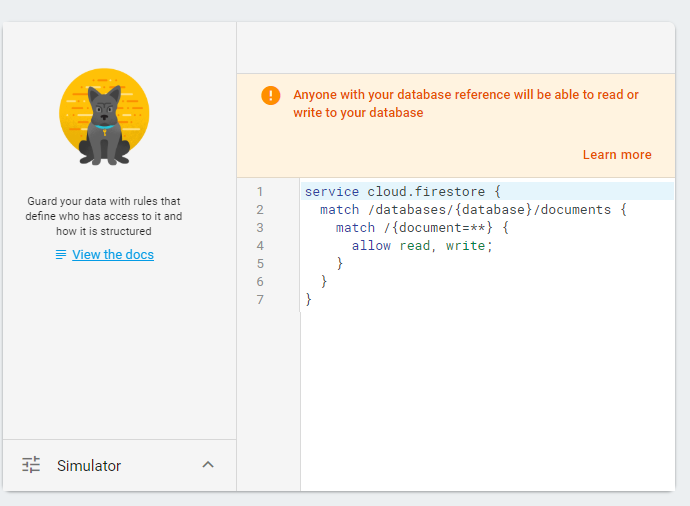
A popup will ask you if you want to start your database in locked or test mode. For this example, we will start in test mode.
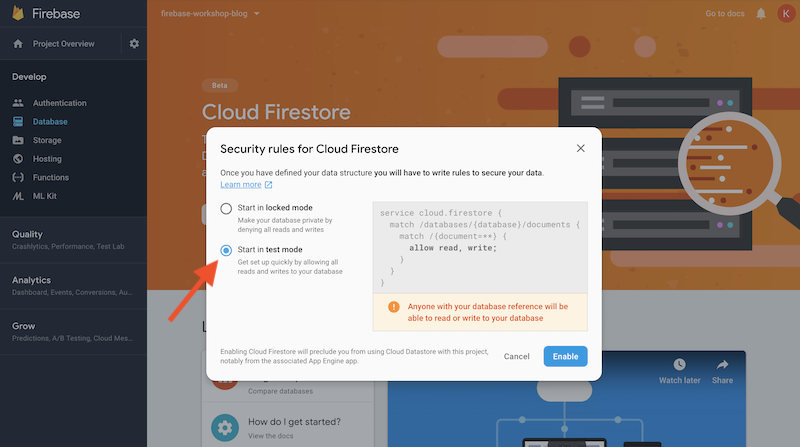
For this example, we will start in test mode. Be warned, this means that anyone can read or write to your database if they have your API key and database endpoint. While we did not publish these to Github, they are VERY easy to get out of requests in your app using browser developer tools. Never fear though! Firestore has very strong rule-based security. We will set up these rules in the later in this post and in the upcoming posts in this series.
That’s it! Now you can Create, Read, Update and Delete data from Cloud Firestore from any application that has the correct Firebase configuration. You can also use the console to play around with your data as much as you like, but we will not cover that in this tutorial. If you are interested in manipulating data via the console check out the Firebase console documentation.
Using Firestore in Our Code
Time to brew up some code! If you have not already done so, run ng serve from the application’s root directory to start your development server, and point your browser to http://localhost:4200.
In order to use Firestore we will be adding code to the ngOnInit function much like we have in the previous posts. In this function we will do the following:
1. Get a reference to the Firestore part of the SDK
2. Create a query reference to the data that we need for this component
3. Set up an observer (or listener) to that data that will react to any Realtime updates to that data pushed out by Firestore
Getting a reference to Firestore is trivial, we will store it on the component to be accessed as this.db.
this.db = firebase.firestore();
The Breweries Collection
Referencing the Breweries Collection and Listening for Updates
Creating a query reference is just as easy, we tell Firestore whether we are accessing a collection or document and pass it the path to get there. In this case we will pass it the string ‘breweries’ since we want to access the breweries collection. We will also store a reference to this collection in the component scope.
this.breweryListQueryRef = this.db.collection(‘breweries’);
There, we now have a CollectionReference to the root collection named breweries in our Firestore database that can be accessed as this.breweryListQueryRef. You may note that this collection does not exist right now, that does not matter! The full ngOnInit function looks like this:
Next, we will listen to real-time updates pushed out by Firestore so our application can always be up to date with our data. In the listenToRefSnapshot function, add this code:
The onSnapShot function on our data reference accepts an observer as a callback function that will be called every time a change is made to our data. In our callback, we will do a little manipulation of the snapshot given back to us to get the relevant data for this component. Since this is a QuerySnapshot that contains multiple QueryDocumentSnapshots as a docs property, we will use the ES6 Array map operator to create an array of breweries that our component will use. We really only want two things from each document: the data in key-value pairs, and the id, which will be used for querying individual documents when editing or deleting.
The return value of the onSnapshot function is a teardown function that we can use to unsubscribe from this observable, the importance of having this will become apparent soon!
Adding Breweries
With just a few lines of code we are already able to listen to data from our database. Let’s move on to the addBrewery method so that we can start to see some data.
The Firestore CollectionReference has a very handy and cleverly named function called add. If we pass an object to this function, a document will be created with key-value pairs that match the properties on the object and Firestore will auto generate a unique ID for the document. In our case, Firestore will also create a collection named breweries if it doesn’t already exist. Now, you may wonder why we are using another query here since we already saved it as this.breweryListQueryRef. Normally, you could just do this.breweryListQueryRef.add(…), however, we will be overwriting this with some filter queries in a little bit here and those references will not have the add function.
We already gave you the createNewBrewery method that builds a new brewery object for you, and for this to work you will need to implement the getCurrentUid method which should look pretty familiar from Part 2.
We will save the UID of the creating user on the brewery, so that later we can add rules to only allow that user to edit or delete that brewery. We have also added some logic to the UI to hide the edit and delete buttons from a user if they did not create that brewery.
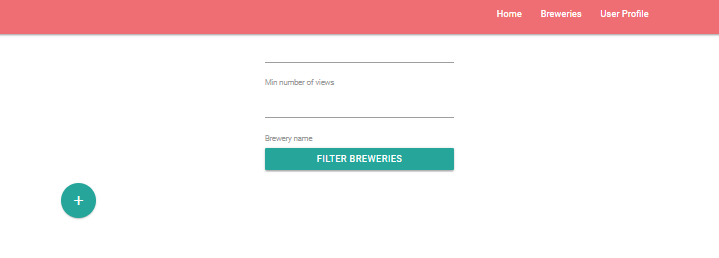
At this point in the app, you can login and navigate to the Breweries page.
If you click the + button, a New Brewery should immediately show up on the list. This is pretty big here, we did not add this brewery to our local breweryList array. We stored a new brewery document in Firestore, which caused a snapshot to be pushed out to our observer function that then updated our breweryList. If you look in your project’s Firestore console, you should now see a breweries collection with a document in it, identified by a unique string. If you open up the console and the app side by side, you can play around with changing a value on the document in the console, and watch it update in real-time in the application. WOW.
Deleting Breweries
Okay, now let’s implement deleting a brewery.
this.db.collection(‘breweries’).doc(id).delete();
That’s it. And like all of the action functions in firebase, they return a promise. So, you can react to a success or error with then and catch.
As a quick note, the syntax we will use to access documents or nested collections will consist of chaining the doc and collection methods together because I think it is easier to see the data structure this way. However, if you prefer you could also write this less verbosely as:
this.db.doc(‘breweries/’ + id).delete()
Filtering Breweries
Before we leave this component and work on editing and reviewing a brewery, let’s implement filtering through our Firebase query.
Basically, when the function is called by clicking the FILTER BREWERIES button we check which filters have values and then create our query accordingly by calling the where method on the CollectionReference, then passing it the property we want to compare against, the comparison operator, and the value to compare against. If there are no filters, we query all the data. Then, we call the listenToRefSnapshot method again to set up our observer on the new query reference.
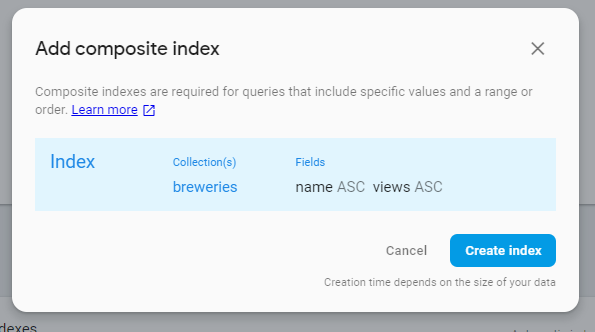
Let’s test this out. In the app, type some number into the Min number of views input and click FILTER BREWERIES. Since this property doesn’t exist on our Document yet, nothing comes back. Go ahead and clear out that input and type “New Brewery” into the Brewery name input and filter again. Now, we see our brewery again! Next try typing whatever you want into both fields and filtering…. Nothing happened? Open up your developer tools console. There should be an error telling you that the query requires an index.
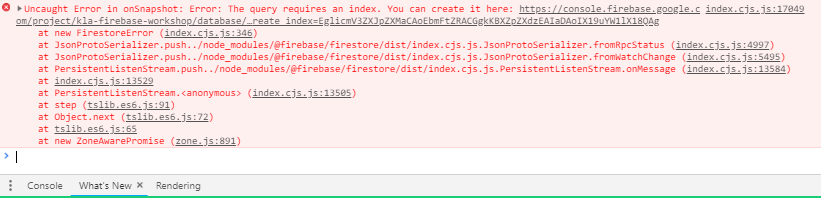
By default, Firestore auto-magically creates indexes on each individual field of a document. This allows our queries pull data back so quickly (and why this performance scales extremely well for a lot of data and a lot of users). However, we just tried to make a compound query. While this is supported, we do need an index first. Luckily, the SDK spits out a URL that we can follow in that error that will bring us to our Firestore console with a pre-created composite index. HOW HANDY! Once that index is done building, you should be able to filter on both properties. Check this video out for some more information on how this works.
Fetching and Updating Breweries
Now, open up src/app/brewery/edit-brewery.component.ts. Following the comments in the file, we will need to get a reference to the brewery document using the ID that we pulled out of the Angular route.
this.breweryRef = this.db.collection(‘breweries’).doc(breweryId);
This time we only want to get the data from this reference once, so instead of calling onSnapshot we will just call the get method, which returns a promise that will resolve into a DocumentQuerySnapshot. We will react to the promise by setting this.brewery to the document’s data using the spread operator.
this.breweryRef.get().then((doc) => {
this.brewery = { …doc.data() }
});
We only need to do one more thing in this component: implement saving the brewery. Following the pattern we have been seeing I bet you can guess how we do this!
Sure enough, we call the update function on the document reference. In this case we can just use the reference that we already saved because we are never adding query criteria to it. Something to note here is that update is a non-destructive operation, it will update any matching fields on the document and add those that were not existing while preserving anything else on the document. There is also a set function that is destructive, that will overwrite the existing document with whatever you are passing to it. Go ahead and try it out! You should be able to edit the brewery you created earlier with no issue.
Reviewing Breweries
Lastly for the app code, we are going to implement viewing a brewery and adding reviews to it. Open up src/app/brewery/brewery.component.ts and implement the code needed for the first comment. This part will be almost exactly the same as the EditBreweryComponent, but this time we want to use onSnapshot instead of get and we will want to set the id on the brewery.
Next, we will set up a CollectionReference for reviews that live on a brewery document. Since collections are not saved as part of the document, we have to query for them separately. This ensures that we do not pull back unnecessary data and allows for queries to be very efficient as we are directly accessing documents and collections instead of joining them.
This should look fairly familiar to the BreweryListComponent. The only new thing we are learning here is that we can order our results. As it appears, this will bring back our reviews ordered by createdOn date in a descending order.
When adding a review, the code will again be very similar with one caveat.
In the resolution of the add functions promise, we are going to add a document in the reviewMapping collection with a custom key that will be the brewery ID and user ID separated by an underscore. We are only saving the review ID on this document because the only thing that we care about is that this document exists. But why do we care?
Think about review apps. You may not want one user to be able to review a brewery multiple times. If they have something different to say they should just update their review. One way for us to check if a user has made a review on a brewery would be to query the reviews collection under the brewery being reviewed where the UID field matches the user that is reviewing and seeing if the results are empty or not. This is not necessarily a bad method, Firestore can get it done very quickly even if the reviews collection grows very large. However, this is a lot of unnecessary database reads. Instead of querying a whole sub collection, we could store a document with a compound ID as it’s ID in a root collection. Now, we just need to query a specific document and see if it exists or not. We will use this when developing rules to keep a user from creating multiple reviews for a brewery.
For our addReview method to work properly we will also have to implement getCurrentUid. You should be able to you handle this one (hint check out the BreweryListComponent).
Lastly, implement deleteReview.
You can ignore the postView method for now, we will come back to that in Part 5 when we learn how to create Cloud Functions that serve as an https endpoint.
Securing Our Data with Firestore Rules
That’s it for the code in this part! To recap, we implemented CRUD operations for breweries and reviews as a sub collection under each brewery along with ordering and querying those collections. We also set up a collection to map breweries and users together. Now that our project has data, let’s set up some rules to protect it.
In your project’s Firestore console, click the Rules tab.
The syntax for writing Firestore rules can take a little getting used to, but they are fairly straightforward. Essentially there are 3 categories of actions: read, write and delete. The “Write” action can be broken down into create and update. If you create a rule on a collection, you have to create rules for all of them. As soon as there is one restrictive rule, Firestore will lock down all operations on collections that are not defined in the rules. We will start with breweries.
For each brewery in the breweries collection, we are going to allow read and create if the user is signed in (these are on separate lines because we will be adding another condition to create in part 5). We also only allow update and delete if the user is the owner of the document. Now, let’s implement those functions.
In both functions we access the request object, which is present in the scope of the rule and contains information about the request that is being made.
Next, let’s set up rules for brewery reviews.
Same thing as breweries for read, update and delete, but for create, they need to be signed in and we need to make sure there is not already a reviewMapping for this brewery and user. For that we use the built in exists function. I did try putting this into a function to make it more readable, but at the time of writing this I was not getting the expected results from doing that, it only works as written here. If you get it working with a function though we would love to hear from you!
And lastly, we will need to have a rule for the reviewMapping collection.
We do not need to bother with update and delete. We will handle deleting these mappings in Part 5.
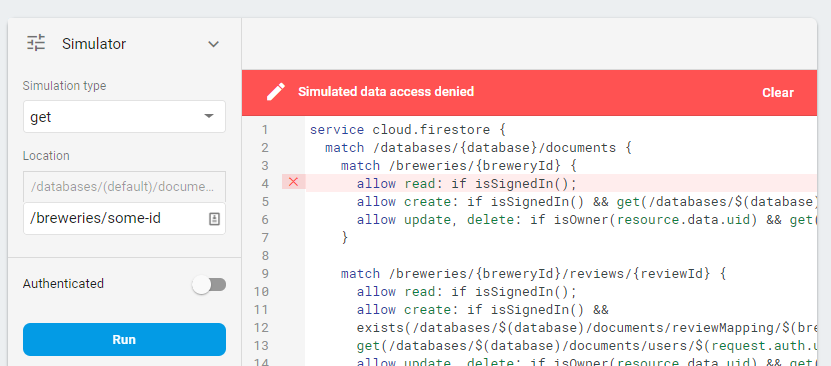
Go ahead and hit publish. Your Firestore database is now locked down! If you scroll down a little you may notice on the bottom left there is a Simulator button. This is fairly new for Firestore, but very useful for testing out rules. If you click this button you can run a simple test by trying to get one of your brewery documents (you will have to get an id) while authenticated and unauthenticated. If access is denied, the simulator will even highlight the line that is blocking the access.
Next Time
Time to pour yourself a cold one because you now have a secure application with two fully functioning CRUD screens which took 0 lines of backend code (other than rules). Look at you go! I’m so proud. Keep an eye out for Part 4 of this series, where you will take a quick coding break and get the application setup for free (that’s right free) hosting with https.
Other recent posts:

Kunz, Leigh and Associates (KL&A) Announces the Retirement of KL&A Co-Founder John Leigh
OKEMOS, MI, April 11, 2023 – Kunz, Leigh and Associates (KL&A) announces the recent retirement of KL&A Co-Founder John Leigh as of March 31, 2023. Mr. Leigh began his career as a developer working on large mainframe systems before moving…

Team Building in a Remote Environment
Blog Barista: Dana Graham | June 15th, 2022 | Culture | Brew time: 5 min
Let me start by saying I don’t care for the term “work family.” I have a family I love, and they have absolutely nothing to do with my career. I want my work life to be its own entity. I like boundaries (and the George Costanza Worlds Theory). Certainly, I want to enjoy and trust my coworkers, and I want to feel supported and cared for…
0 Comments