Blog Barista: Greg Antrim | May 1, 2019 | Internet of Things | Brew time: 12 min
The Internet of Things (IoT) is a wonderful thing. With the wide variety of sensors, development boards, and code samples available, you can monitor or automate just about anything. More often than not though, people struggle with making this data available and usable. It’s a problem that I have ran into during previous projects and one I ran into again when attempting to build a temperature and humidity monitoring system for our server room. In the past, I had built custom solutions and APIs to get to my data but for something as simple as monitoring temperature this seemed like overkill. Luckily, a coworker pointed me towards a company called Particle and their lineup of development boards. What makes particle different is that along with their boards, they give you access to the Particle Cloud allowing you to easily access data collected by your device. Even better, your first 100 devices are free.
In today’s post, I’ll show you how to wire up a DHT22 temperature and humidity sensor to a Particle Photon. We’ll connect the photon to the Particle cloud and then set up an integration between the Particle Cloud and IFTT to automatically alert us when the temperature or humidity reach a certain threshold. Here is a quick overview of the steps we’ll be covering:
- Materials and Software Needed
- Particle Account and Device Setup
- Connecting the DHT22 Sensor to the Photon
- Web IDE Project Setup
- Writing the Code
- Setting Up Email Alerts through IFTTT
Materials and Software
Hardware
- Particle Photon
- DHT22 Temperature and Humidity Sensor
- Micro USB Cable
- USB Wall Charger
- Android or iOS Device
Software
Particle Account and Device Setup
Before we can use our Photon or the Particle Cloud, we need to create an account and then add our Photon to our account. Luckily, Particle makes the setup process pretty easy. Since the setup steps are somewhat device specific and highly interactive I’m not going to cover them here. Particle provides an excellent setup wizard on their setup page.
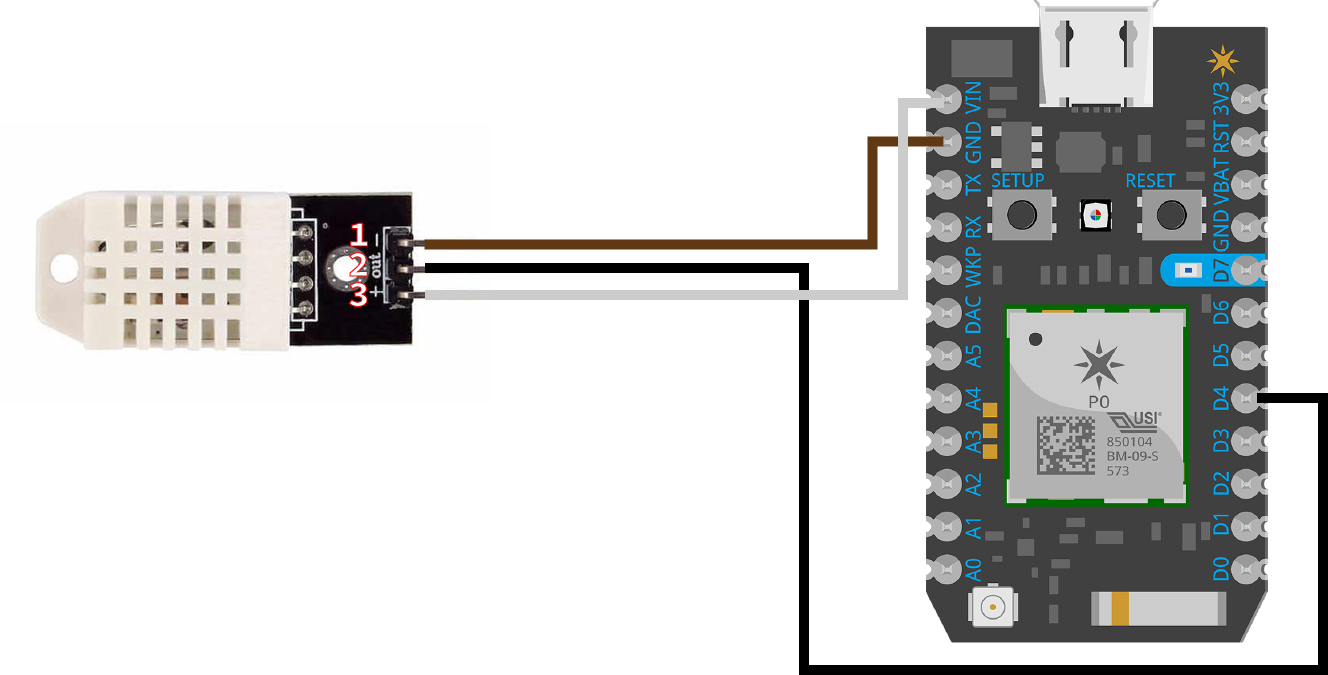
Connecting the DHT22 Sensor to the Photon
Now that we have our device set up and connecting to our Wi-Fi Network it’s time to wire the DHT22 sensor to the Photon. Connect the DHT22 to the photon according to the table and diagram below.

Web IDE Project Setup
With our Photon connected to the internet and wired to our temperature sensor its almost time to start coding. To keep things simple, we will be using Particles Web IDE to write and flash our code. Its worth noting that Particle does offer a dedicated desktop IDE called Workbench that is powered by Visual Studio Code, but as of this writing it is still in beta and setup is a little complicated. Before we start writing our code we first need to set up a new project
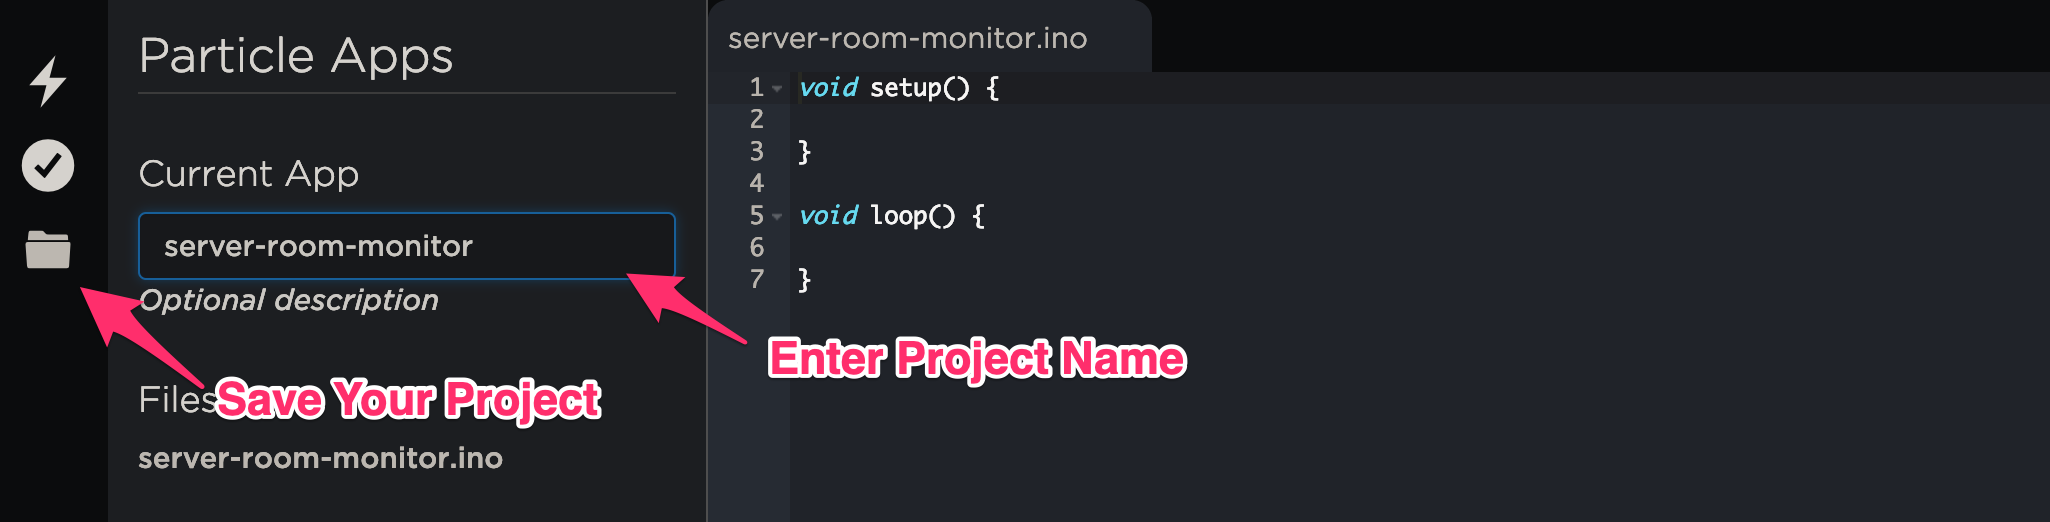
1. Navigate to the Particle Web IDE
2. Enter a name for your project. I will be using server-room-monitor for my project name.
3. Save your project by clicking the folder icon on the left sidebar
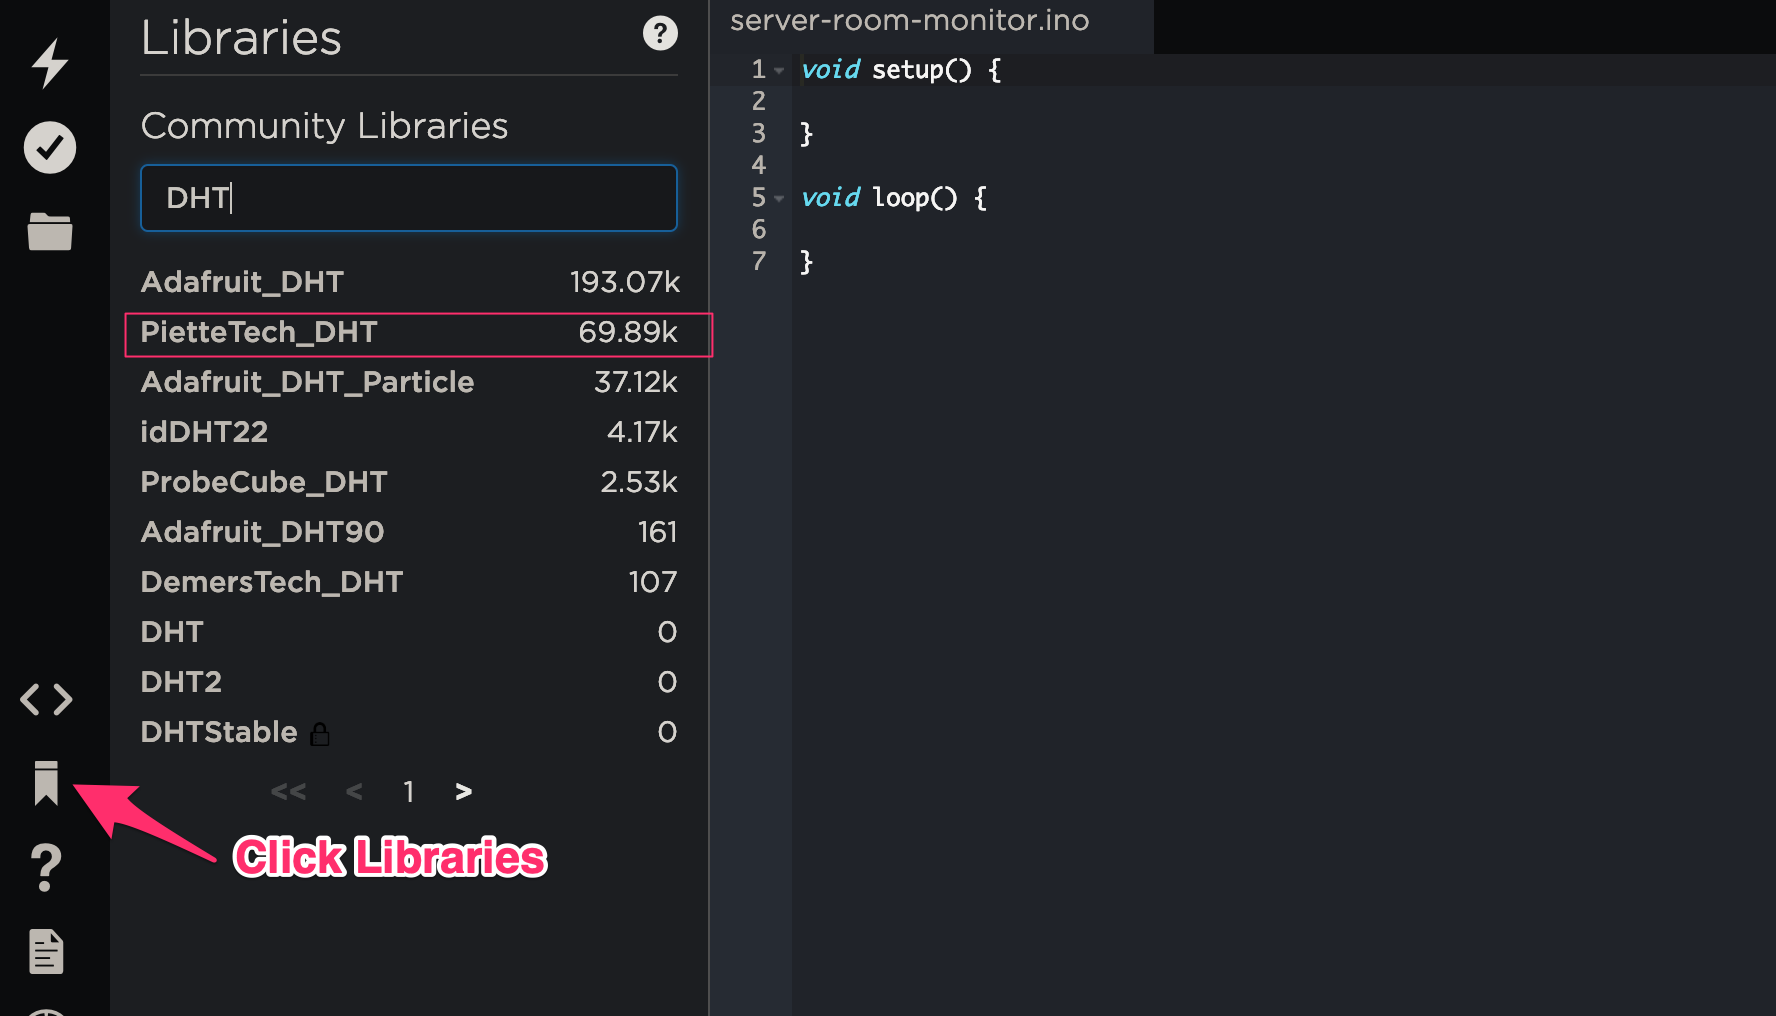
4. Click the Libraries button on the left side bar and
5. Enter DHT in the search box and select PietteTech_DHT from the search results
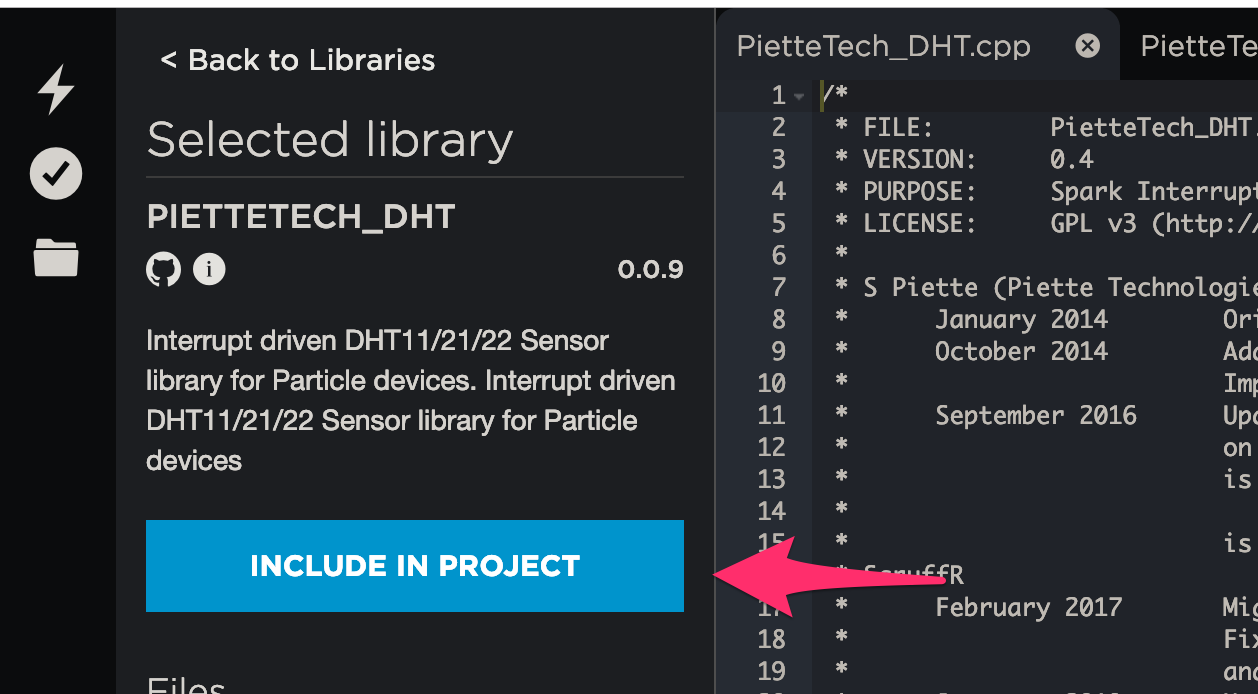
6. Click the Include in Project button
7. Click the Devices button on the left sidebar
8. Click the star next to your device name to specify that we want to send code to that device

Writing the Code
Declarations
We’ve added the DHT libraries and selected our device so now it’s time to write some code. We’ll start by declaring some variables that will be used throughout our app. Between the #include <PietteTech_DHT.h> and void setup() lines add the following code.
Lines 1-4
Since the PietteTech DHT library works with several different DHT devices we need to specify the type of DHT device we are using. We specify digital pin 4 as the pin we are going to be receiving data on and then we initialize the DHT library with our device type and pin.
Lines 6-11
Here we define some variables that will be used to keep track of device state and to trigger alerts. Specifically:
- serverTempMax and serverHumidityMax are the maximum temperature in Fahrenheit and humidity percentage that our device can reach before we trigger alerts for overheating or excess humidity
- serverTemp and serverHumidity will hold the current temperature and humidity values
- overheatDetected and tooHumid will be used to check for state changes so that we don’t continuously trigger alerts. I will go into more detail on this later
Particle Variables
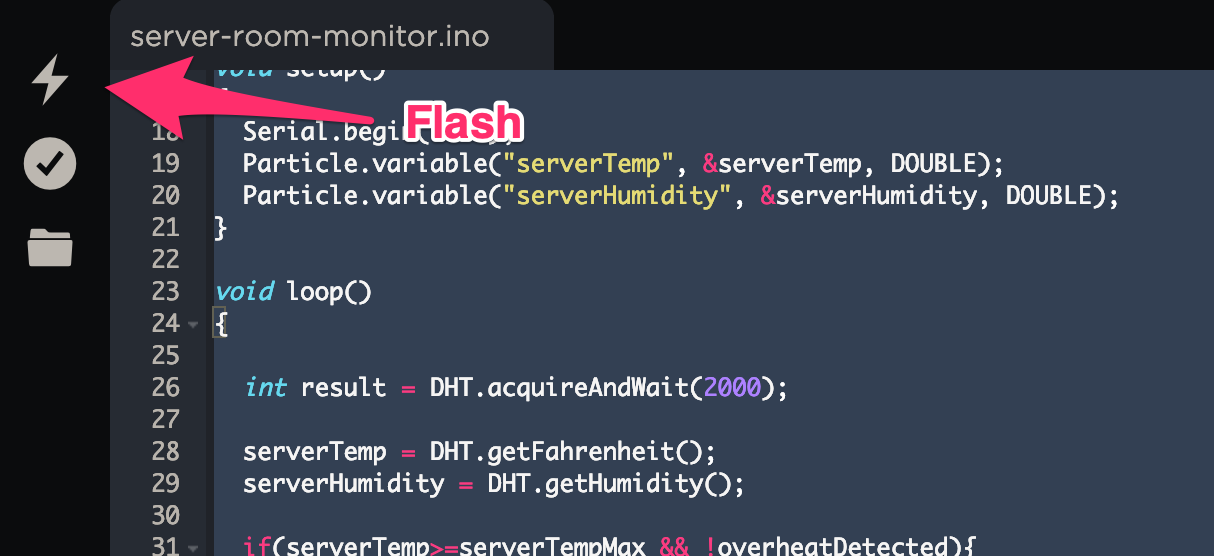
Particle Variables are variables whose values can be checked through the Particle API. They are great for making simple values quickly accessible. We will be defining two variables, one for current temperature and another for current humidity. Add the following code to the setup() function:
In the code above, we declare two Particle variables: serverTemp and serverHumidity. We pass the Particle variables a reference to our local serverTemp and serverHumidity variables, and we specify that these variables should be of type DOUBLE.
Particle Events
By using Particle variables, we are already able to access the current temperature and humidity values from the Particle cloud. This allows us to manually check the current temperature from wherever we are, but most people don’t want to spend their days manually refreshing those variables. It would be much more useful if our device automatically alerted us when these values go above a certain range. Particle events allow us to do exactly that. Add the following code to the loop() function:
Lines 1-4
Acquire the latest values from our DHT sensor and update our local serverTemp and serverHumidity variables
Lines 6-9
If the temperature is above our specified maximum (81ºF) and we have not already detected an overheat, publish the server_temp Particle event with a value of overheat.
Lines 10-13
If the temperature is below our specified maximum and we have previously detected an overheat, publish the server_temp Particle event with a value of normal.
Lines 15-18
If the humidity is above our specified maximum (60%) and we have not already detected the excess humidity, publish the server_temp Particle event with a value of tooHumid.
Lines 19-24
If the humidity is below our specified maximum (60%) and we have previously detected excess humidity, publish the server_temp Particle event with a value of normal. Finally, we delay for 10 seconds to make sure we don’t exceed Particle’s rate limit.
That’s it for the coding portion of this post. Go ahead and hit the Flash button to upload the code to our photon. You should see the LED flash several different colors and then return to a slowly pulsing cyan.
Here is the full code for reference.
Testing
Our device is now broadcasting the current temperature and humidity and triggering events when we hit our temperature and humidity thresholds. In order to make sure everything is working we will head over to the Particle Device Console.
1. Navigate to the Particle Device Console
2. Select your device from the list of devices
3. On the bottom right side of the screen you should see the Variables section. Our serverTemp and serverHumidity variables should be listed in that section. Click the Get button next to one of the variables and the current value of that variable will be displayed.
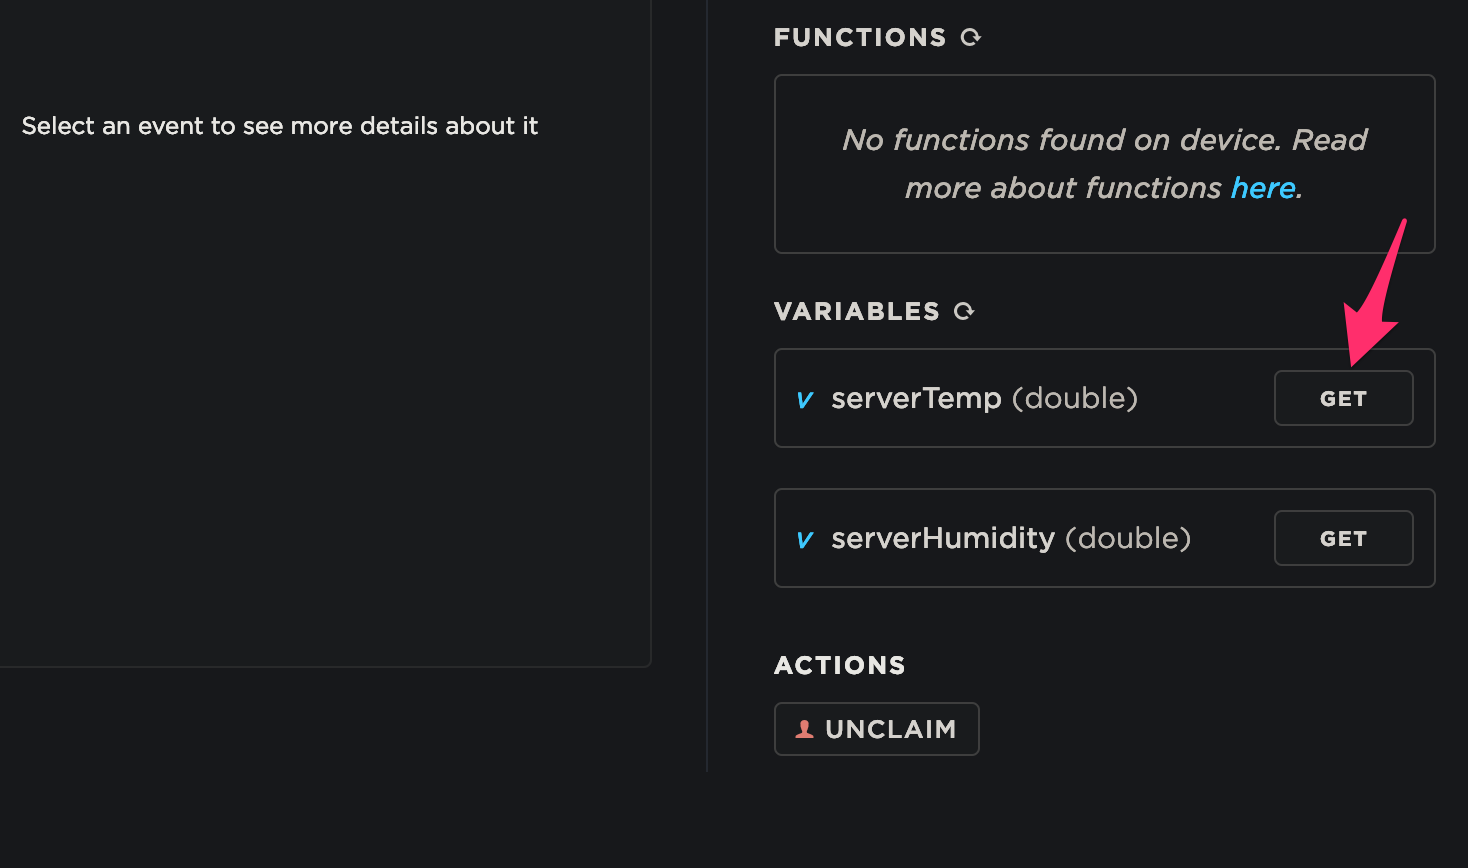
You can also view any triggered events in the event logs section of the page.

Setting Up Email Alerts through IFTTT
Now that our device is publishing temperature and humidity events, it’s time to take action when those events occur. Specifically, we will be sending out an email each time temperature or humidity exceeds the maximum value, and another email when those values return to normal. In order to accomplish our goal, we will be using Particle’s built in Integrations and IFTTT.
Creating an IFTTT Applet
If This Then That (IFTTT) is “…the easy way to get your apps and devices working together” In our case we will be using it to send an email through Gmail whenever our Particle server_temp event is published. The process for sending alerts for the server_humidity event is almost identical so I will not cover that in this post.
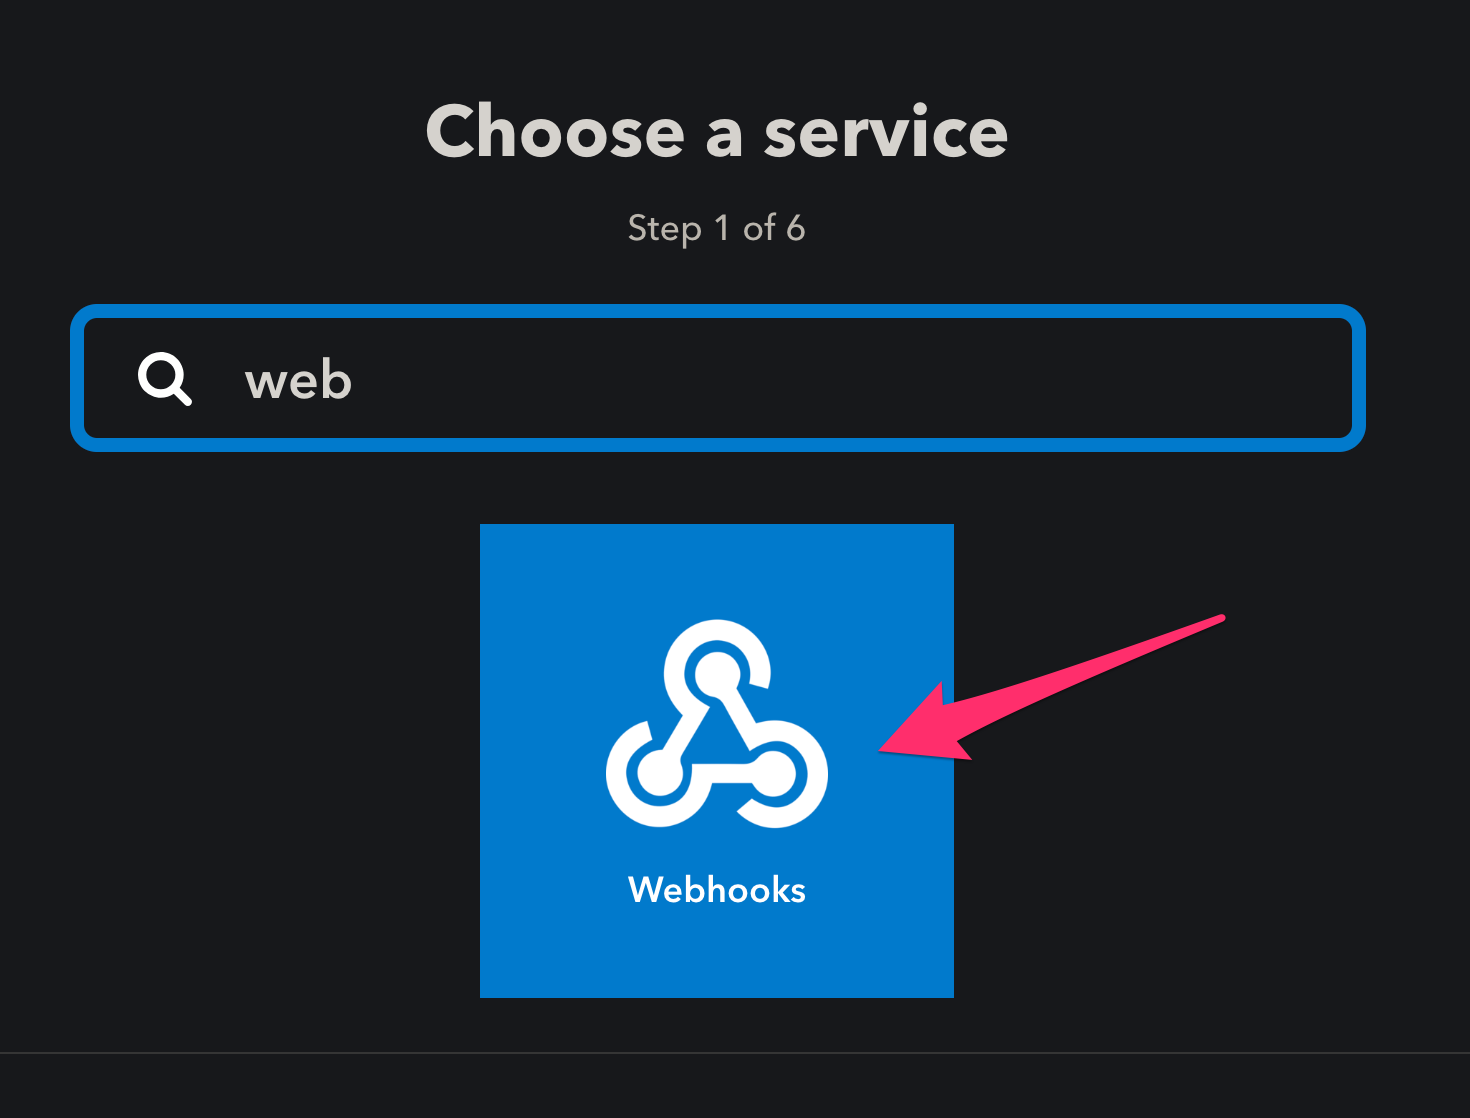
1. Navigate to IFTTT and either create an account or log in
2. Go to My Applets and click on the New Applet button

3. Click on the plus sign

4. Choose the Webhooks service
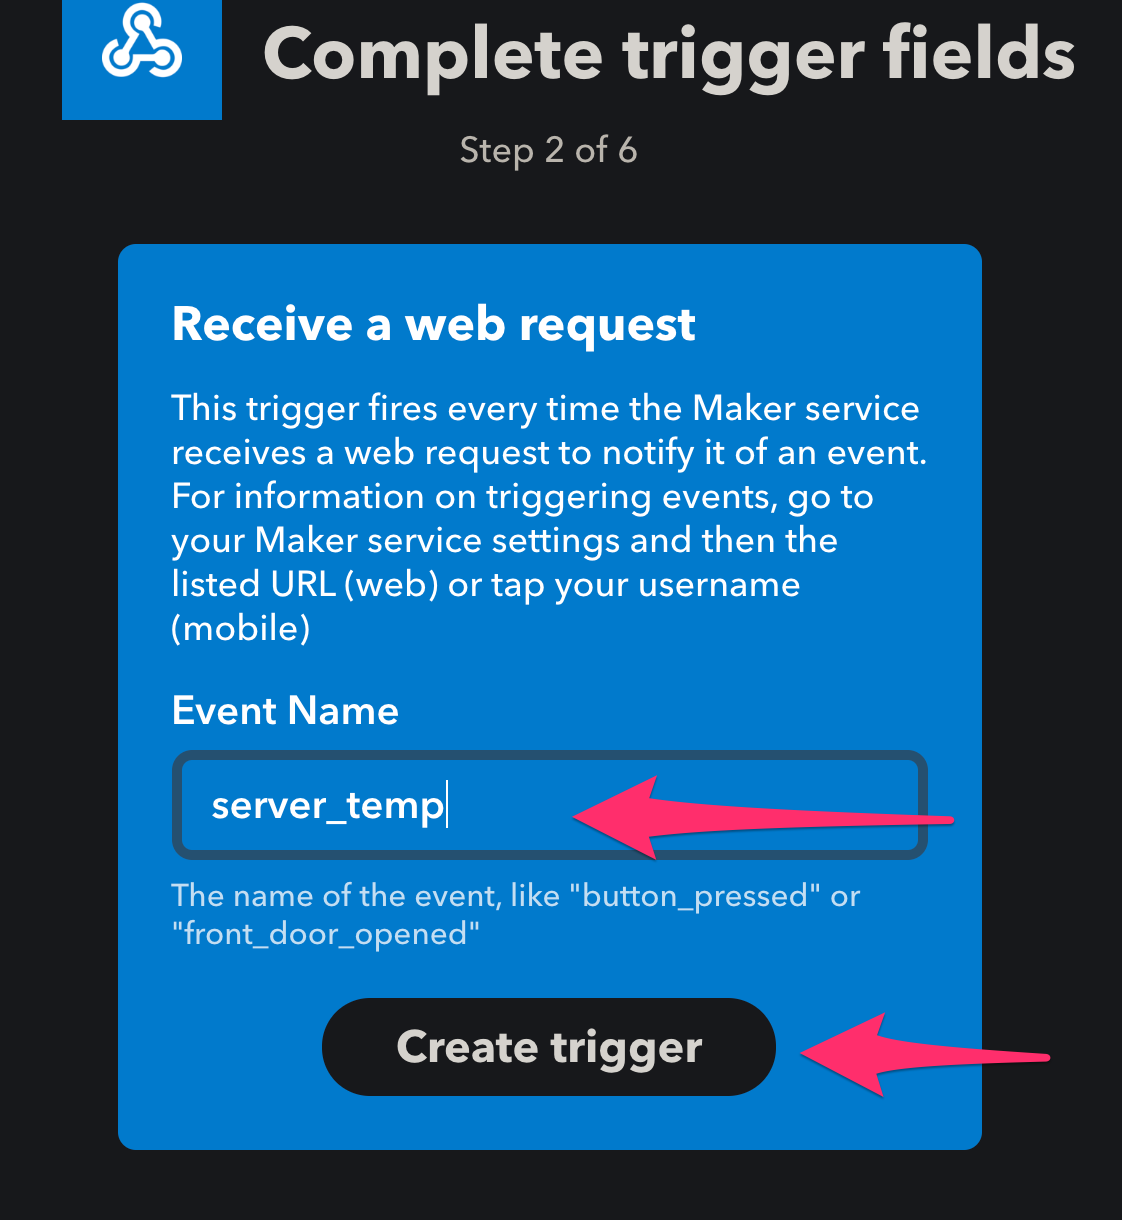
5. Choose Receive a web request
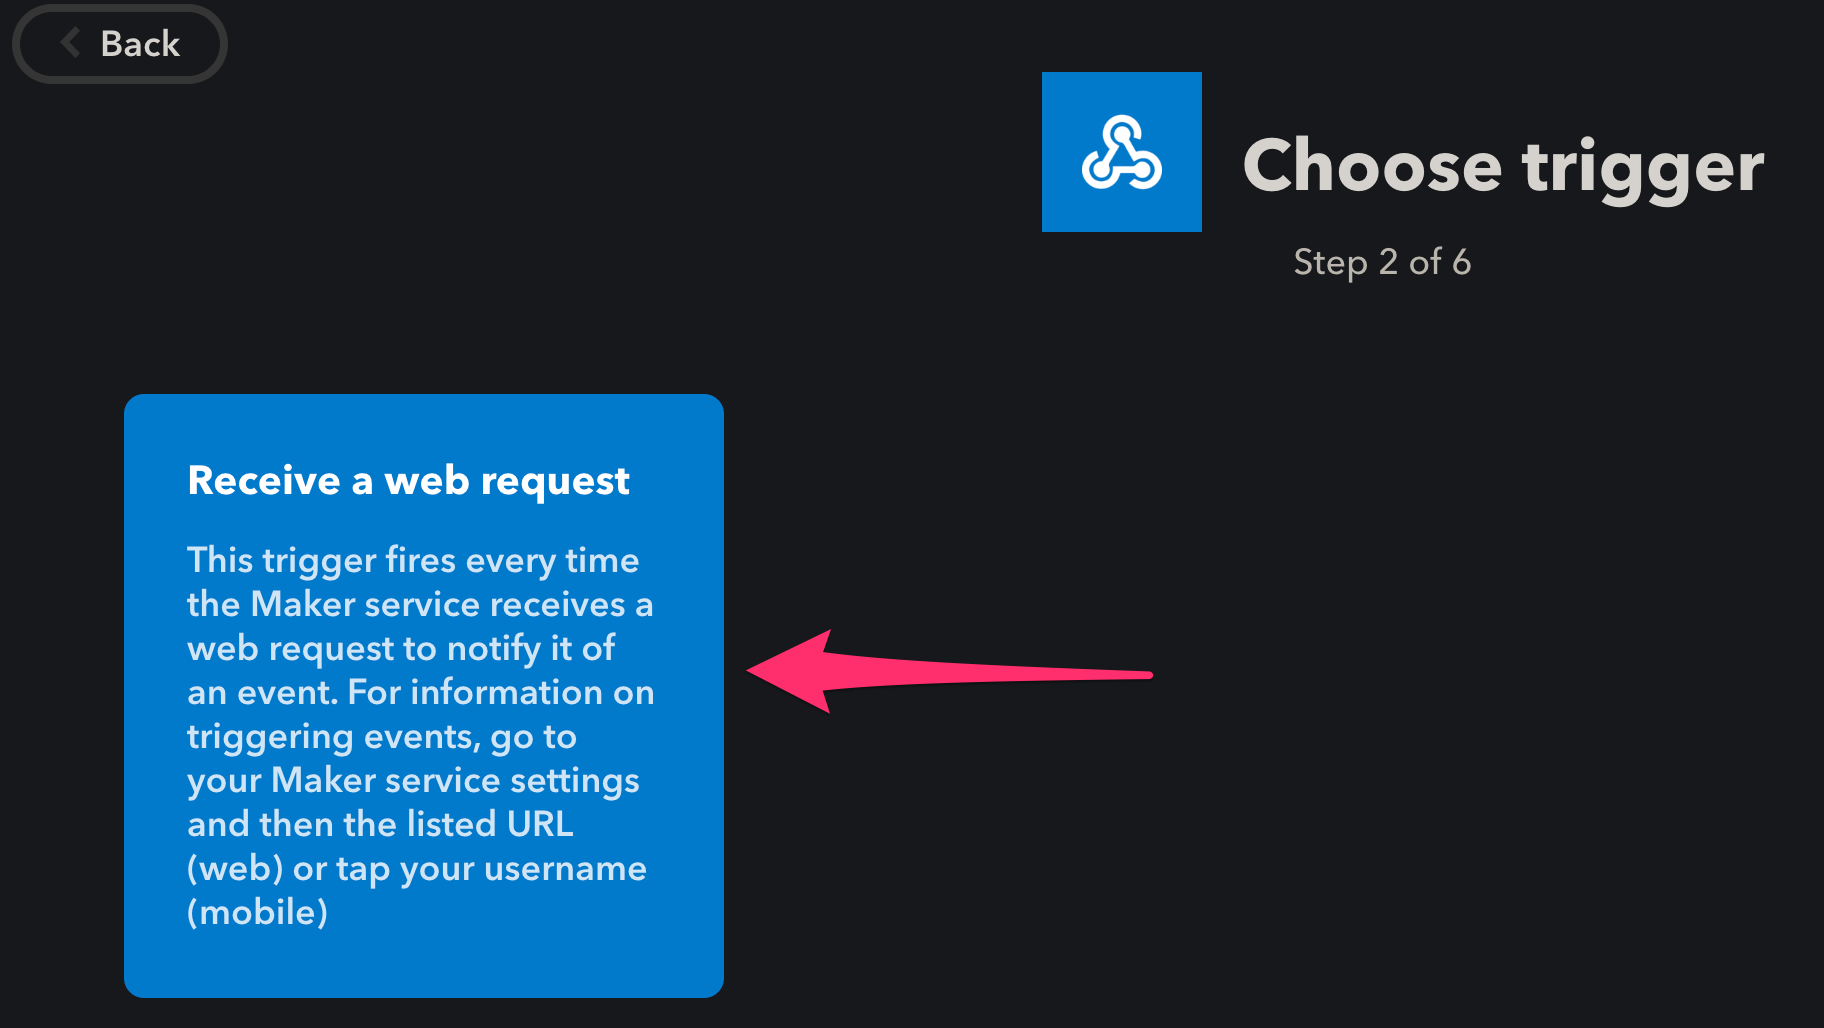
6. Enter server_temp in the Event Name input and click Create Trigger
7. Click on the Plus Sign

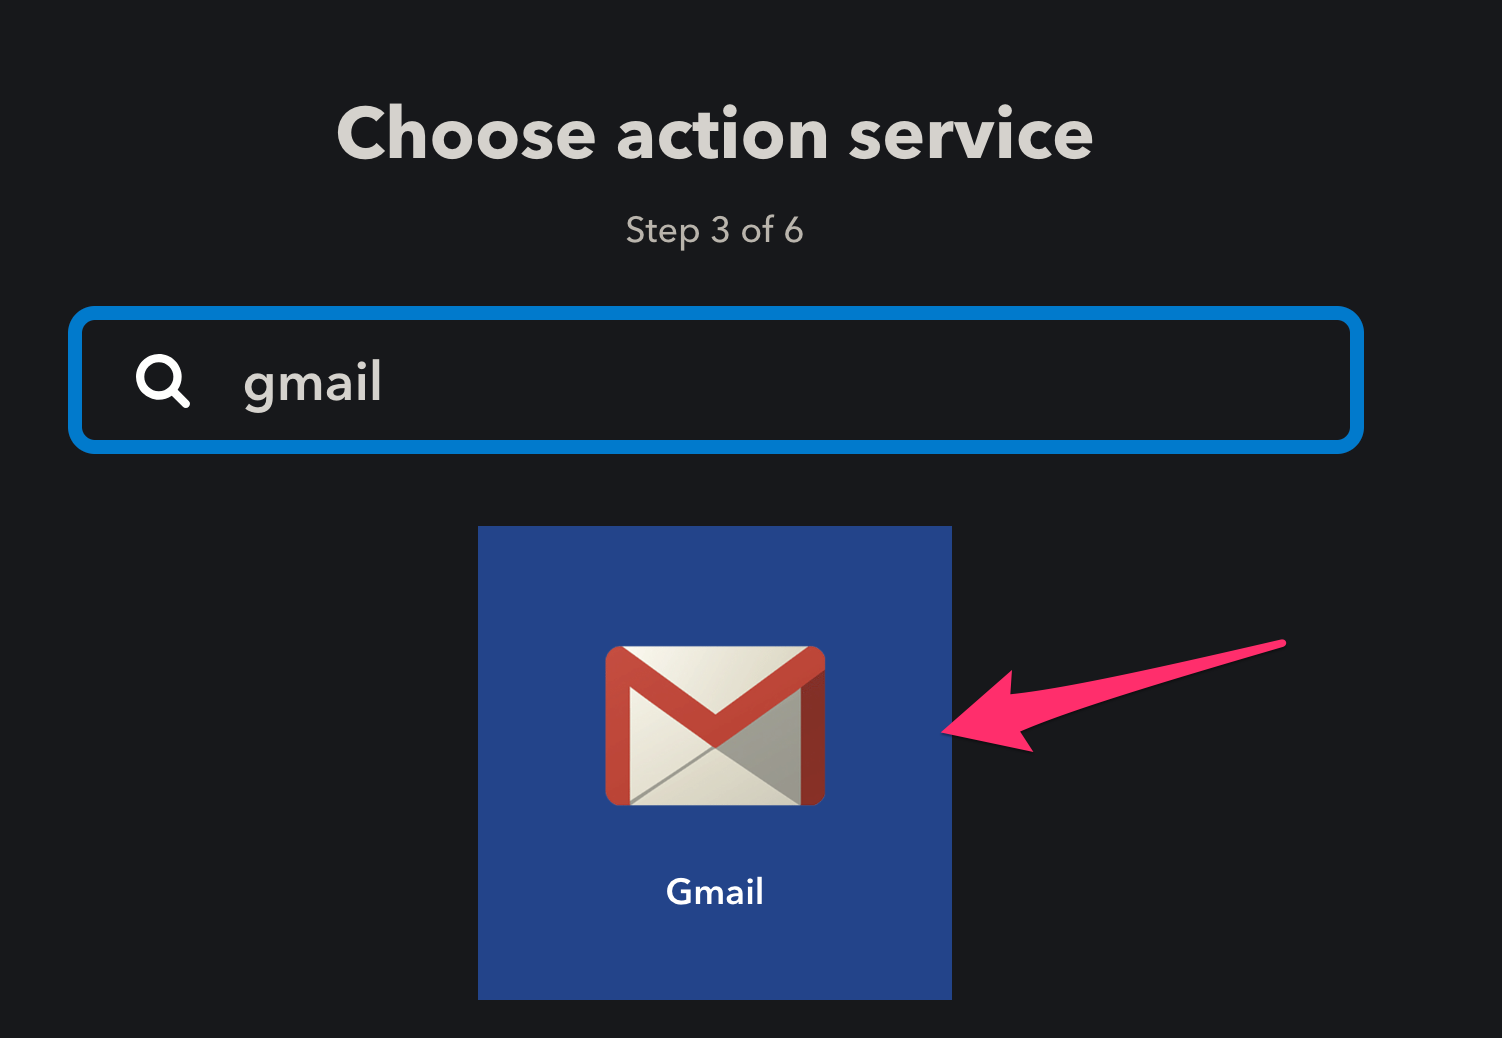
8. Select Gmail from the list of services
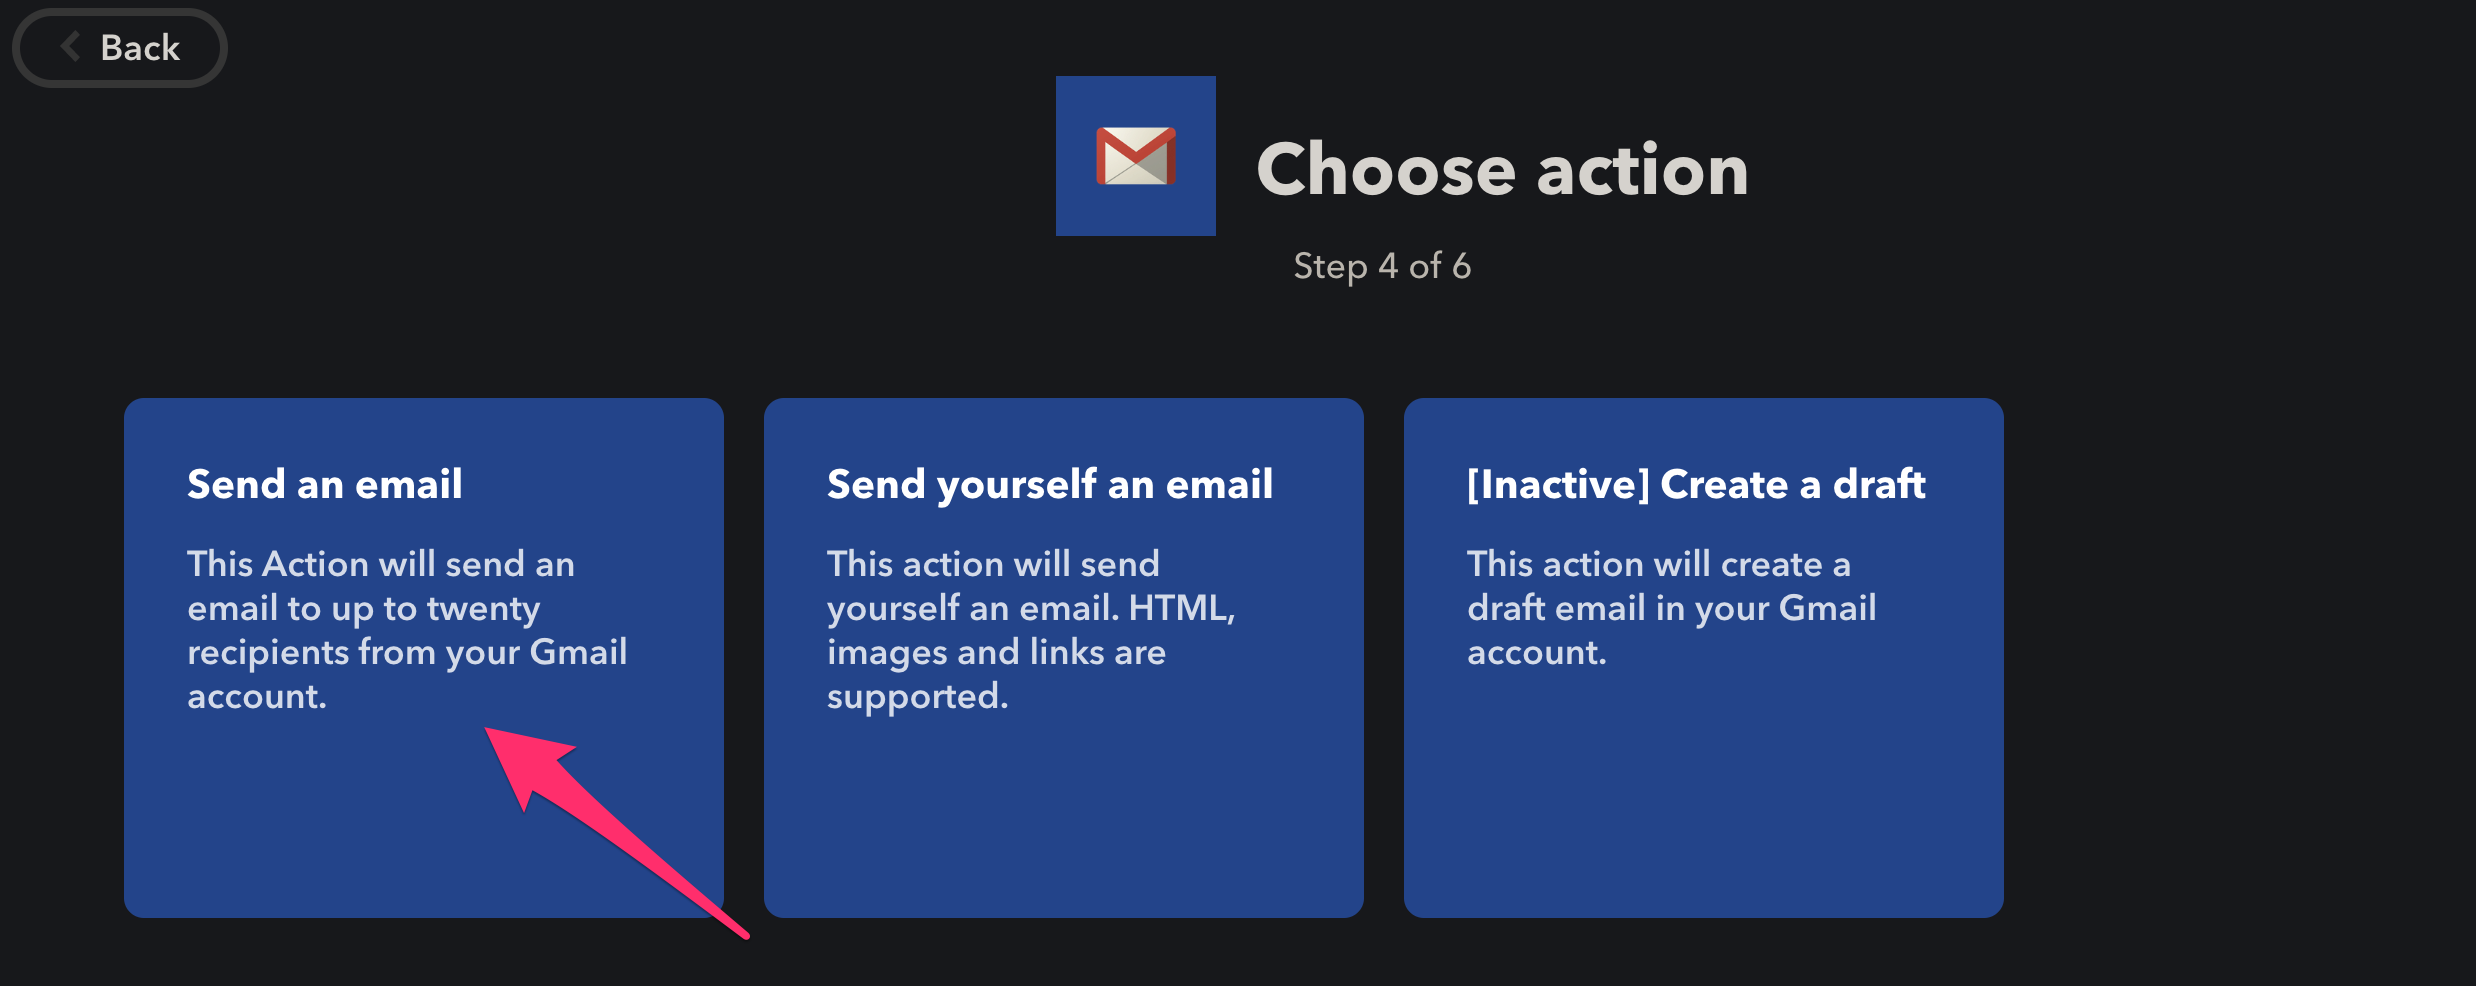
9. Select Send an email
10. Enter at least one email address in the To address field and
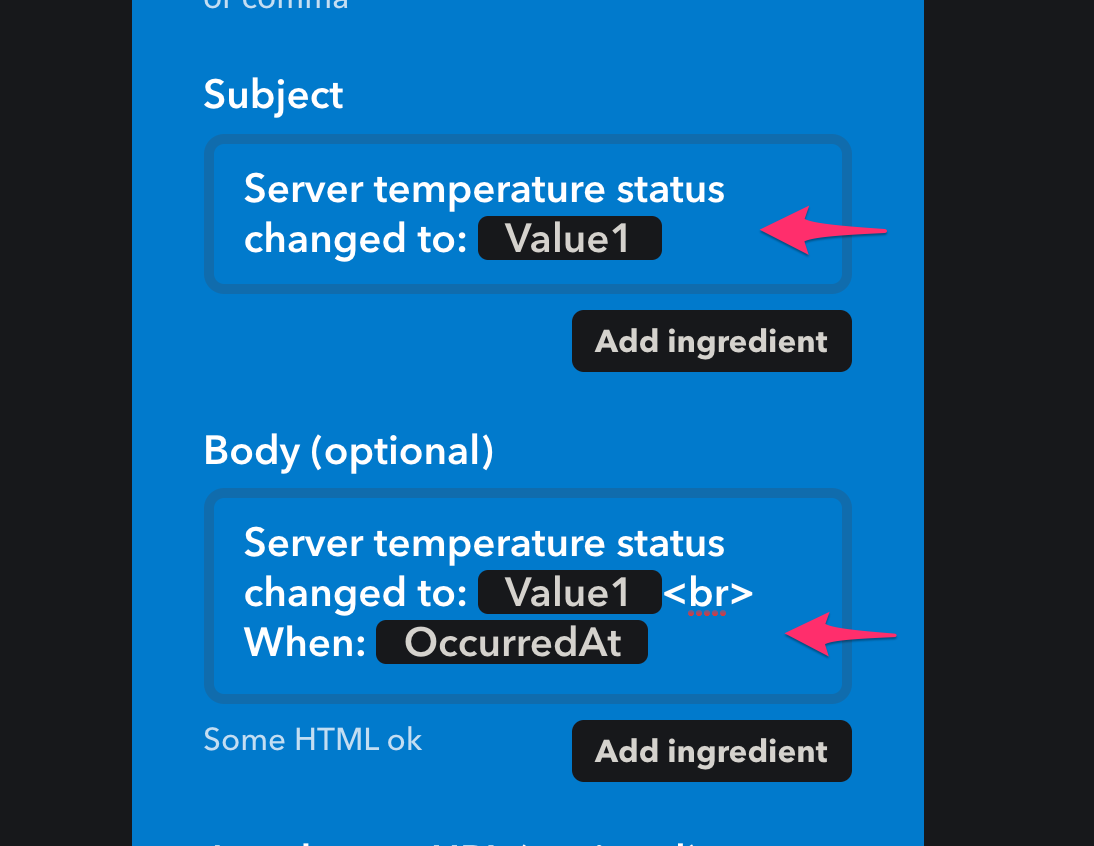
11. In the Subject field enter: Server temperature status changed to: {{Value1}}
12. In the Body field enter: Server temperature status changed to: {{Value1}}<br> When: {{OccurredAt}}
13. Click Create Action
14. Click Finish
15. Navigate to the Webhooks Settings page and make a note of the secret key following the last slash of the URL. You will need this for the next step
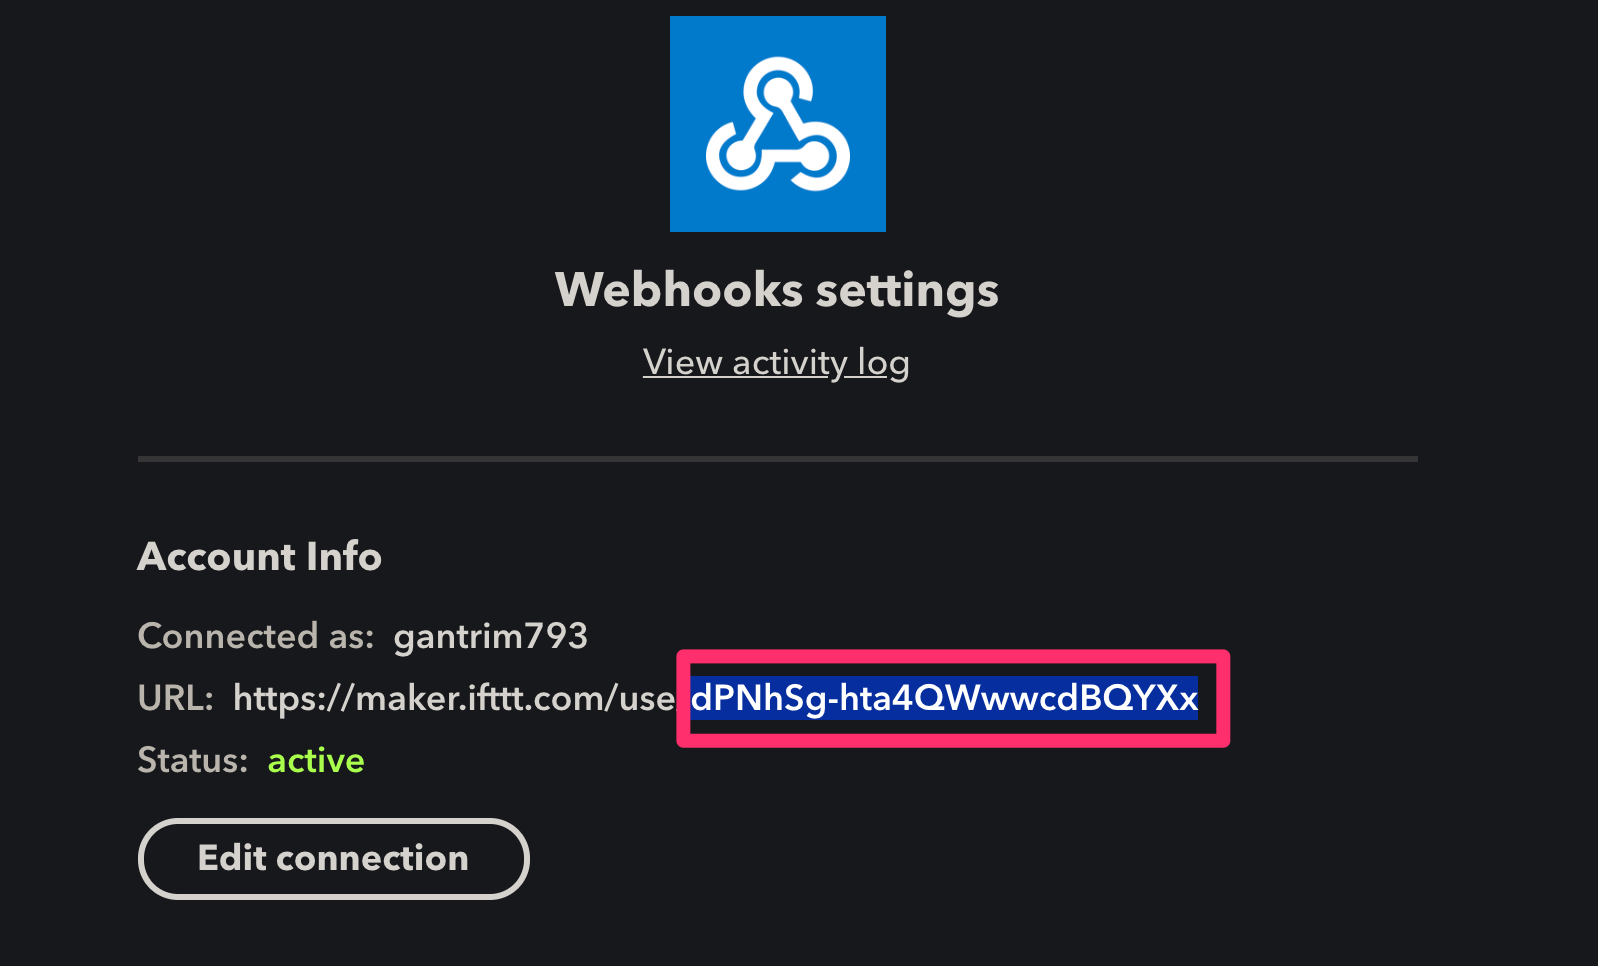
So, what did we actually do here? We created an applet that will listen for incoming requests. When a request is received, we will parse the server_temp event value (either overheat or normal) from the JSON Body. In this case the event value of is sent in as Value1. We will also grab IFTTT’s built in OccurredAt variable which lets us know when the request was received. Using those variables, we will send an email to the email address specified in Step 11 with the subject we specified in Step 12 and the body we specified in Step 13.
Particle Integrations
We have created an IFTTT applet that will respond to incoming requests, so the next step is to get the Particle cloud to send out requests when temperature events occur. To accomplish this, we will be using Particle’s Integrations feature.
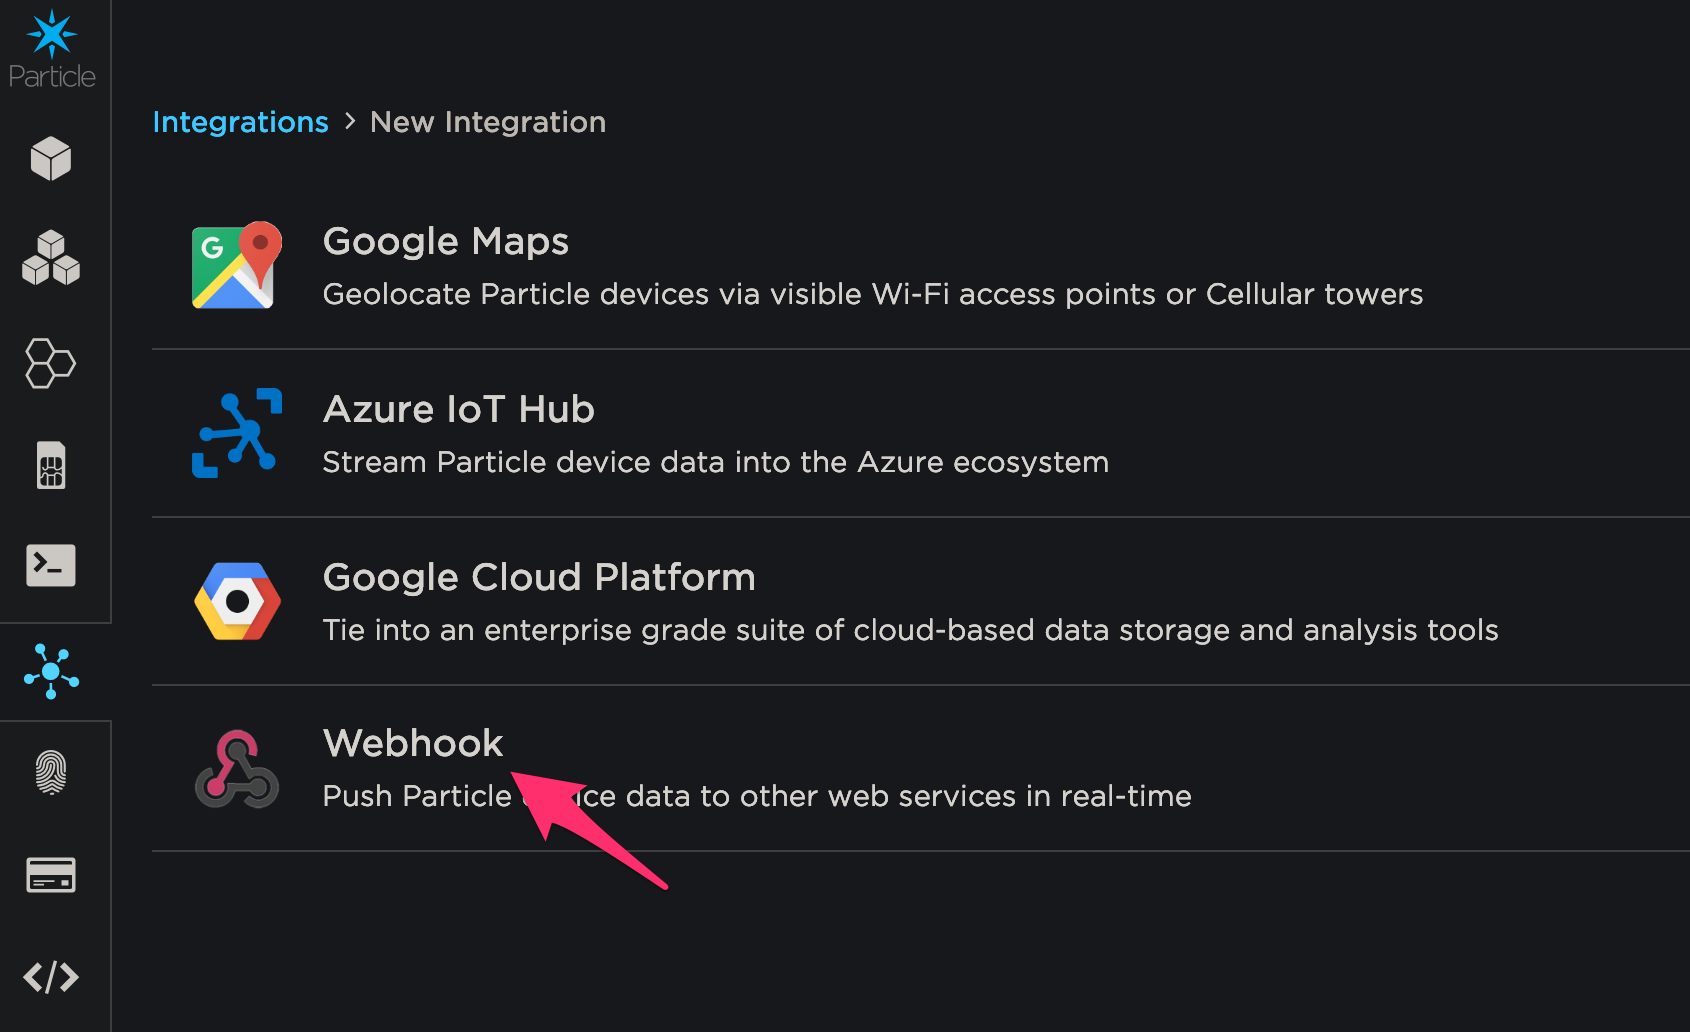
1. Navigate to the Integrations page and click on New Integration
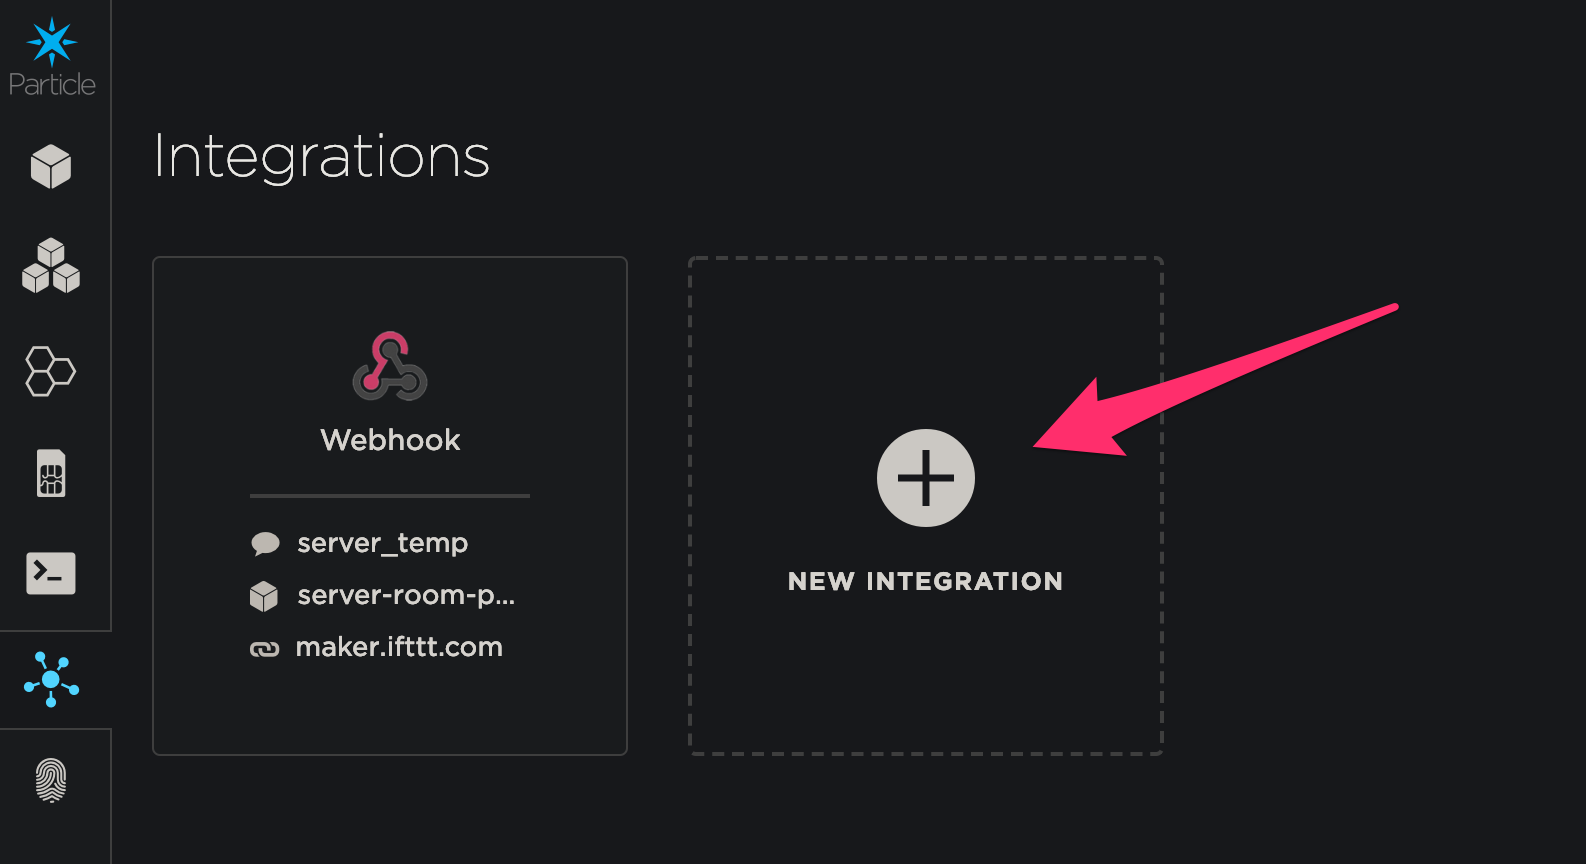
2. Select Webhook from the list of integration types
3. Enter the following Information, replacing <YOUR_IFTTT_SECRET_KEY_HERE> and <YOUR_DEVICE_NAME> with your values
Event Name: server_temp
URL: https://maker.ifttt.com/trigger/server_temp/with/key/<YOUR_IFTTT_SECRET_KEY_HERE>
Request Type: POST
Request Format: JSON
Device: <YOUR_DEVICE_NAME>
4. Click Create Webhook
With that integration set up, Particle will send a POST request to IFTTT whenever a server_temp event occurs.
And That’s it! Our photon is broadcasting variables and events and we will now receive email alerts when the temperature goes over our threshold and another email when it returns to normal. With a basic understanding of Particle variables, events, and integrations we could easily expand on this post to send SMS alerts, or even build a full web or mobile application to monitor the temperature and humidity. I look forward to seeing what you come up with!
3 Comments
Other recent posts:

Kunz, Leigh and Associates (KL&A) Announces the Retirement of KL&A Co-Founder John Leigh
OKEMOS, MI, April 11, 2023 – Kunz, Leigh and Associates (KL&A) announces the recent retirement of KL&A Co-Founder John Leigh as of March 31, 2023. Mr. Leigh began his career as a developer working on large mainframe systems before moving…

Team Building in a Remote Environment
Blog Barista: Dana Graham | June 15th, 2022 | Culture | Brew time: 5 min
Let me start by saying I don’t care for the term “work family.” I have a family I love, and they have absolutely nothing to do with my career. I want my work life to be its own entity. I like boundaries (and the George Costanza Worlds Theory). Certainly, I want to enjoy and trust my coworkers, and I want to feel supported and cared for…
Thanks for the clear instructions. My values for both Temp and Humidity are all -5.0.
Can you please help to correct this?
Hey Alex,
Thanks for taking the time to read this post. First, you should note that these steps are specific to a particle photon and a DHT22 temperature module. Other particle devices (Argon, Boron), and other temperature sensors (DHT11) may require different code or libraries. I mention this because when I was writing this post, I started with a DHT11 and an Argon and ran into a similar issue. I also noticed that since this article was written, the Piette library seems to have stopped working and the Adafruit library has started working again. The code is pretty similar using either library but I have provided a gist here: https://gist.github.com/gantrim/471f3e62811f4e73caecd3e9e239ca76 that should give you the same functionality. For reference, the library name is ADAFRUIT_DHT_PARTICLE and the code provided is using version 0.0.2. Hopefully, that solves your problem. Let me know if you have any other questions.
I only get -5 as results for both temp and humidity, why is that?