Blog Barista: Jim Rasche | June 12, 2019 | Developer Tools | Brew time: 9 min
Jenkins Pipeline is a powerful, expressive tool to describe your Continuous Integration process, unshackling you from the limitations of the “freestyle” GUI. This post will walk you through creating a simple Jenkins Pipeline that messages you through Slack. This topic should be helpful to anyone who desires a faster and more robust development cycle, even if you only have a minimal understanding of Jenkins.
This how-to requires a somewhat up to date instance of Jenkins with the core Pipeline plugin installed. If you do not have a running Jenkins instance you can launch one in minutes using docker by following these steps. If you already have a Jenkins instance, verify it is setup to use Pipeline with these steps. More so, if you don’t have a slack workspace setup you can create one here.
What we will cover:
- Creating a new Pipeline job
- “Hello, World!” with Pipeline
- Working with a plugin
- Creating a Slack token
- Securely adding a Slack token to Jenkins
- Verifying Slack message sending
- Handling multiple projects
Creating a New Pipeline Job
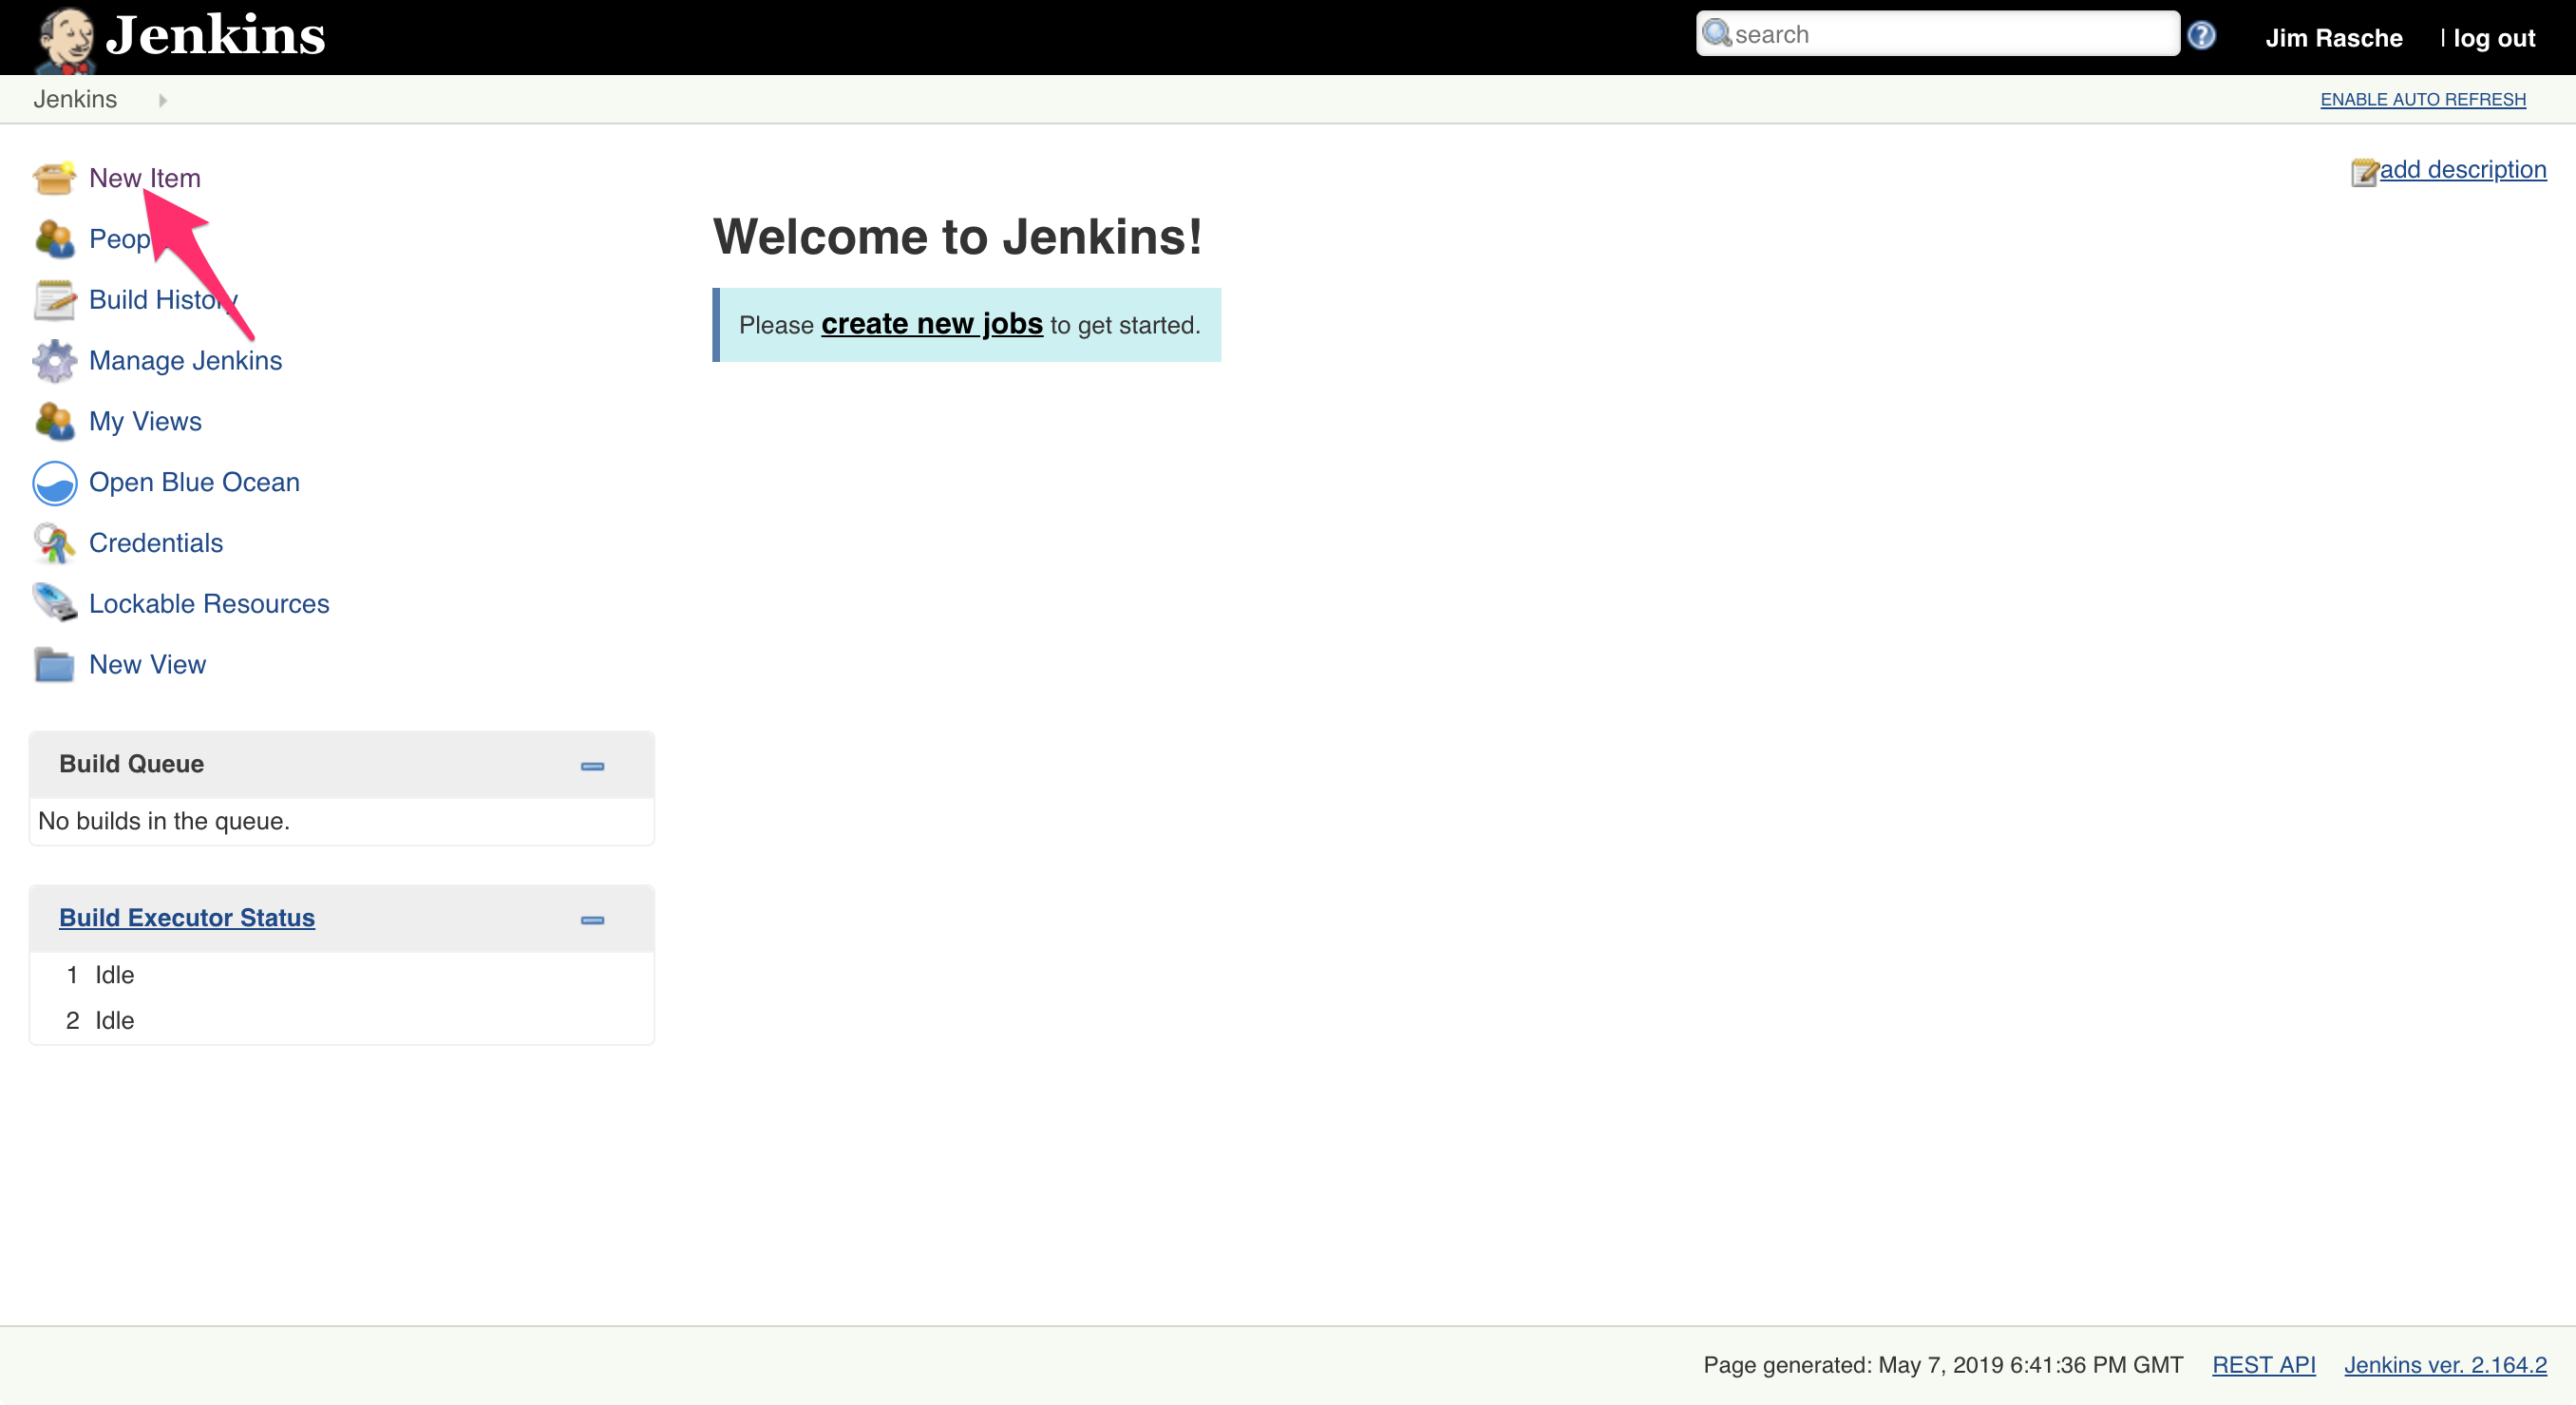
1. To start, you’re going to create a new Pipeline job. Go to your Jenkin’s home page and click “New Item.”
2. Click project type “Pipeline,” give it a name, and click “OK.”
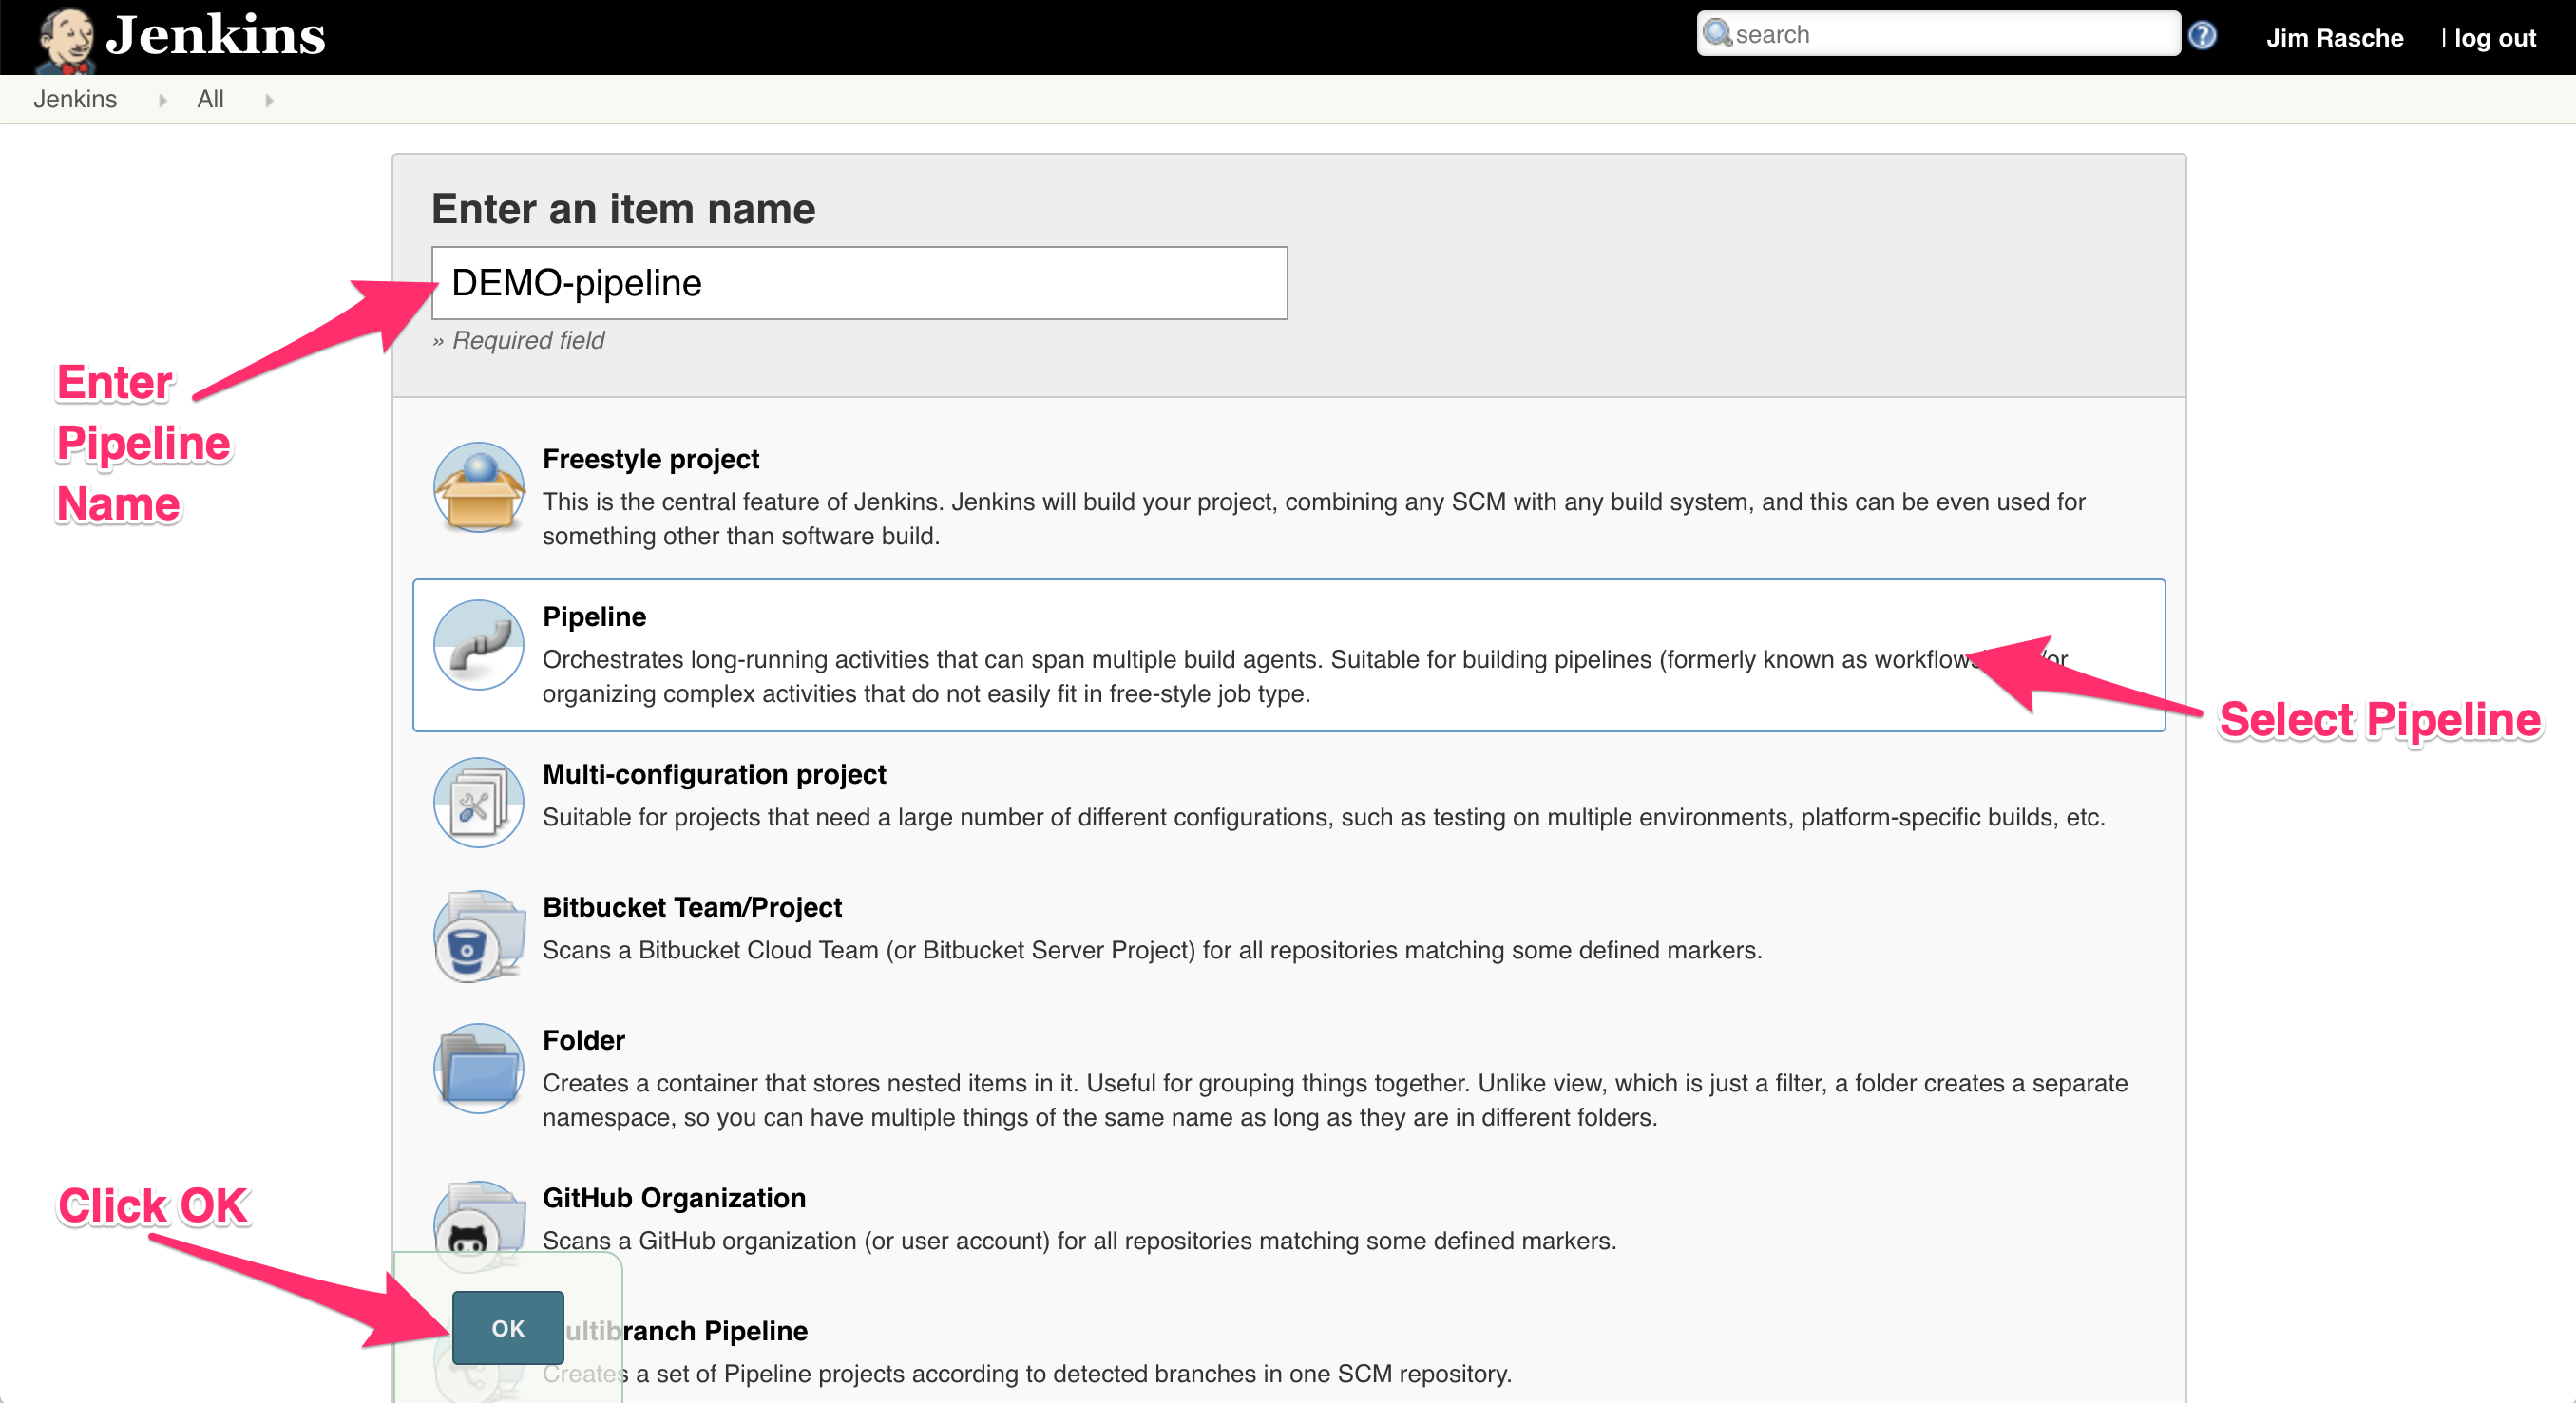
NOTE: Notice that some of the GUI options available in the freestyle jobs are available here as well. You can still setup traditional build triggers with pipeline builds using plugins such as the Jira or GitHub plugins.

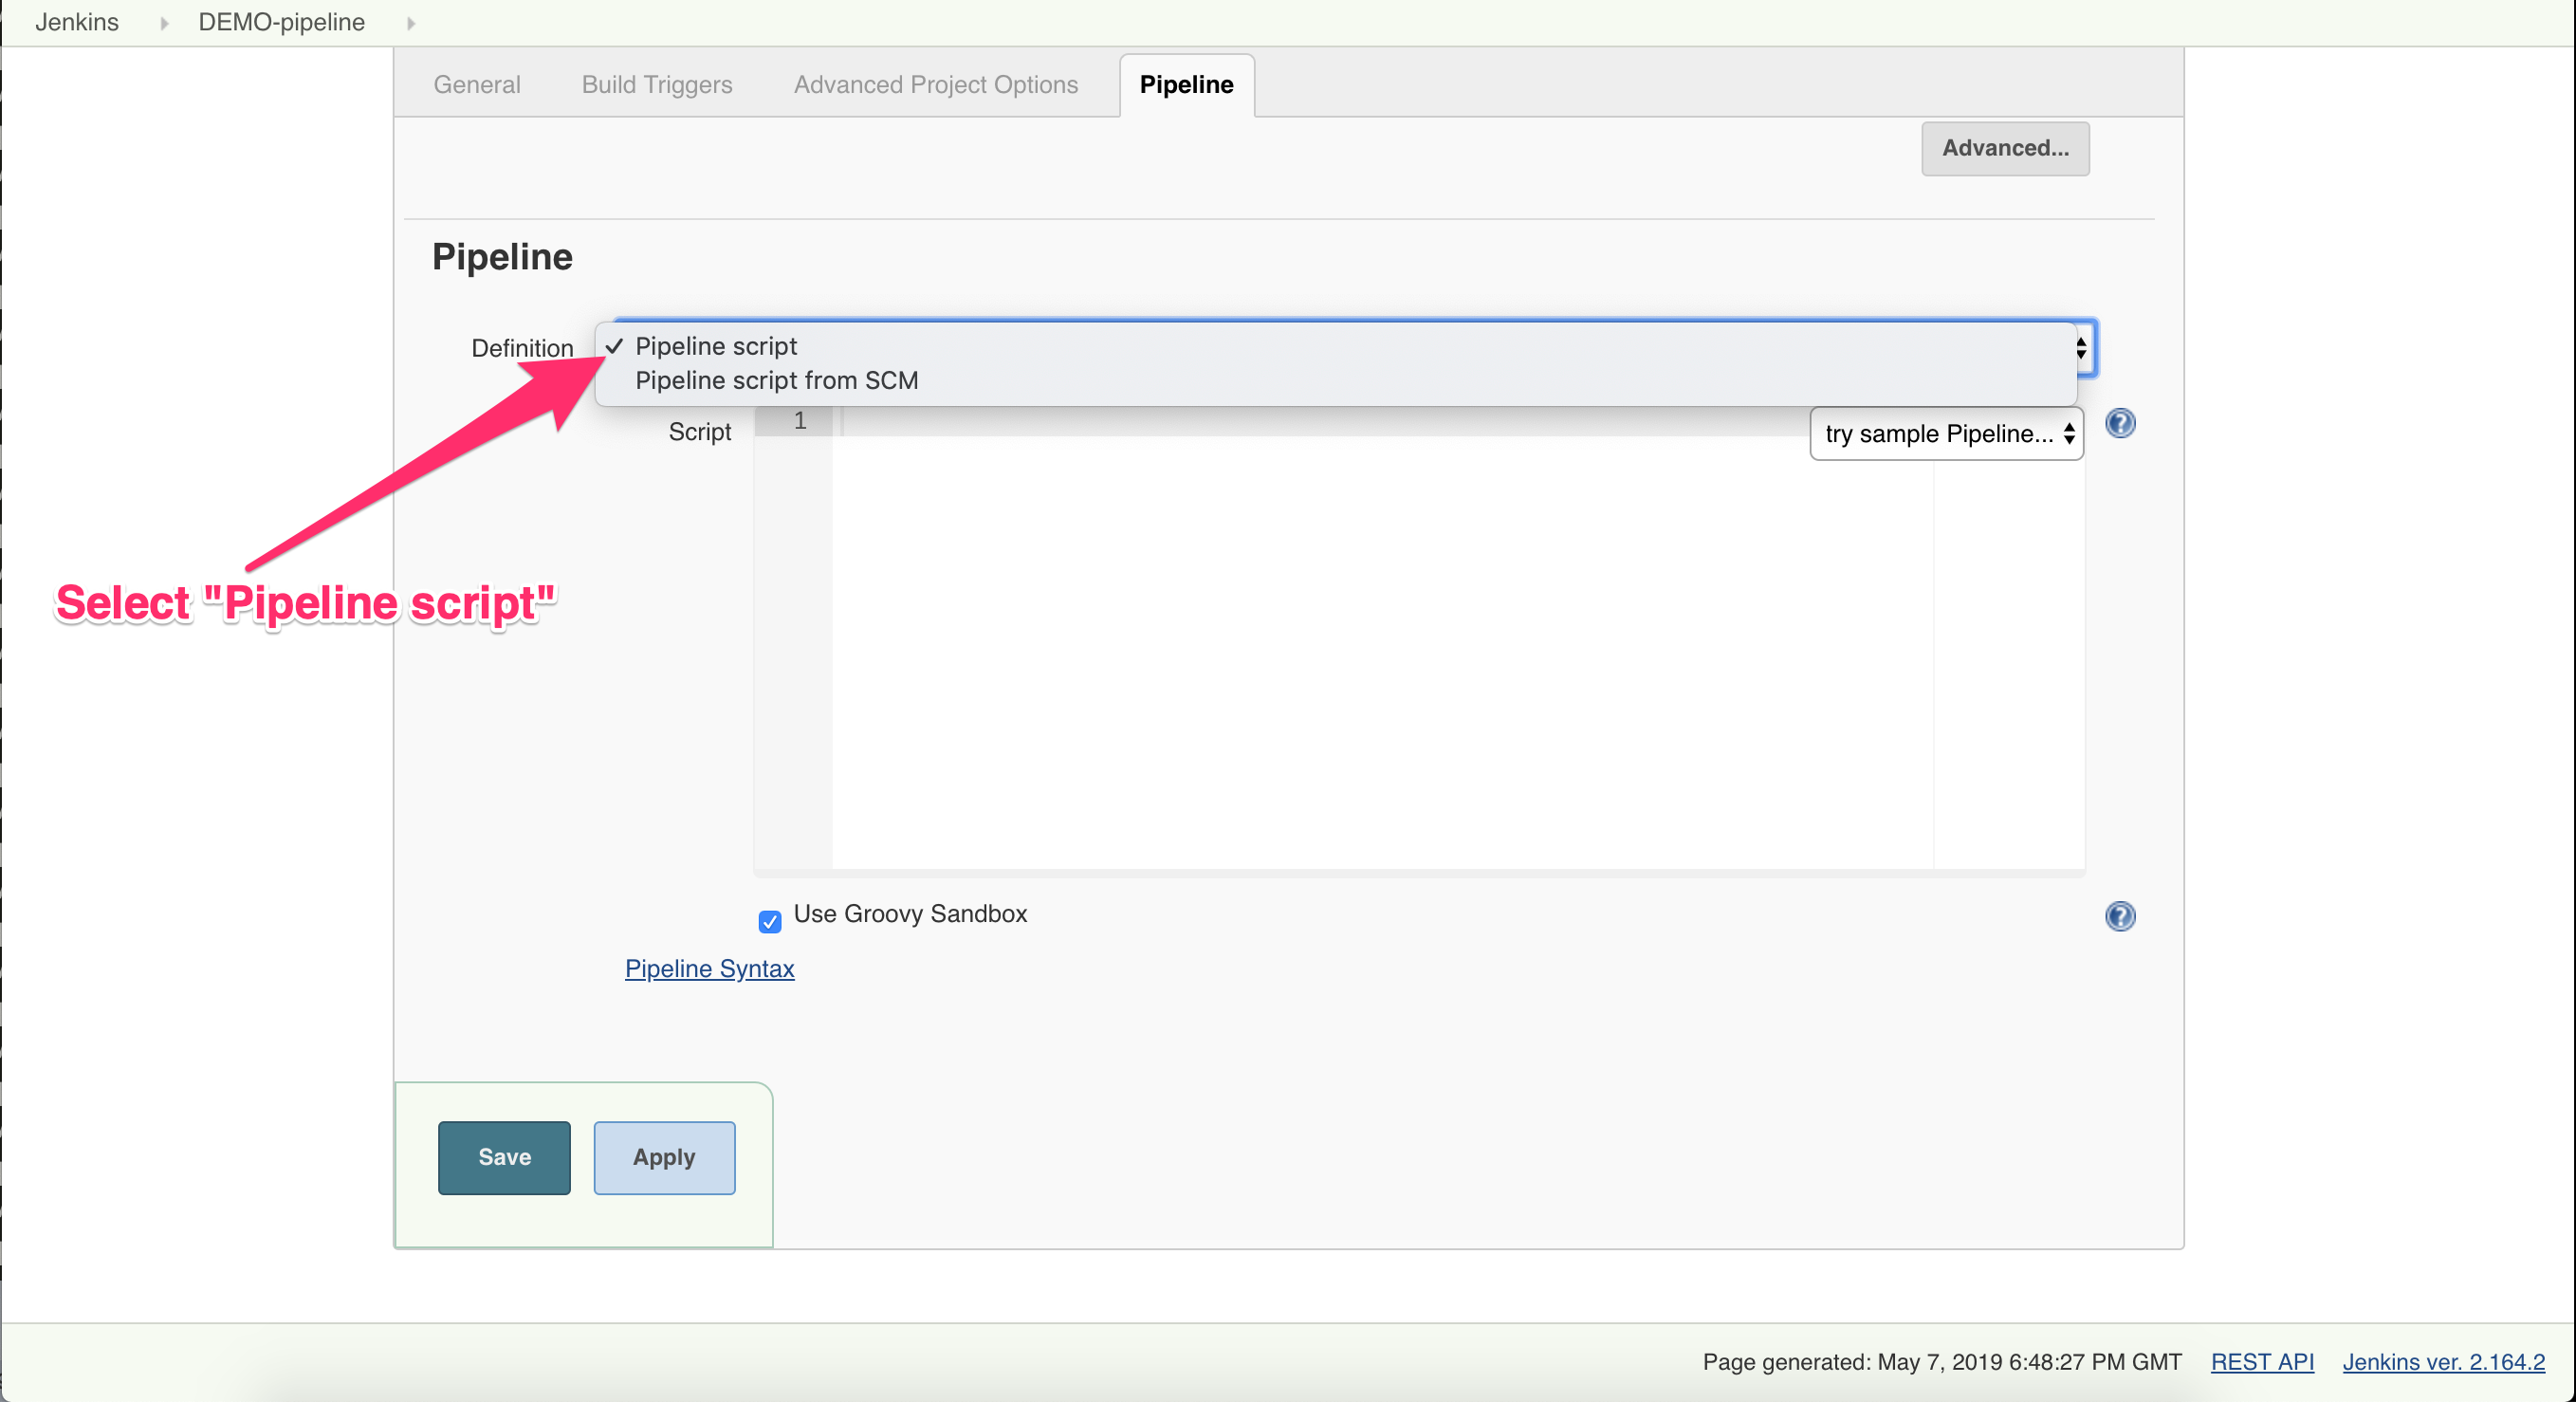
3. Scroll down to the Pipeline section at the bottom. Select “Pipeline script.” From the “Definition” drop-down list. Doing this will allow you to define and modify the Pipeline using the script input box.
“Hello, World!” with a Pipeline
Since you’ve set up a new Pipeline job, it’s time to write a basic Pipeline. I like to have 3 windows open when working with Pipeline code because I can change, run and view results without clicking:
1. The first window is the “Configure” window to modify the pipeline script. To open the “Configure” page, navigate to: <jenkins-url>/job/<job-name>/configure
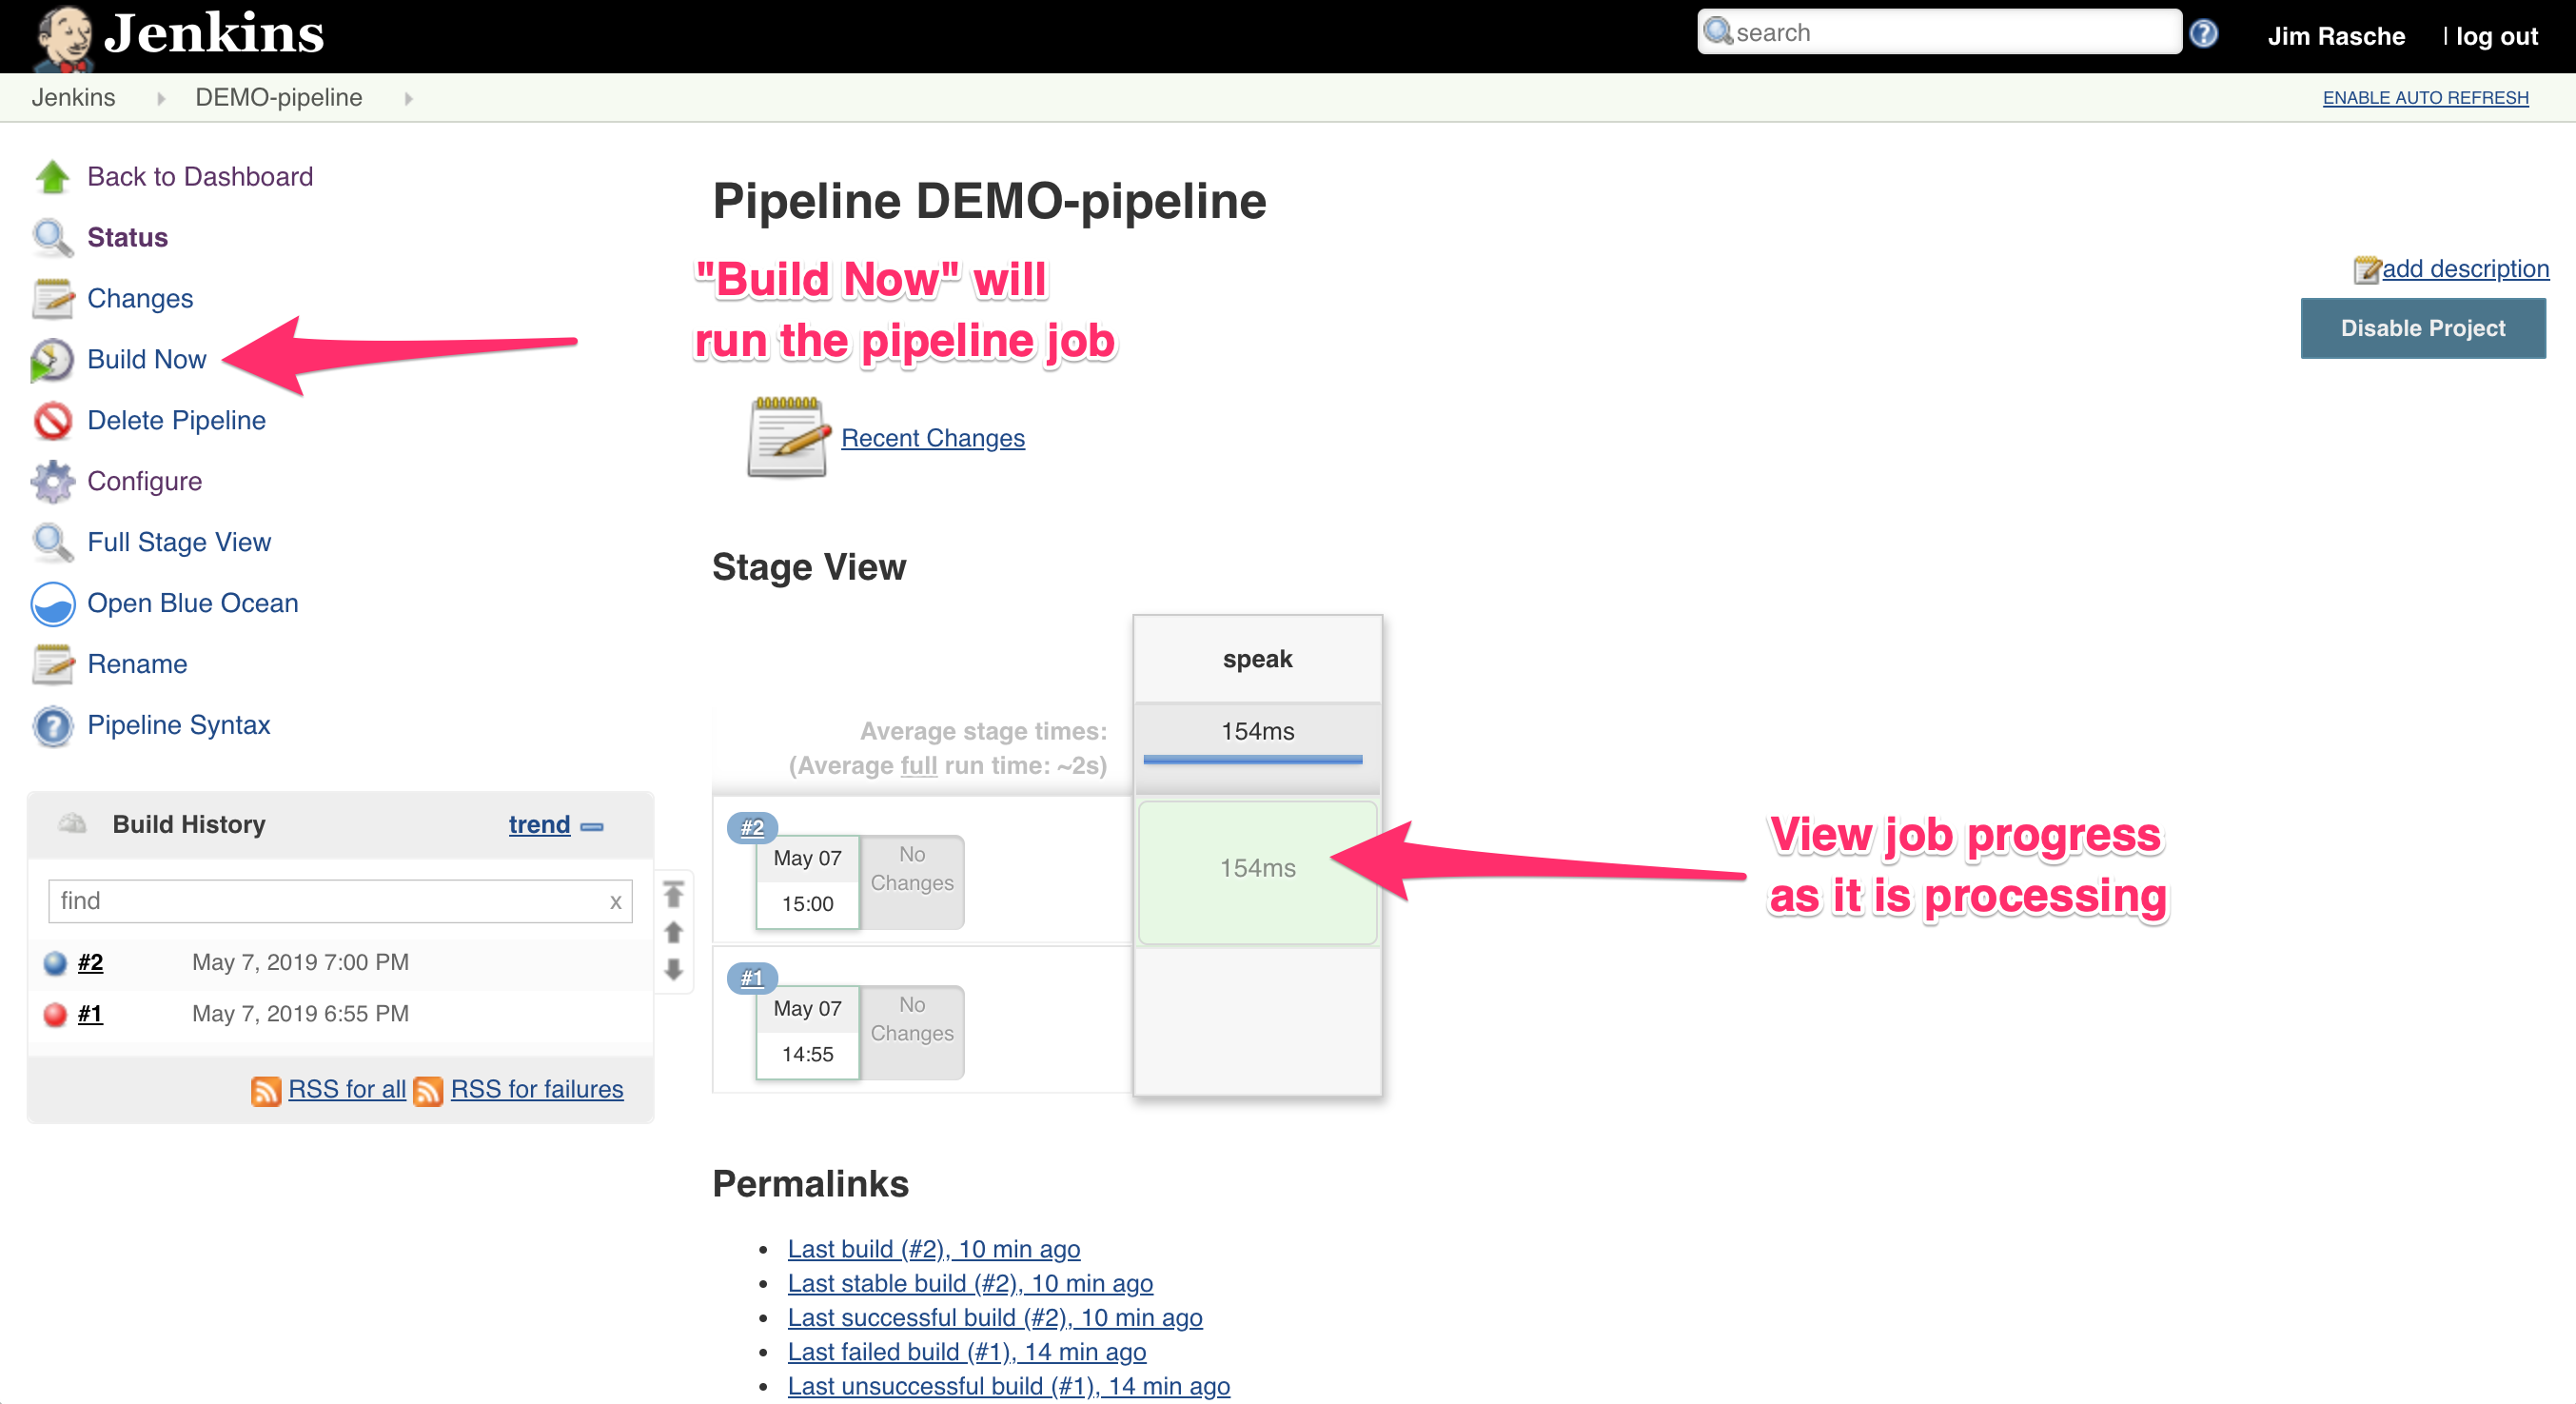
2. The second window is the “Build” window to kick off builds. To open the “Build” page, navigate to: <jenkins-url>/job/<job-name>/
3. The third window is the “Console” window which allows you to view the build output. To open the “Console” window, navigate to: <jenkins-url>/job/<job-name>/lastBuild/console
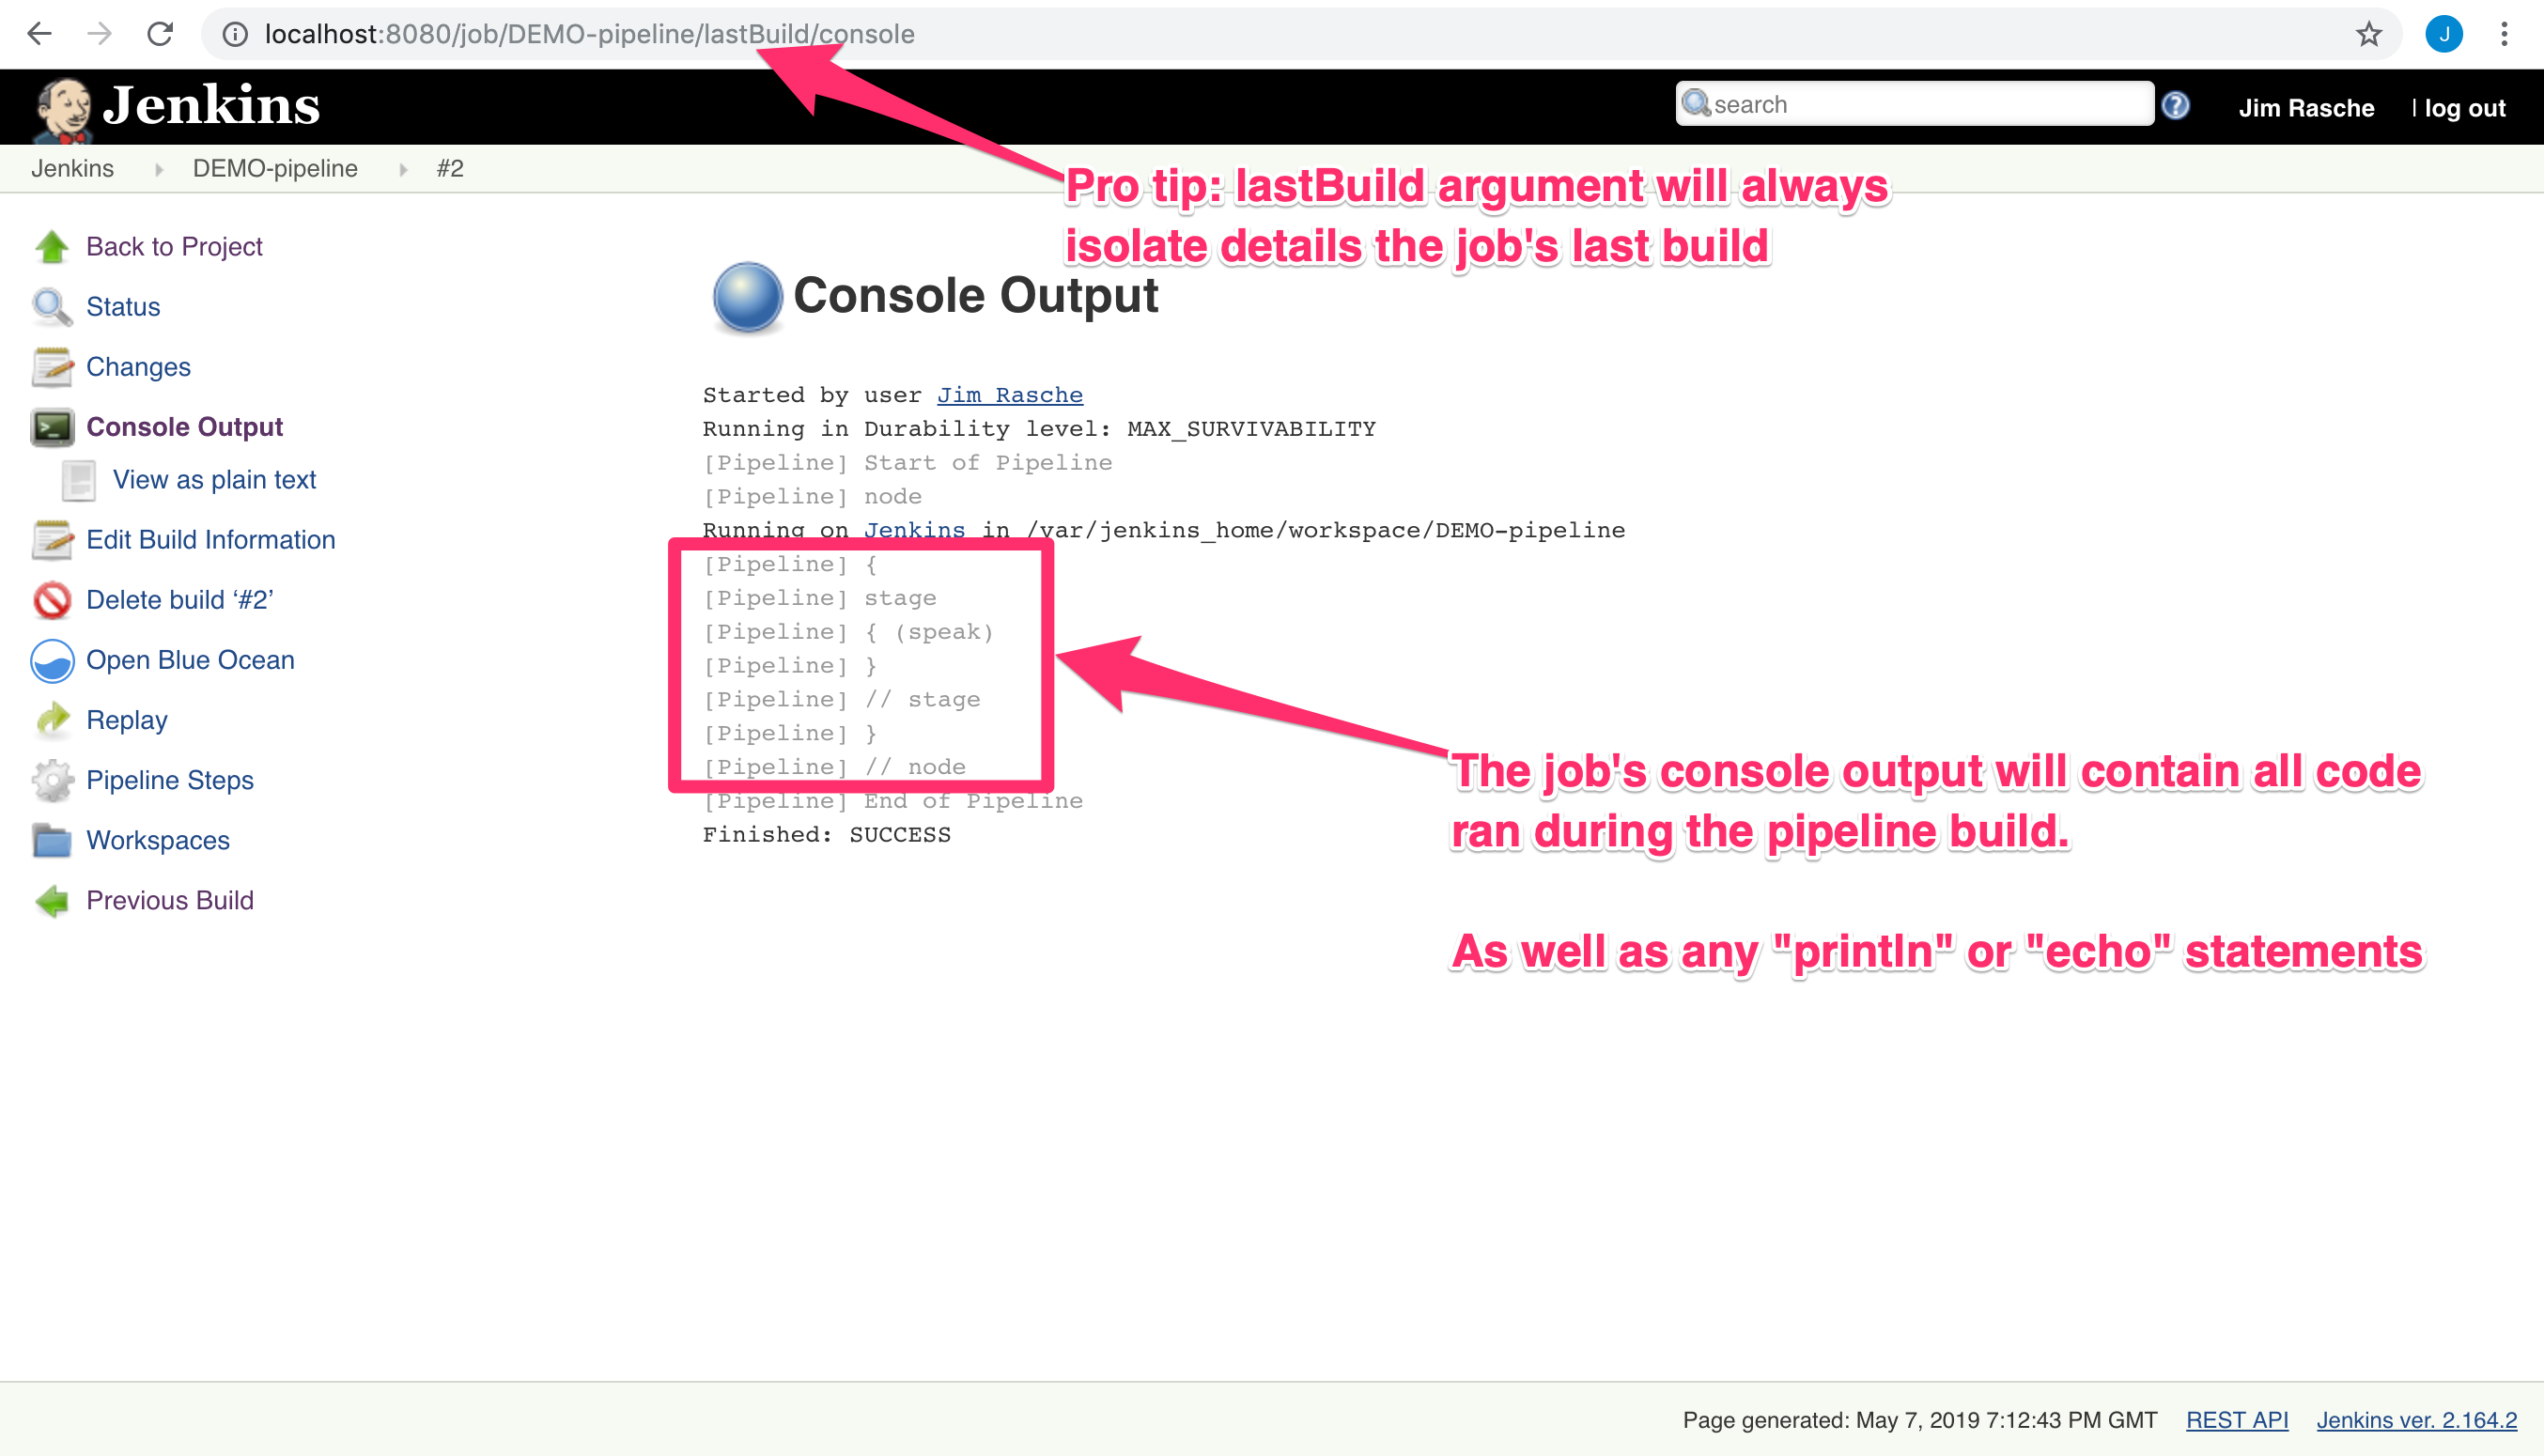
NOTE: Here’s a little Pro Tip for you. The lastBuild argument will always show details of the job’s last build. The Job’s console output will contain all code ran during the Pipeline build including any println or echo statements in your build script. This can be useful when trying to debug build issues.
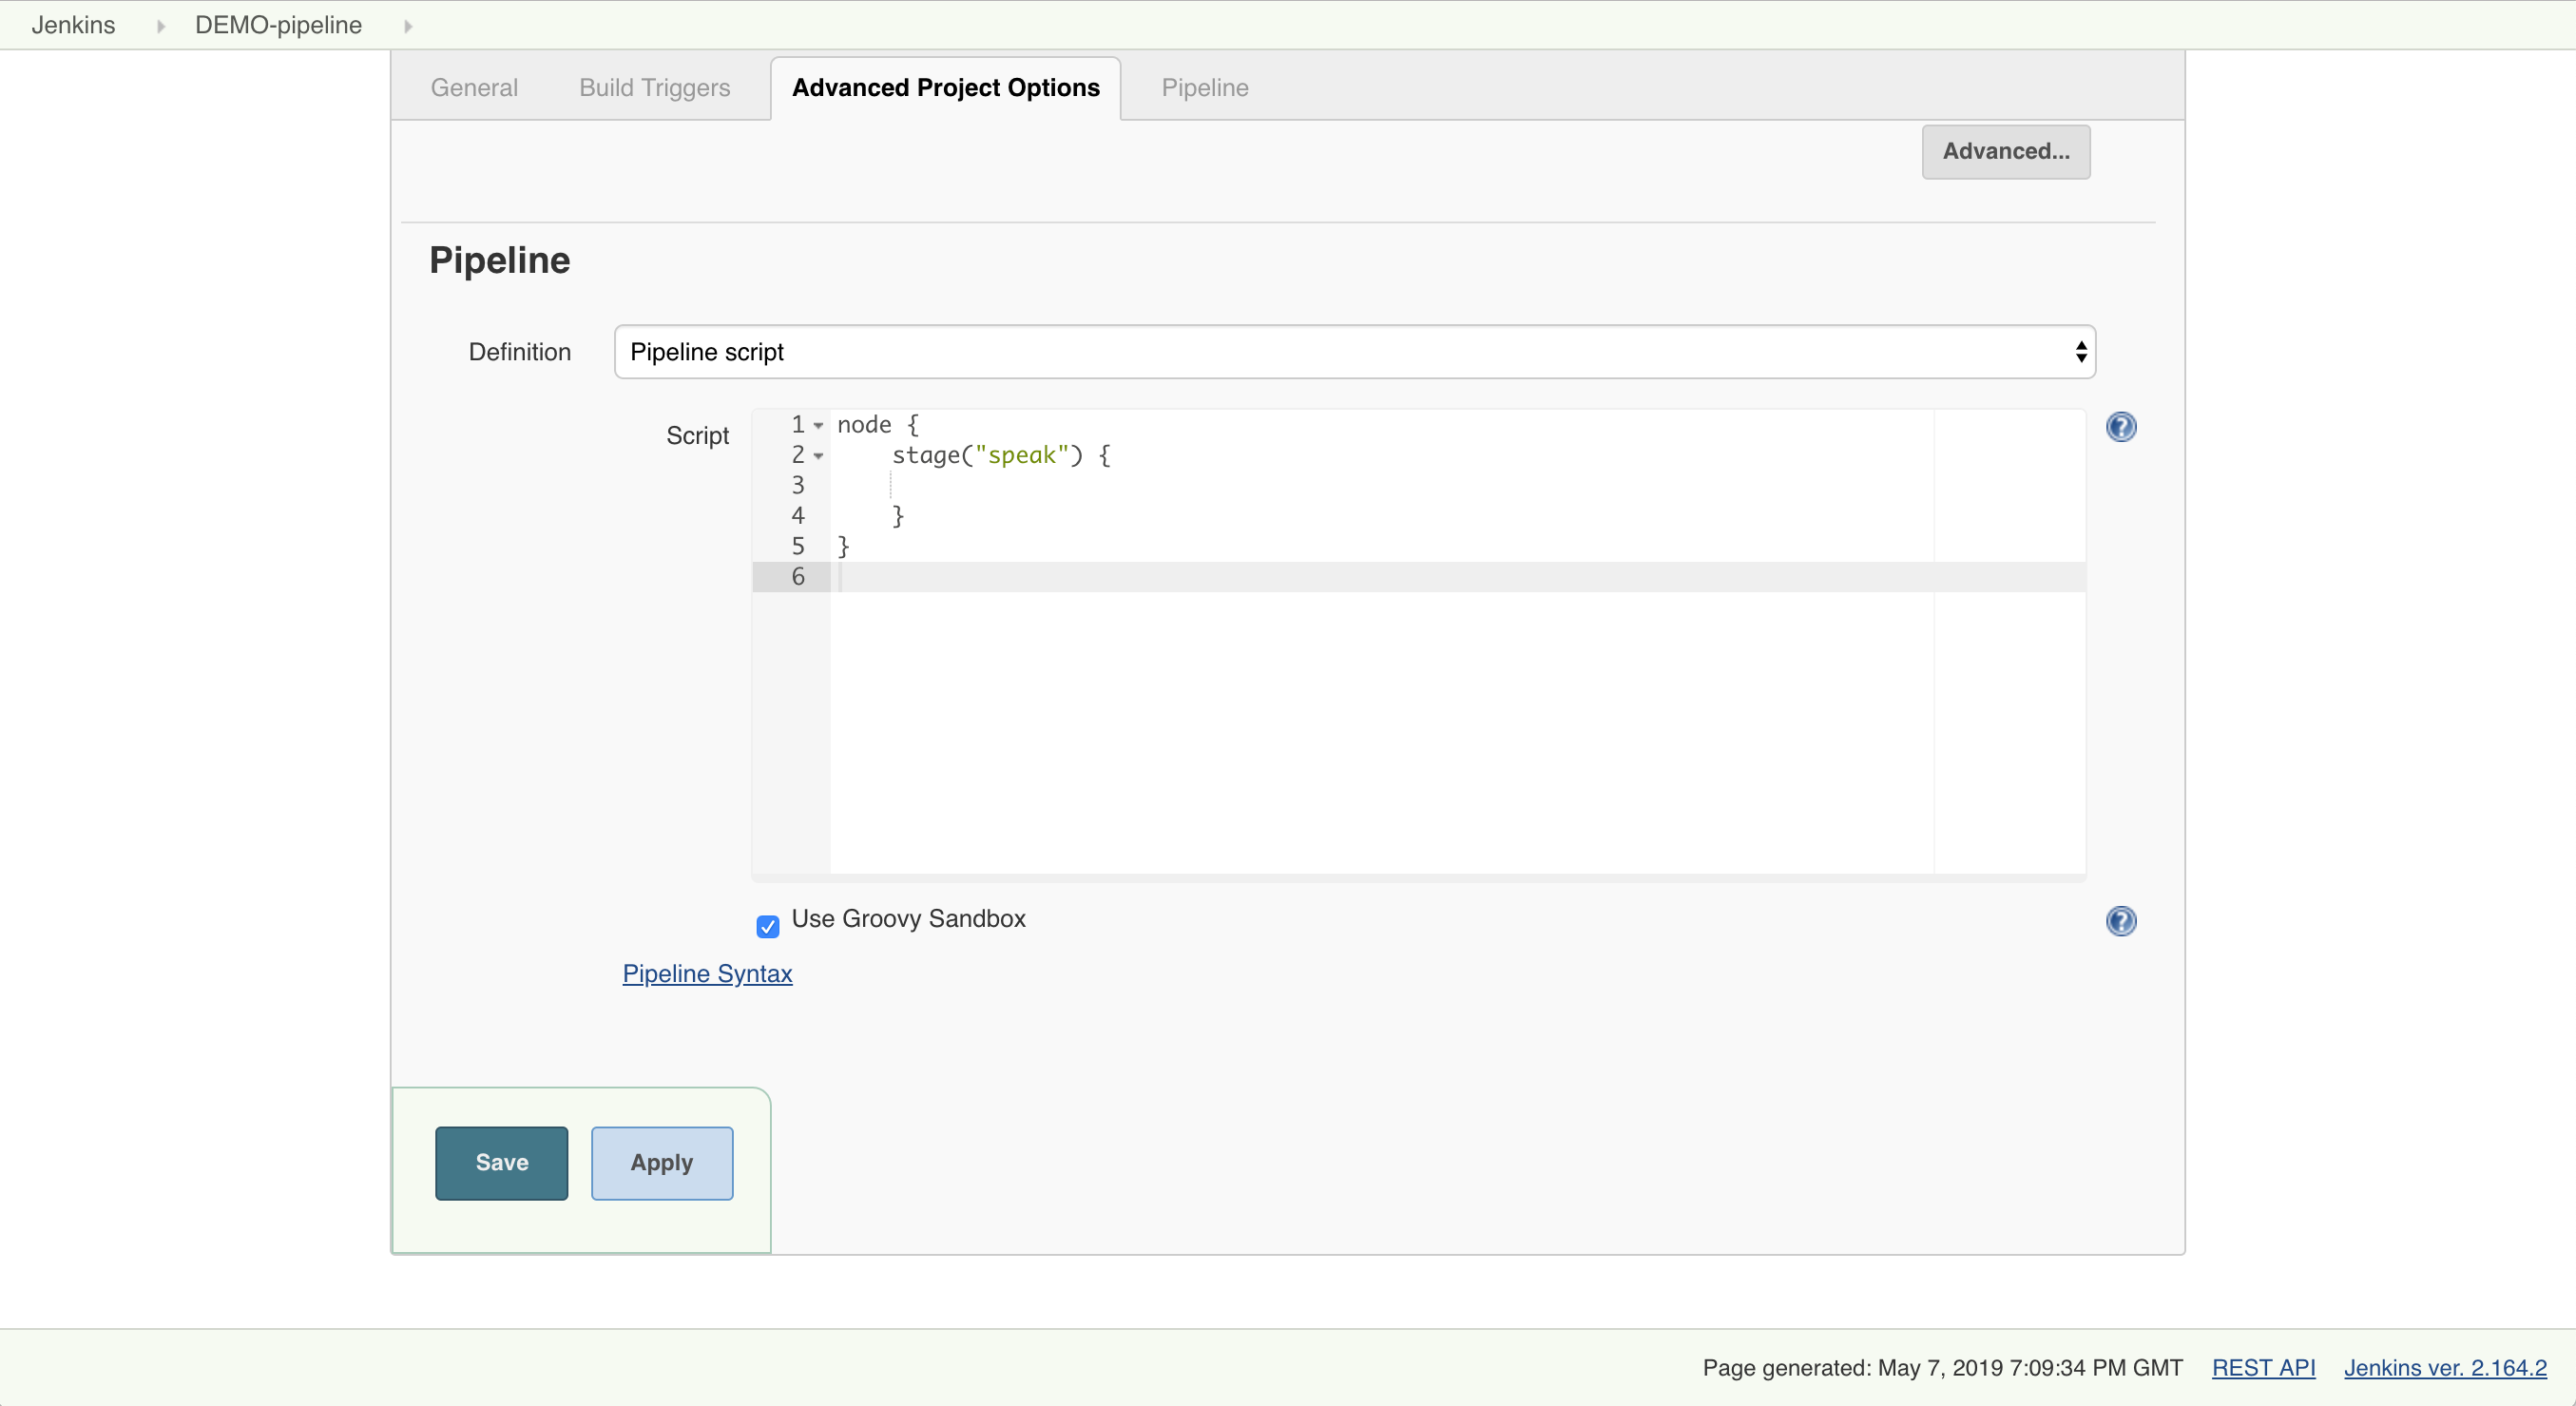
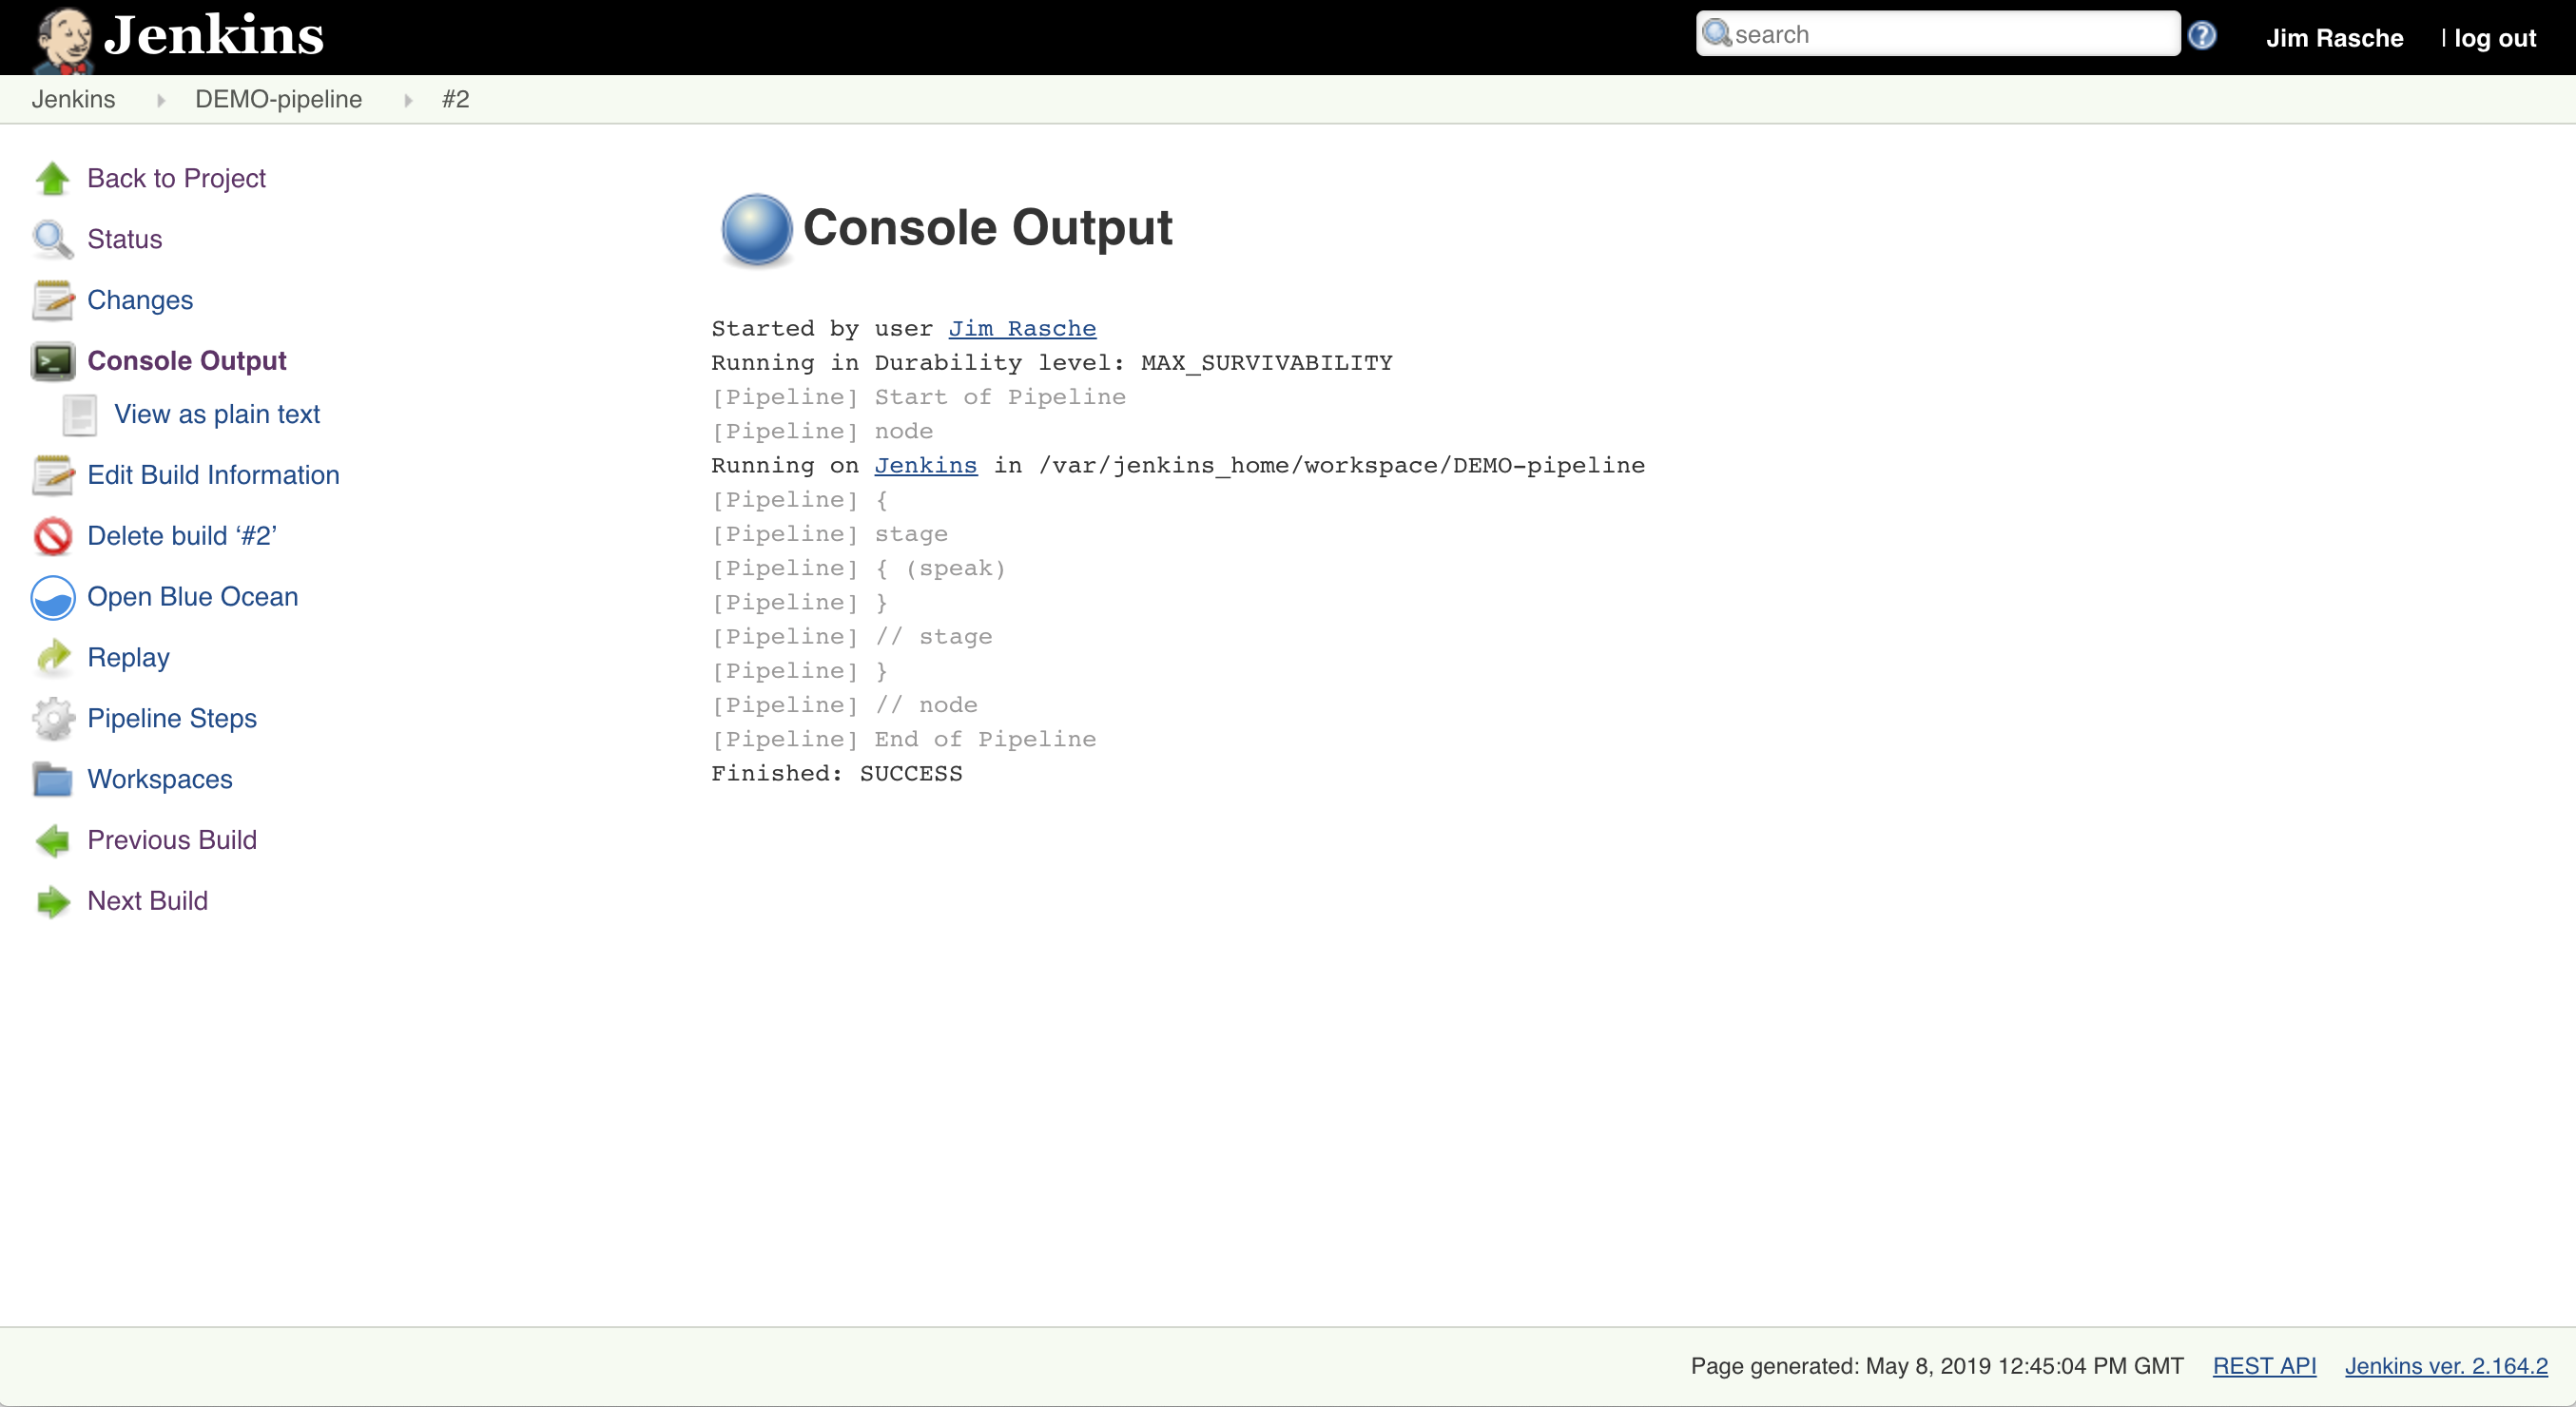
1. Let’s start with the skeleton of a scripted Pipeline. This is essentially saying run a job with a single executable chunk (stage) labeled “speak” on a Jenkins node. Read Pipeline fundamentals for more technical details.
a. On the “Configure” page for your job, under the “Pipeline” section, enter the following code in the “Script” text area.
b. Click “Apply” to apply changes.
c. Click “Build Now” on the side navigation of the “Build” window.
d. Refresh your “Console” window to see the following output.
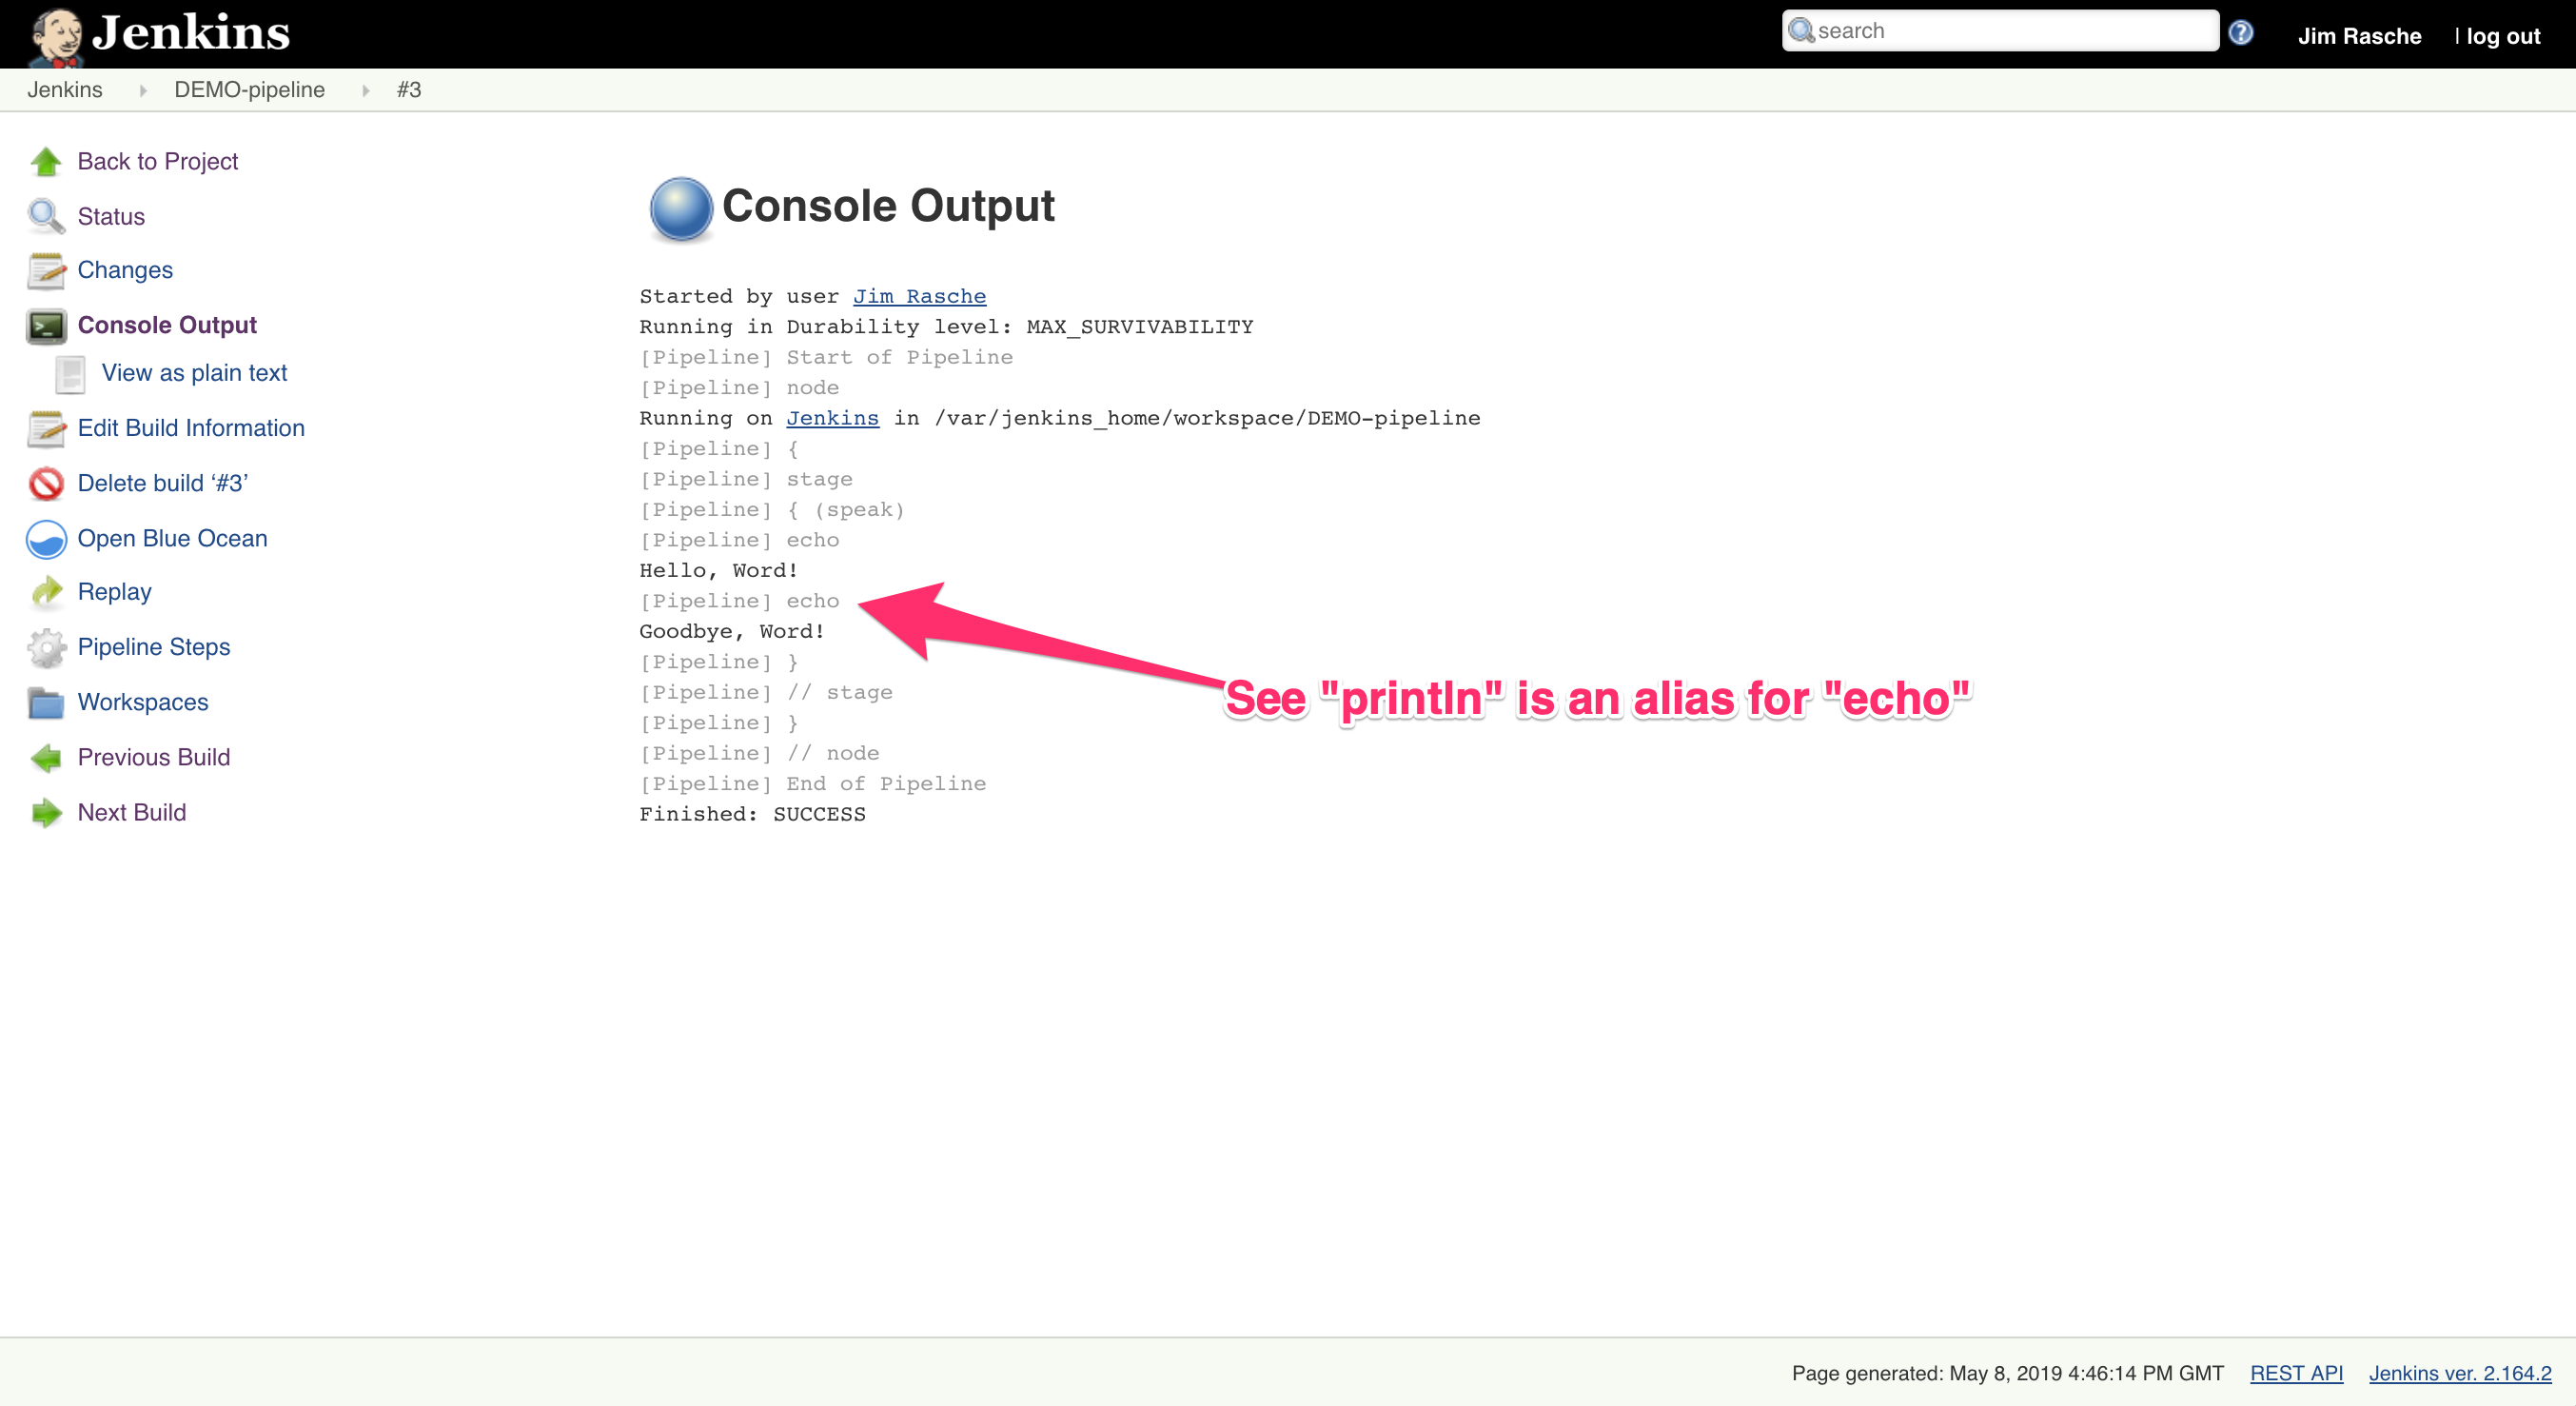
2. Now we are going to write a couple lines to console.
a. On the “Configure” page for your job, under the “Pipeline” section, enter the following code in the “Script” text area.
b. Click “Build Now” on the side navigation of the “Build” window.
c. Refresh your “Console” window to see the following output.
Working with a Plugin
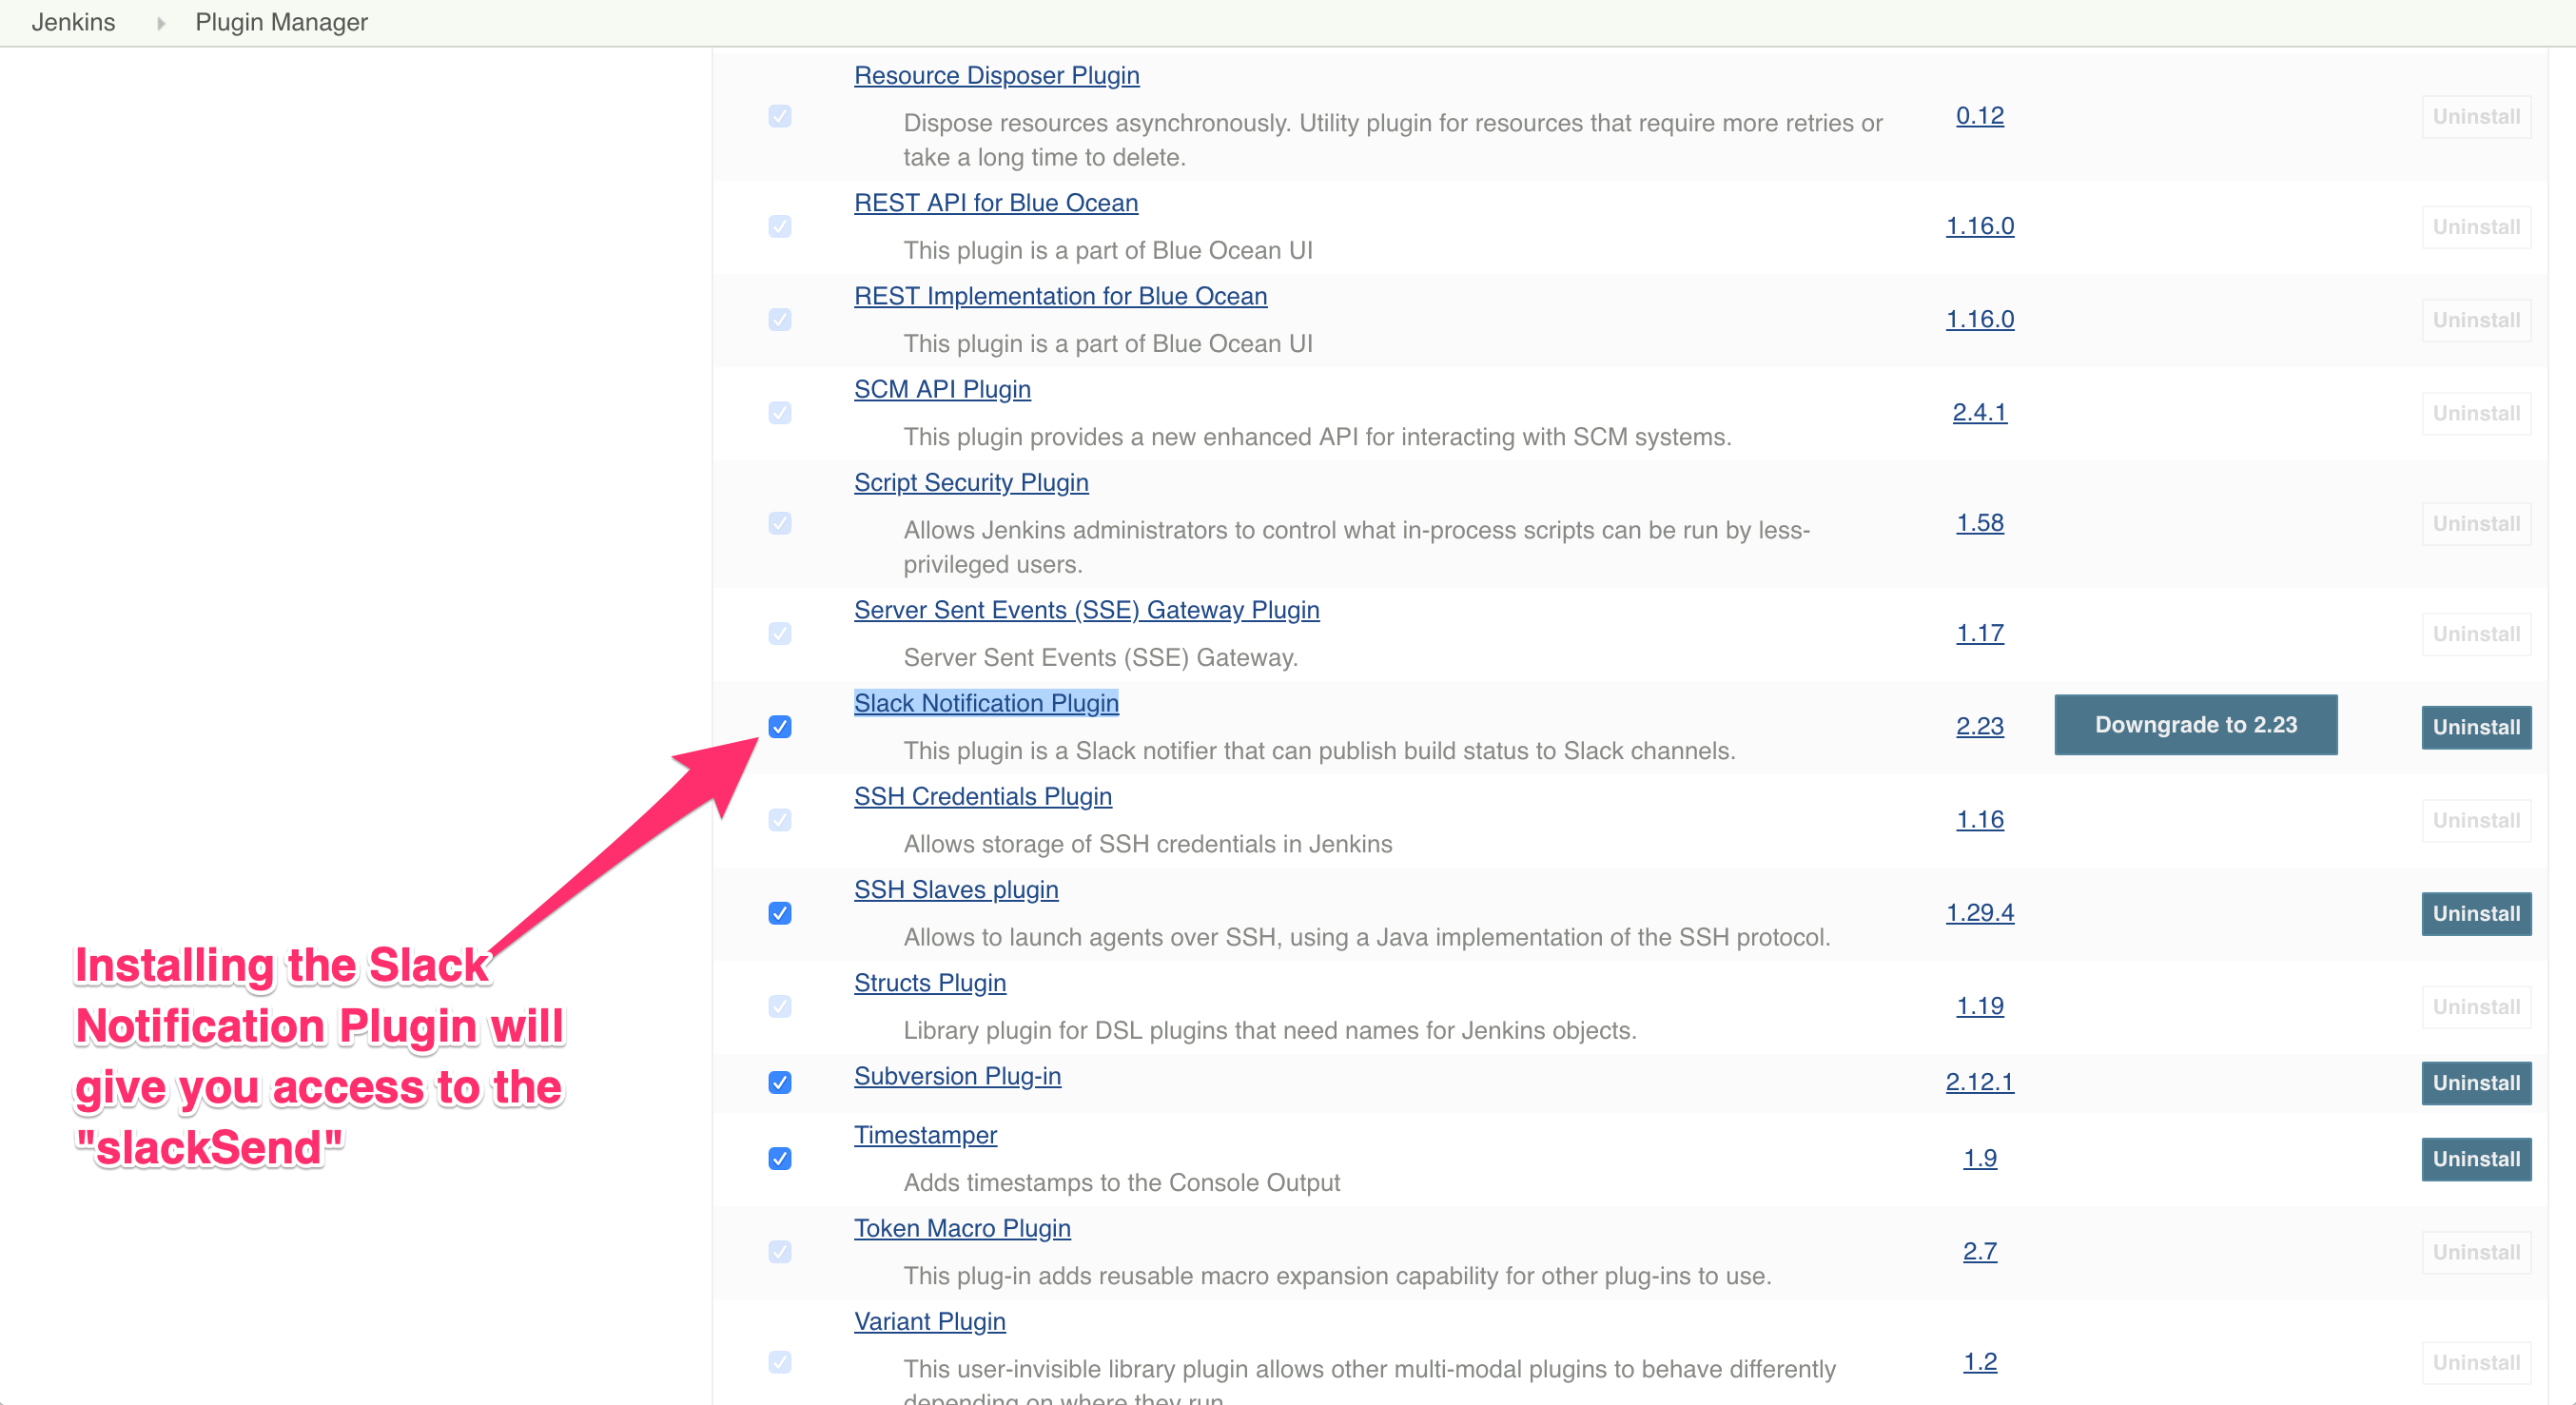
1. To utilize the Slack plugin, first make sure it is installed.
2. Jenkins offers a GUI tool to easily form Pipeline steps from installed plugins at <jenkins-url>/pipeline-syntax. This is a good place to start when using a new Pipeline plugin step. As an example, we are going to generate a pipeline step that sends a slack message.
a. Select “slackSend: Send Slack Message” from the “Sample Step” dropdown.
b. You can enter whatever you want for the “Message” and “Color” fields.
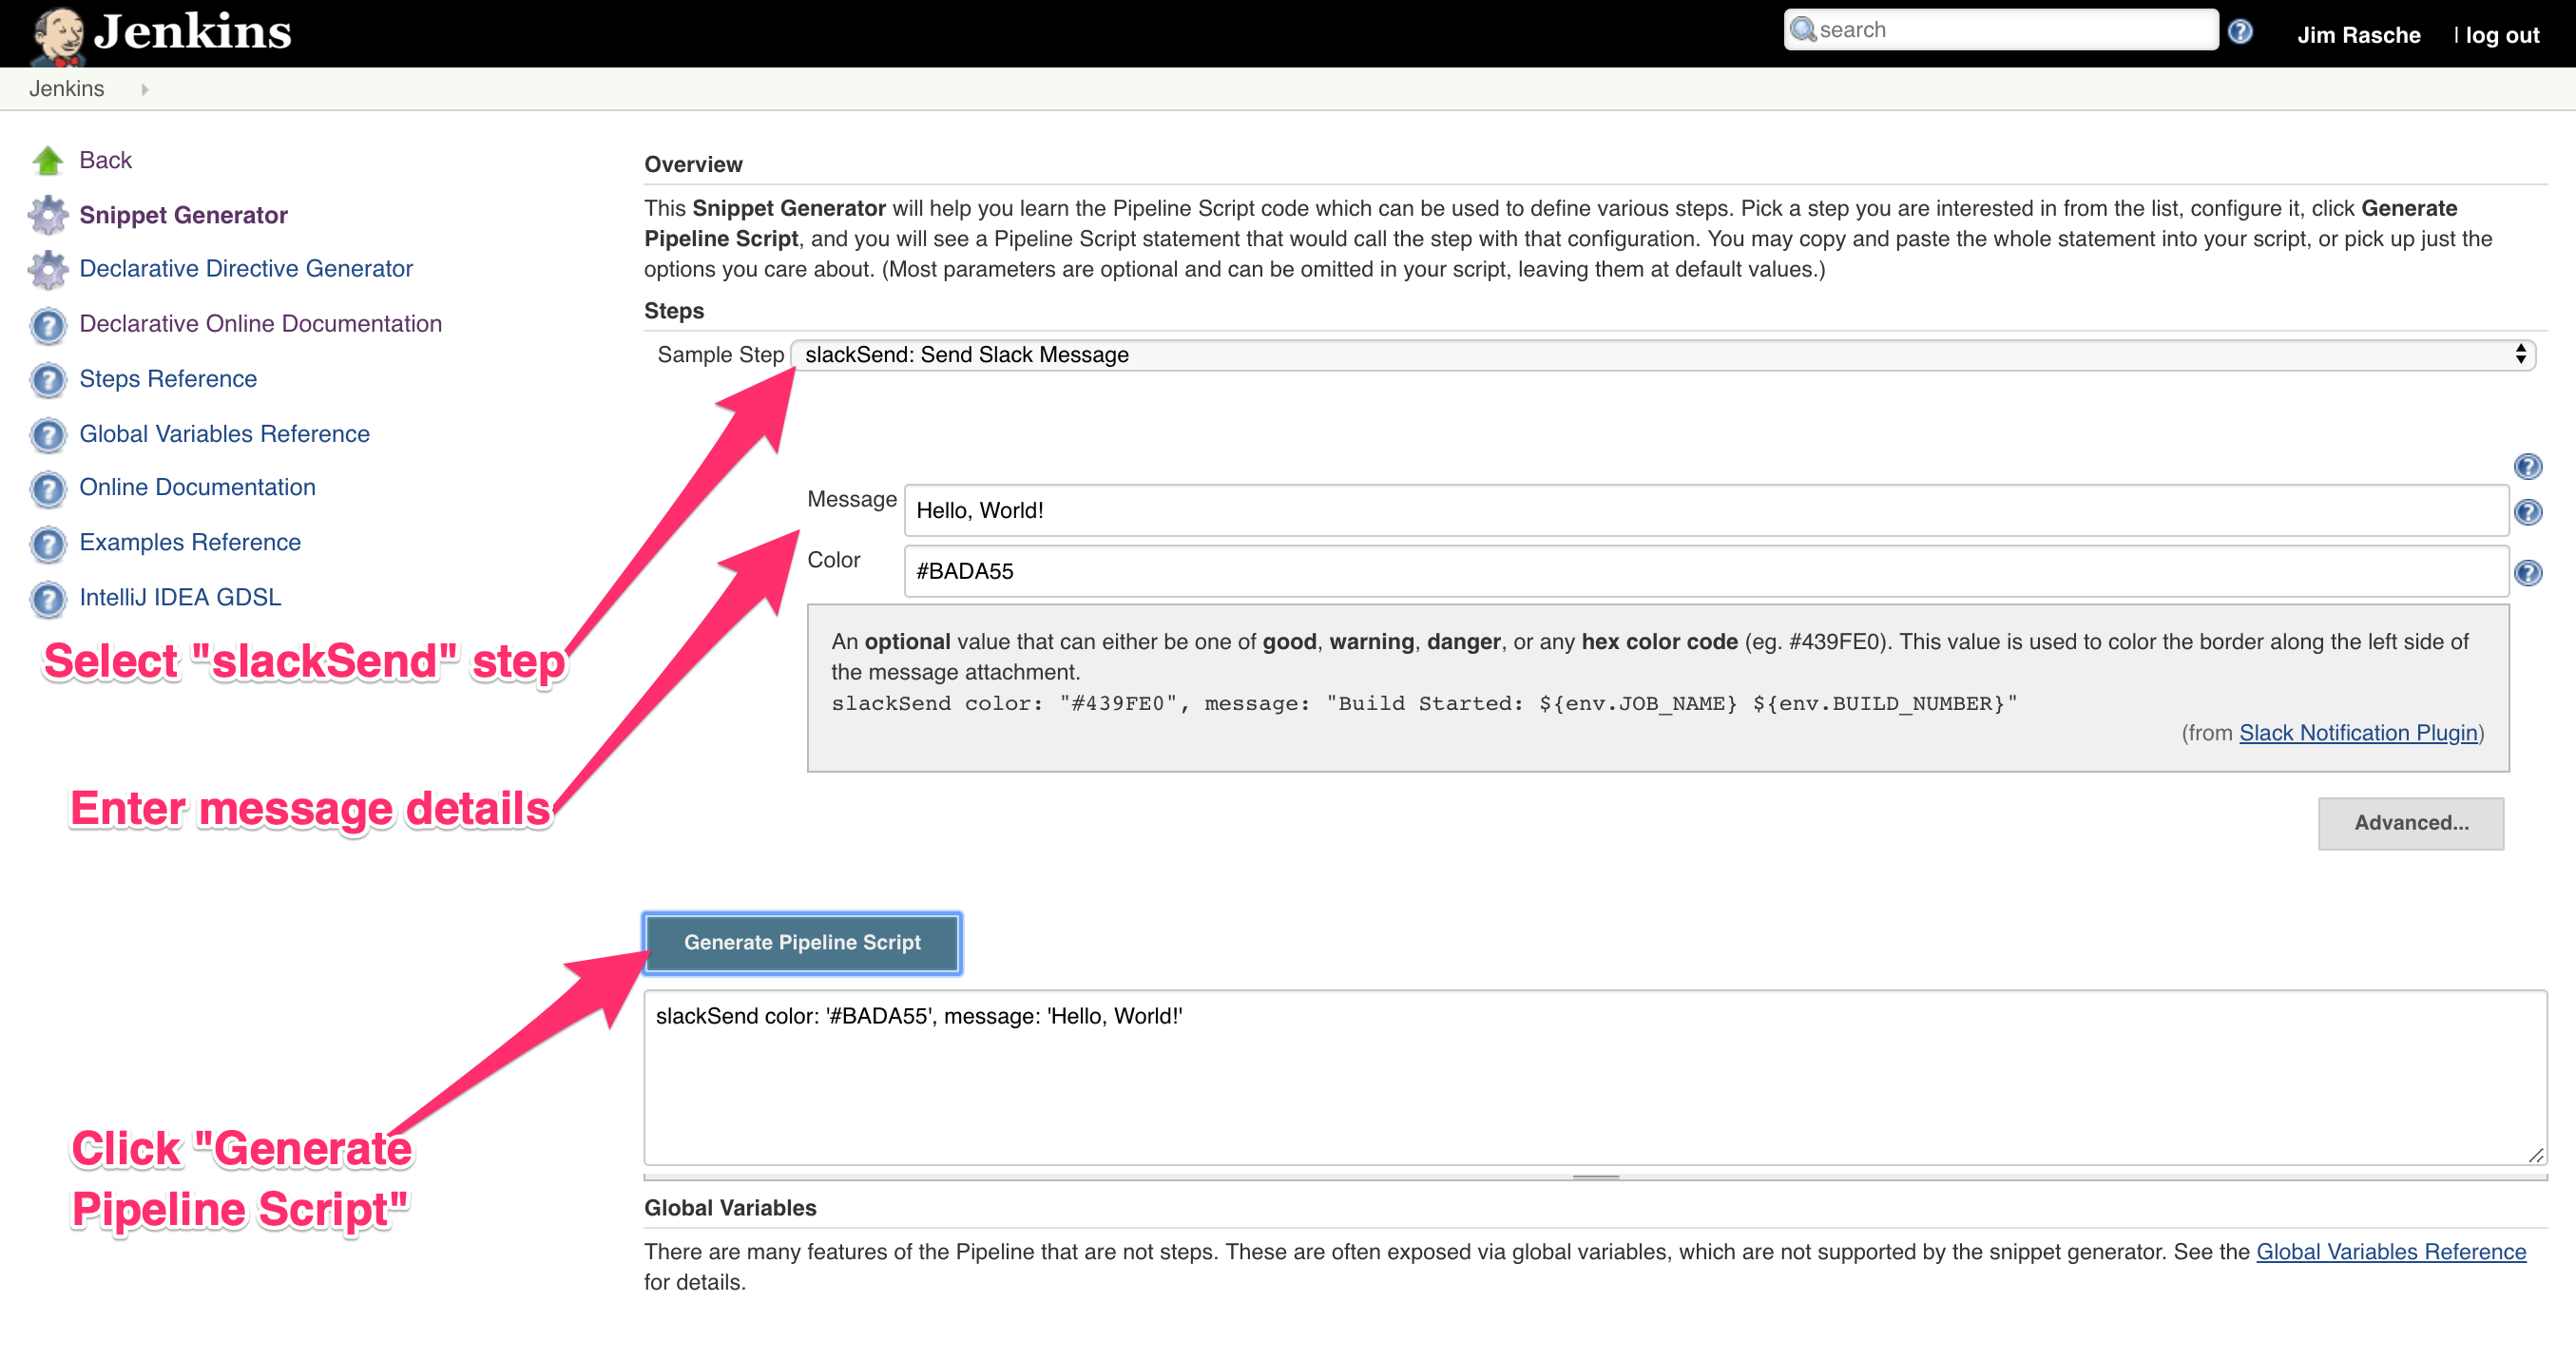
3. Click the “Generate Pipeline Script” button.
4. Copy the output into the stage(“speak”){ node of your pipeline script. When finished, your Pipeline script should look similar to the snippet below.
5. Save your changes then click “Build Now” and take a look at the console output.

It looks like the build technically succeeded but the slackSend step produced an error:
Based on the error message, it looks like we encountered an authorization issue. Reading through the plugin code confirms we need to either setup a credential in Jenkins and give the slack plugin that, or we need to pass in a token as a string to give Jenkins permission to use Slack.
Creating a Slack Token
In order to send slack messages through Jenkins we need to provide some way for our job to authorize itself with Slack. Luckily for us, Slack has a prebuilt Jenkins integration that makes things pretty easy.
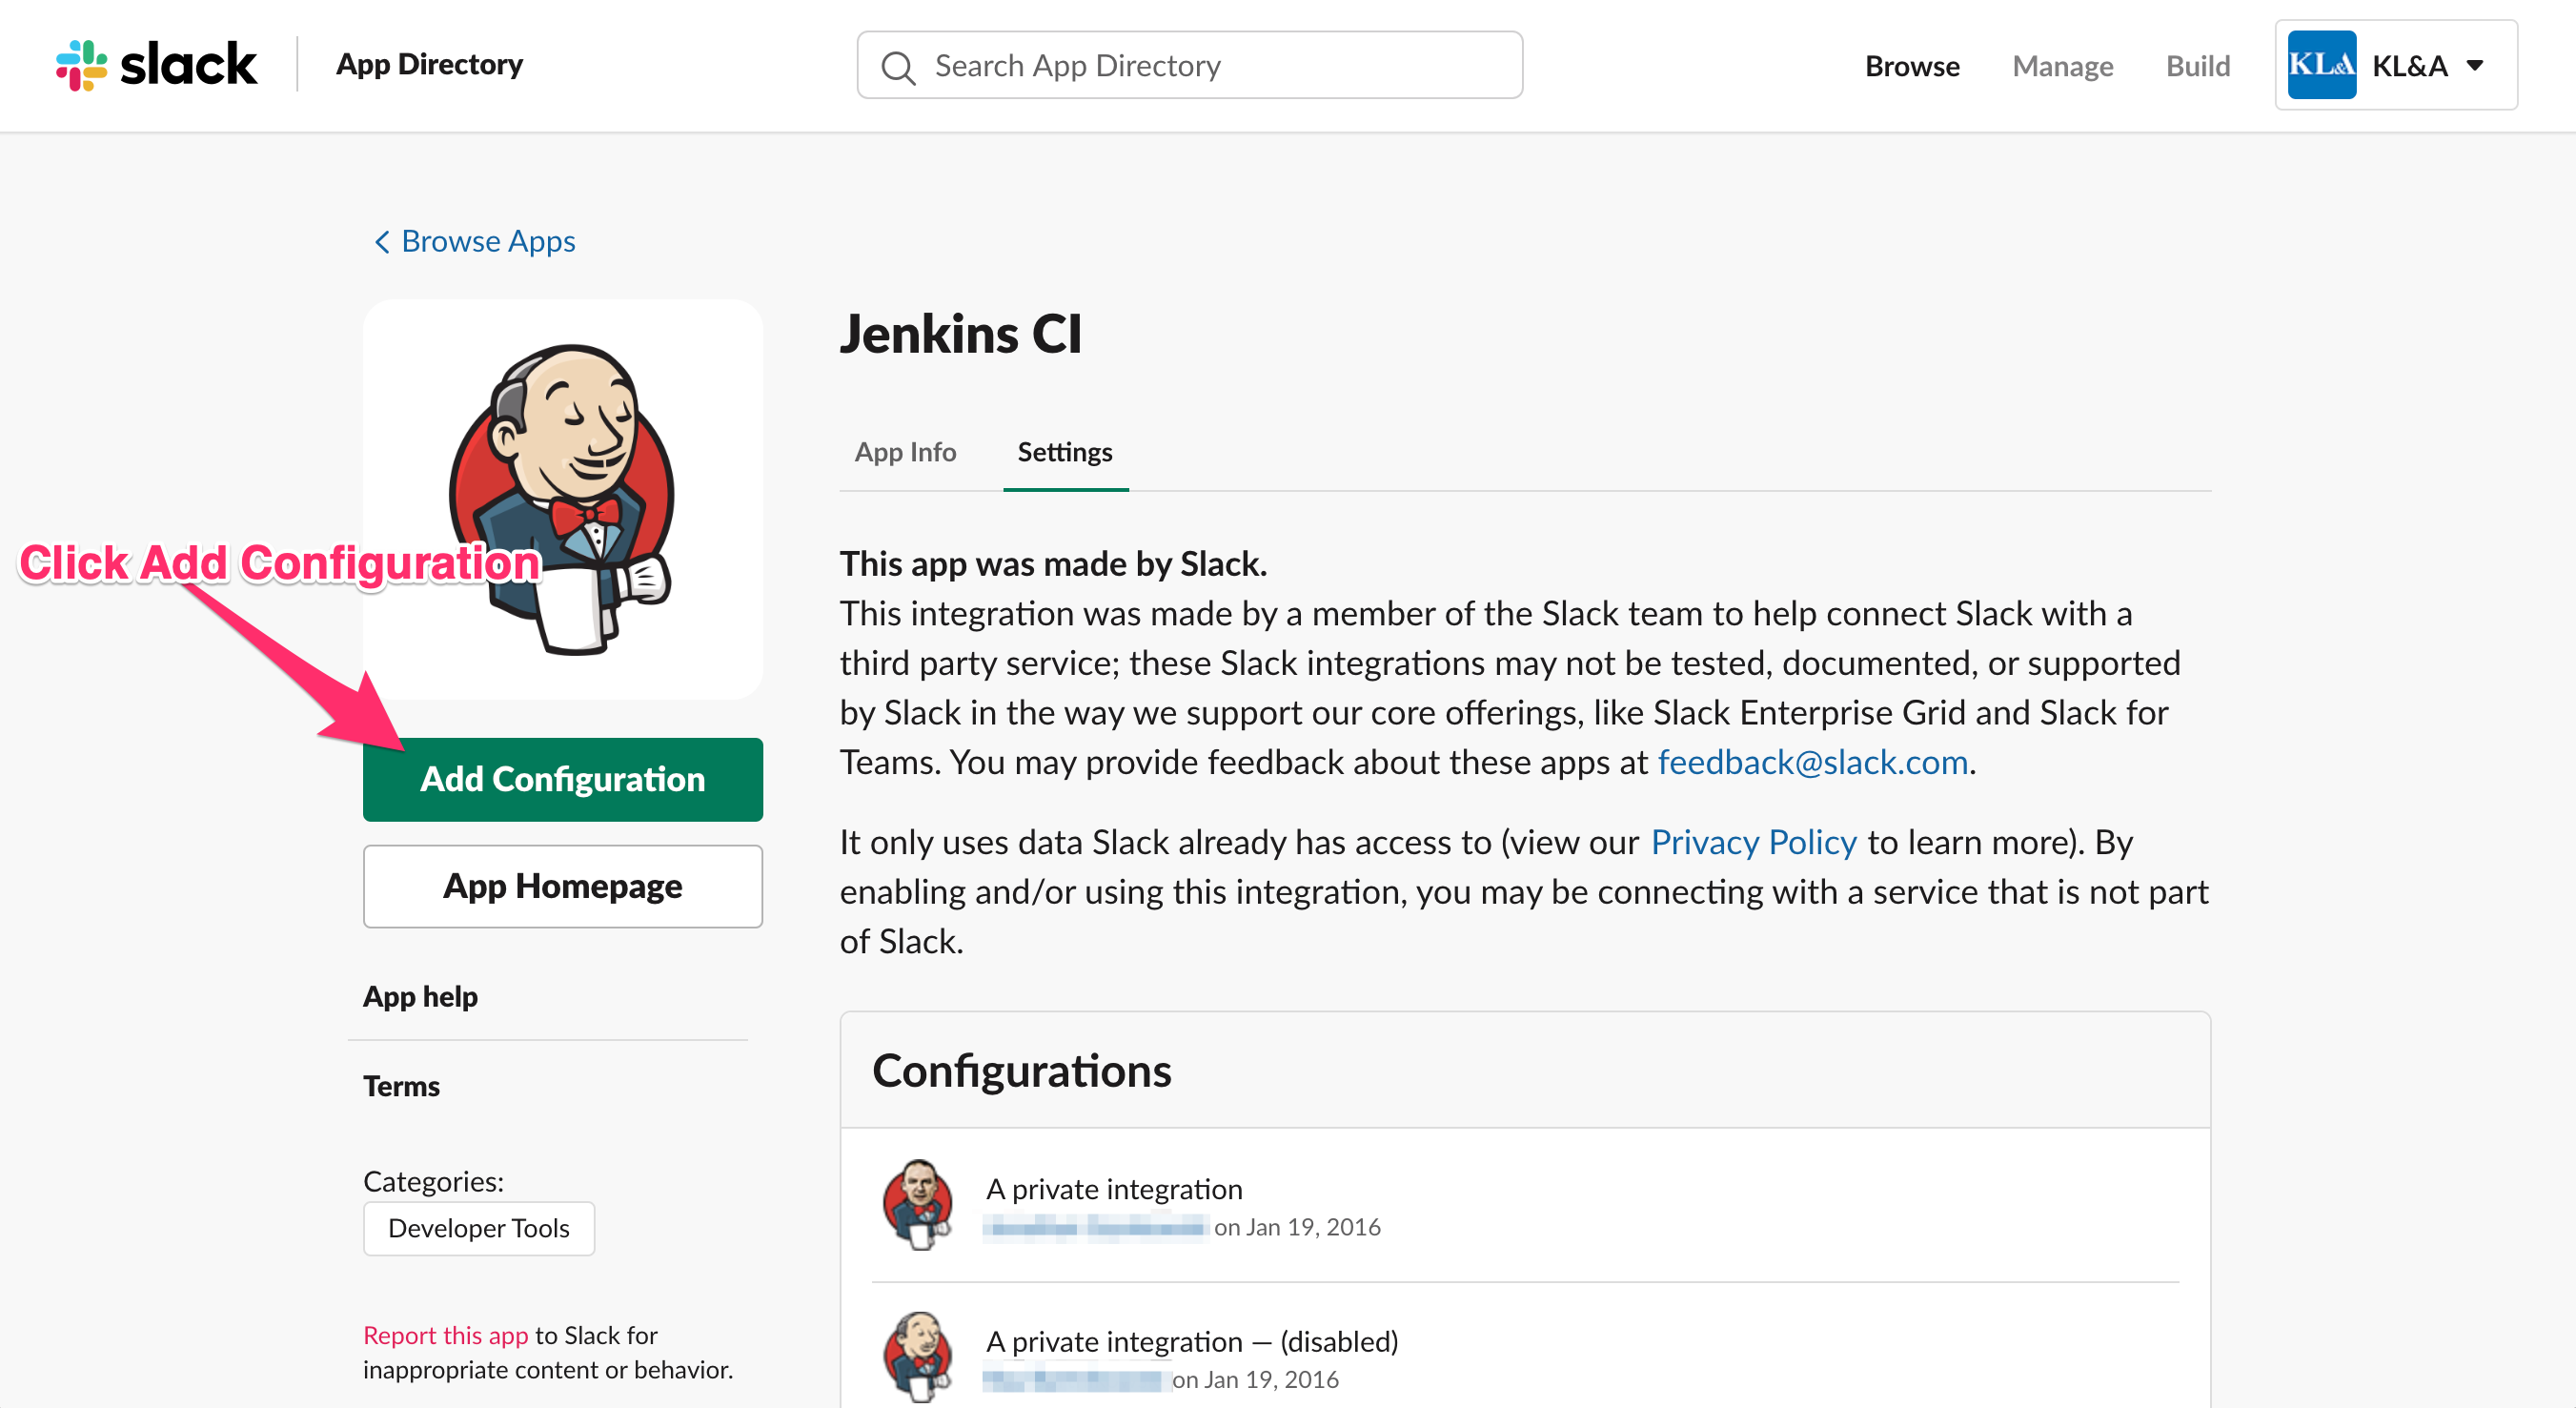
1. Navigate to Slack’s Jenkins CI App Page.
2. Click Add Configuration.
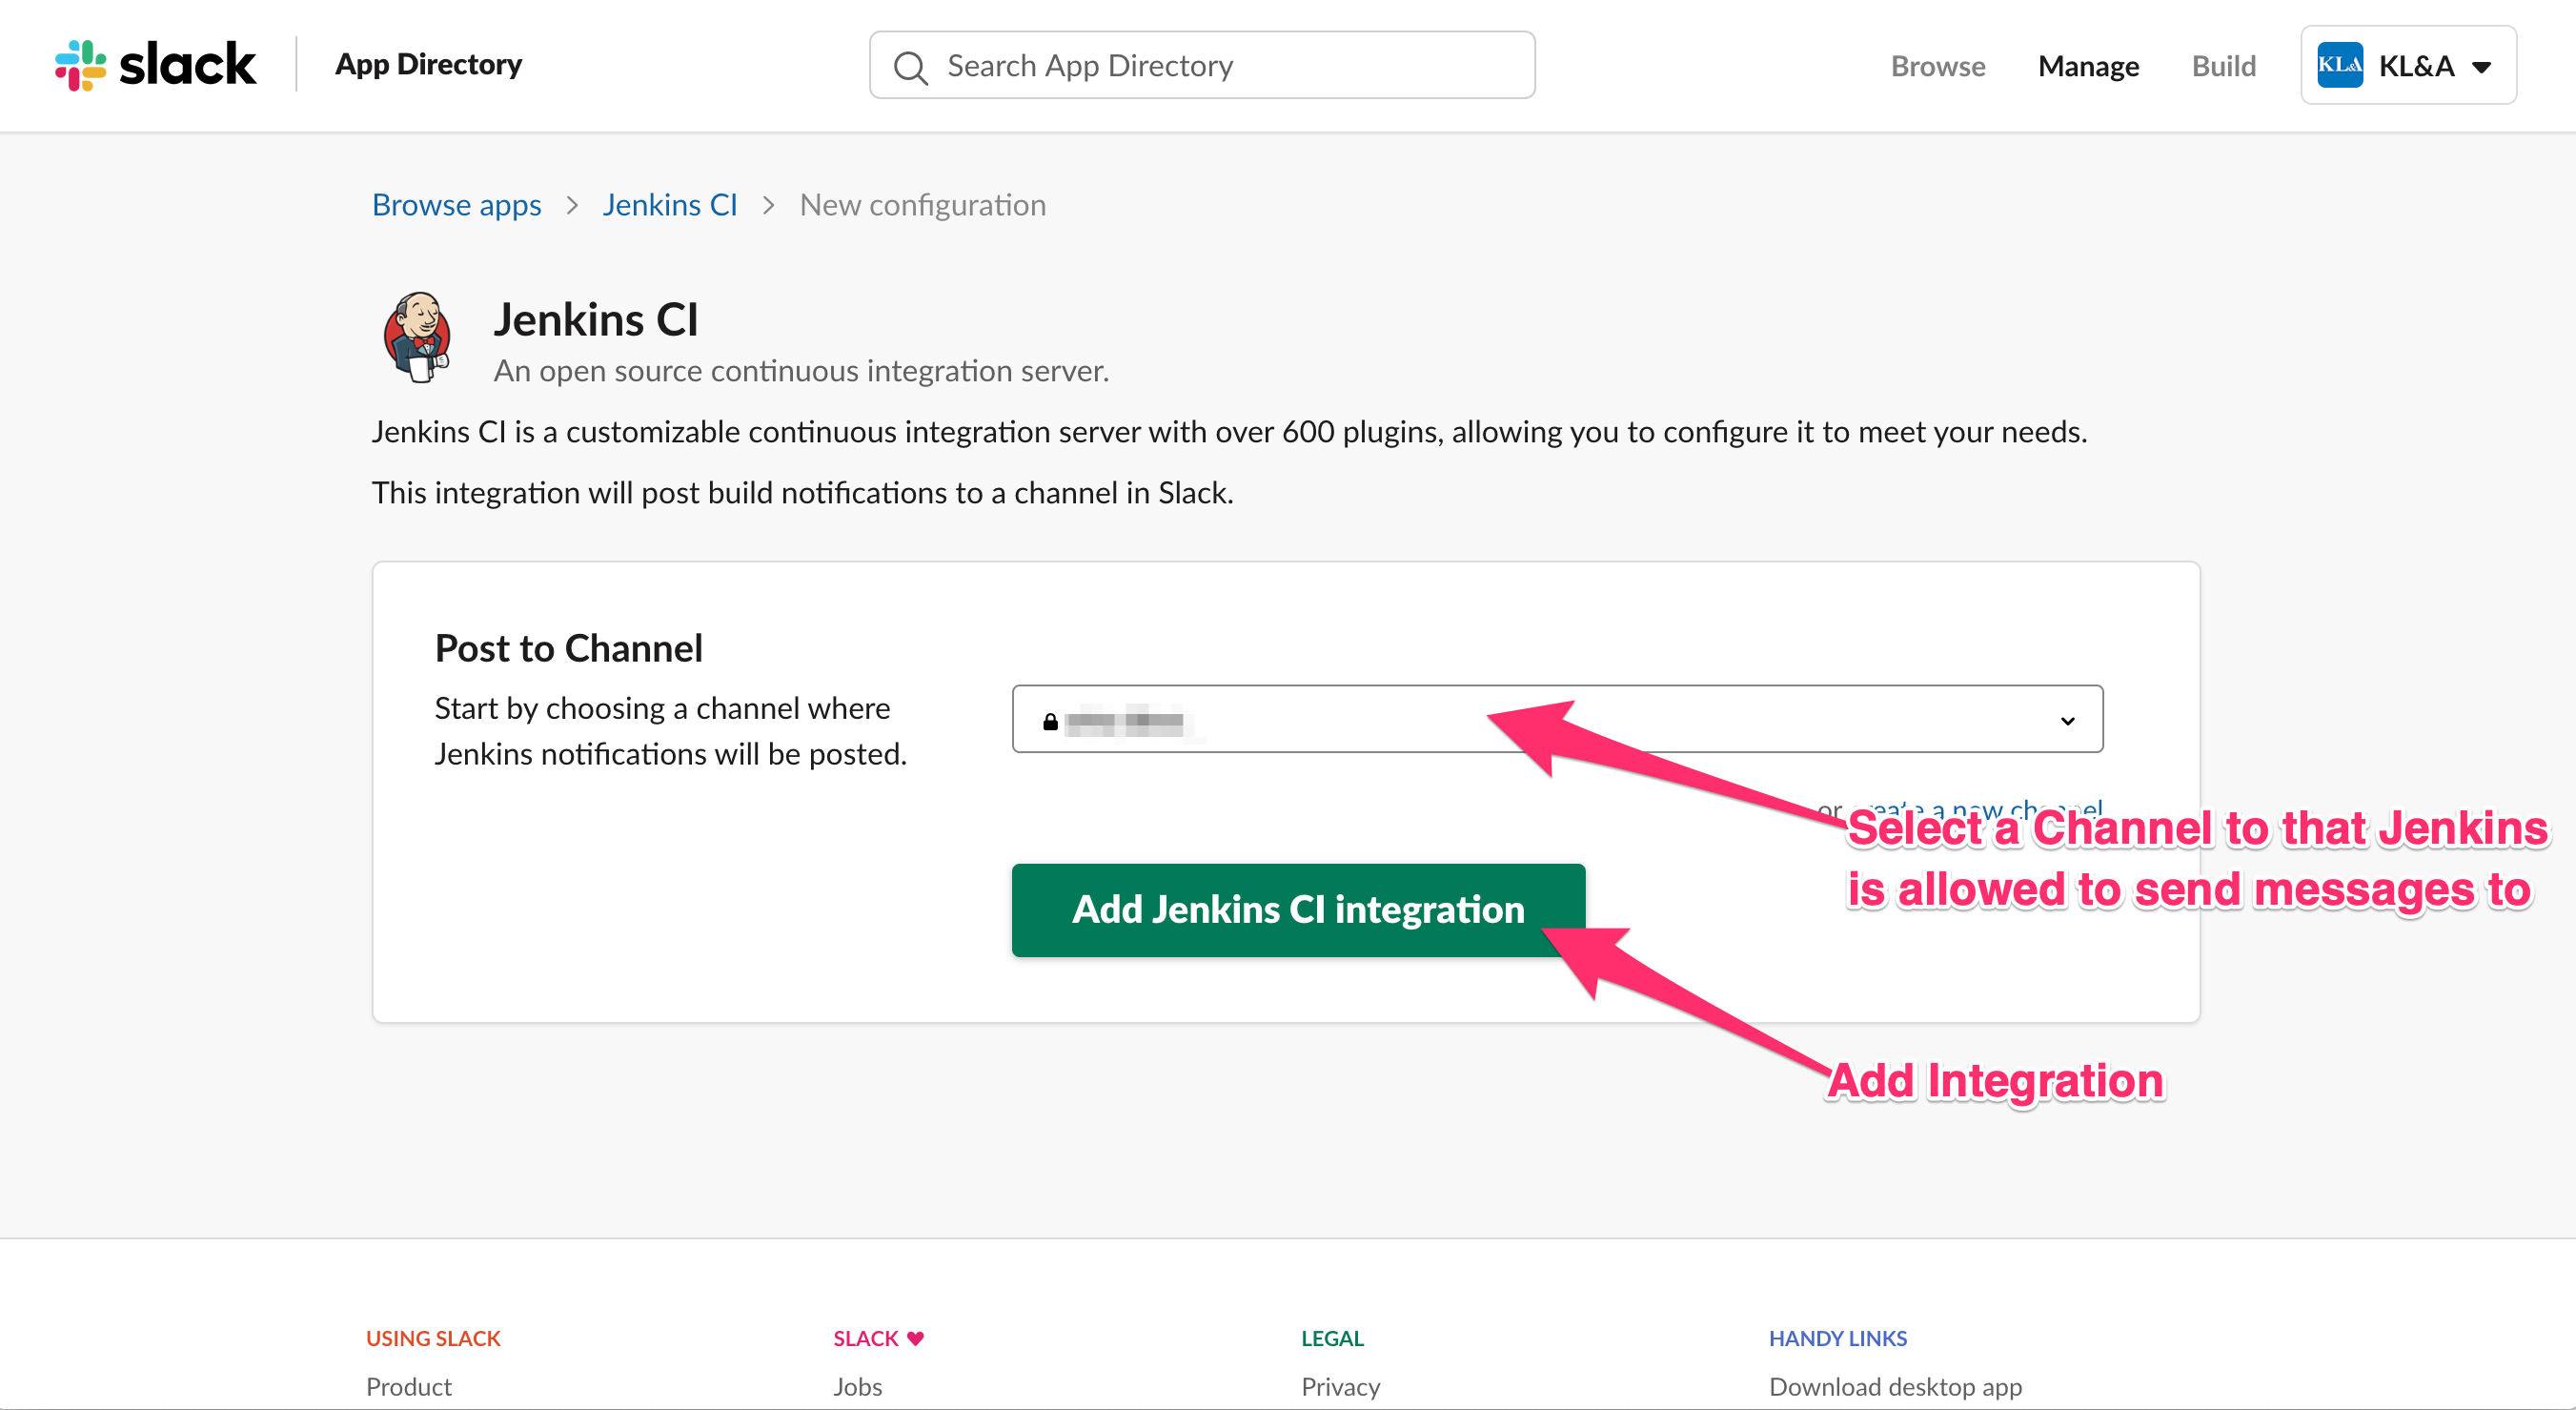
3. In your new configuration, you need to select a channel that Jenkins is allowed to send messages to. Then, click “Add Jenkins CI Integration.”
NOTE: After the integration was created, you should get a Slack message in the channel you selected in the previous step. It should look like this.

4. After the integration is successfully added, you will be directed to a page with further setup steps and your integration token. You can ignore the setup steps since I’m going to introduce another step for improved security. You’ll want to copy the “integration token,” before you move forward.

Securely Adding Your Slack Token to Jenkins
As mentioned above, we are going to do some extra work to secure our integration token. This way, the token authenticating your Jenkins instance to Slack won’t be visible when used.
Add Your Slack Integration Token as a Secret Key
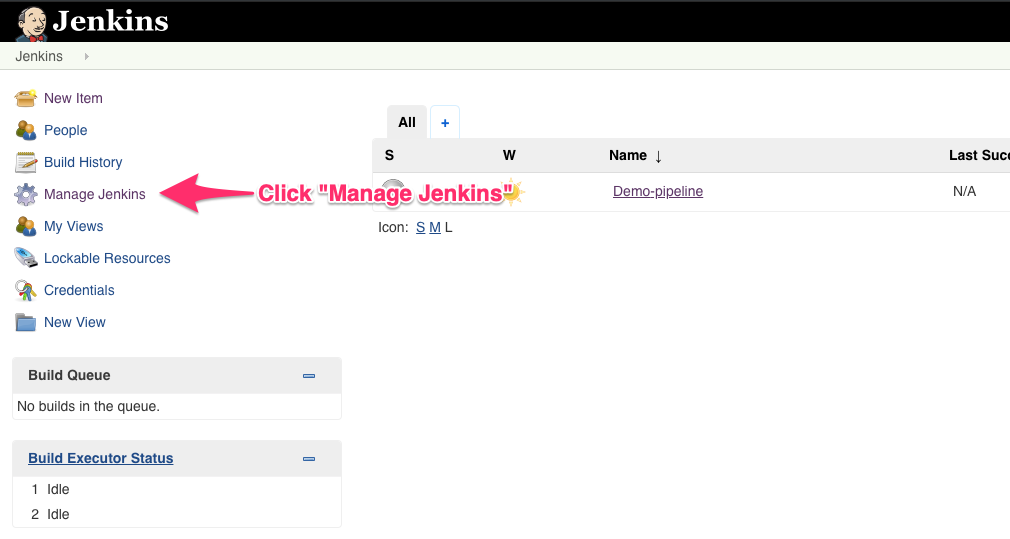
1. Navigate to your Jenkins home page and click on “Manage Jenkins” in the navigation on the left side of the page.
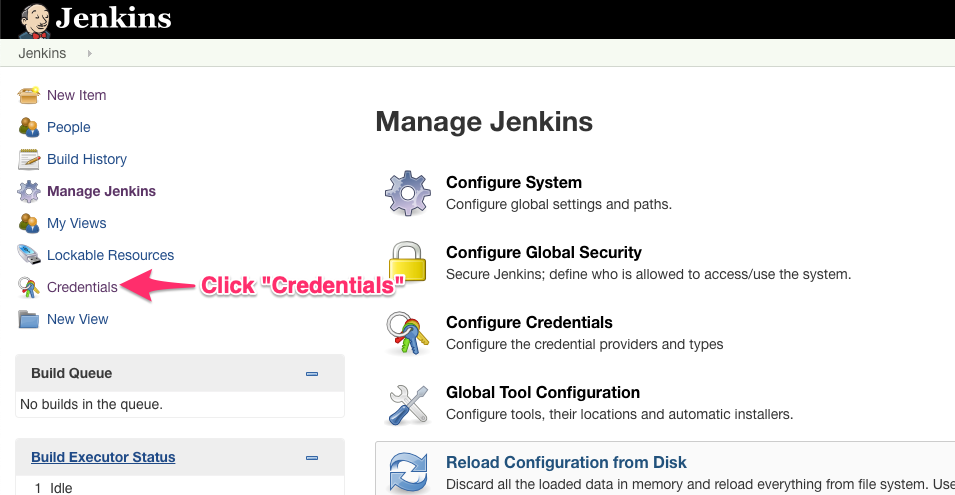
2. Click “Credentials” in the navigation on the left side of the page.
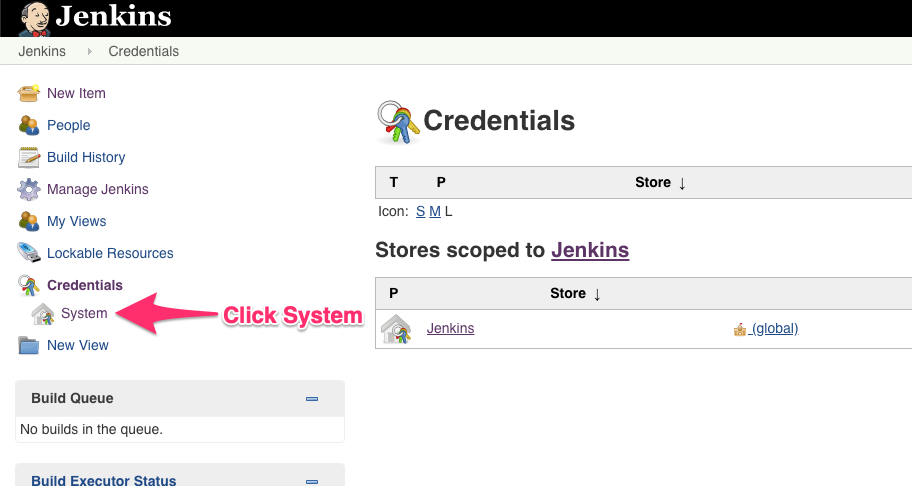
3. Click on “System” in the side navigation.
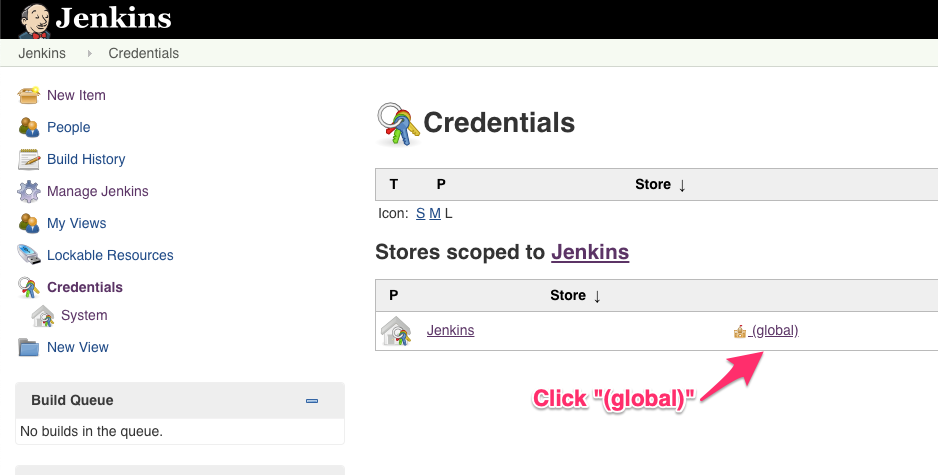
4. Click “(global)” under the “Stores scoped to Jenkins” header.
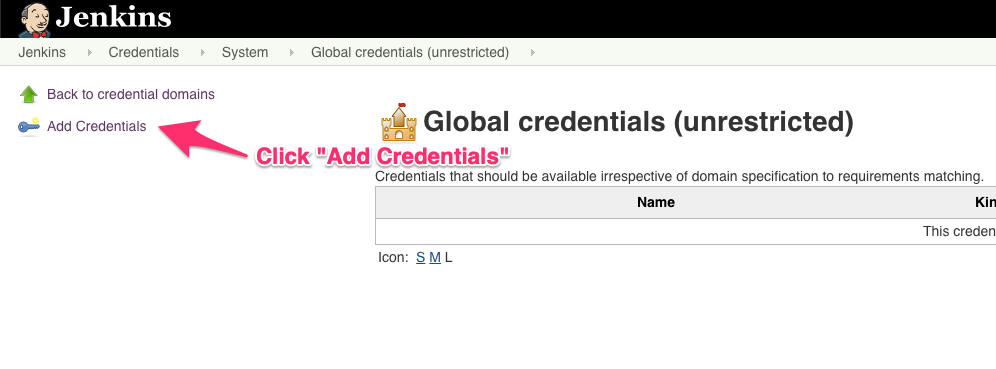
5. Click “Add Credentials” on the side navigation.
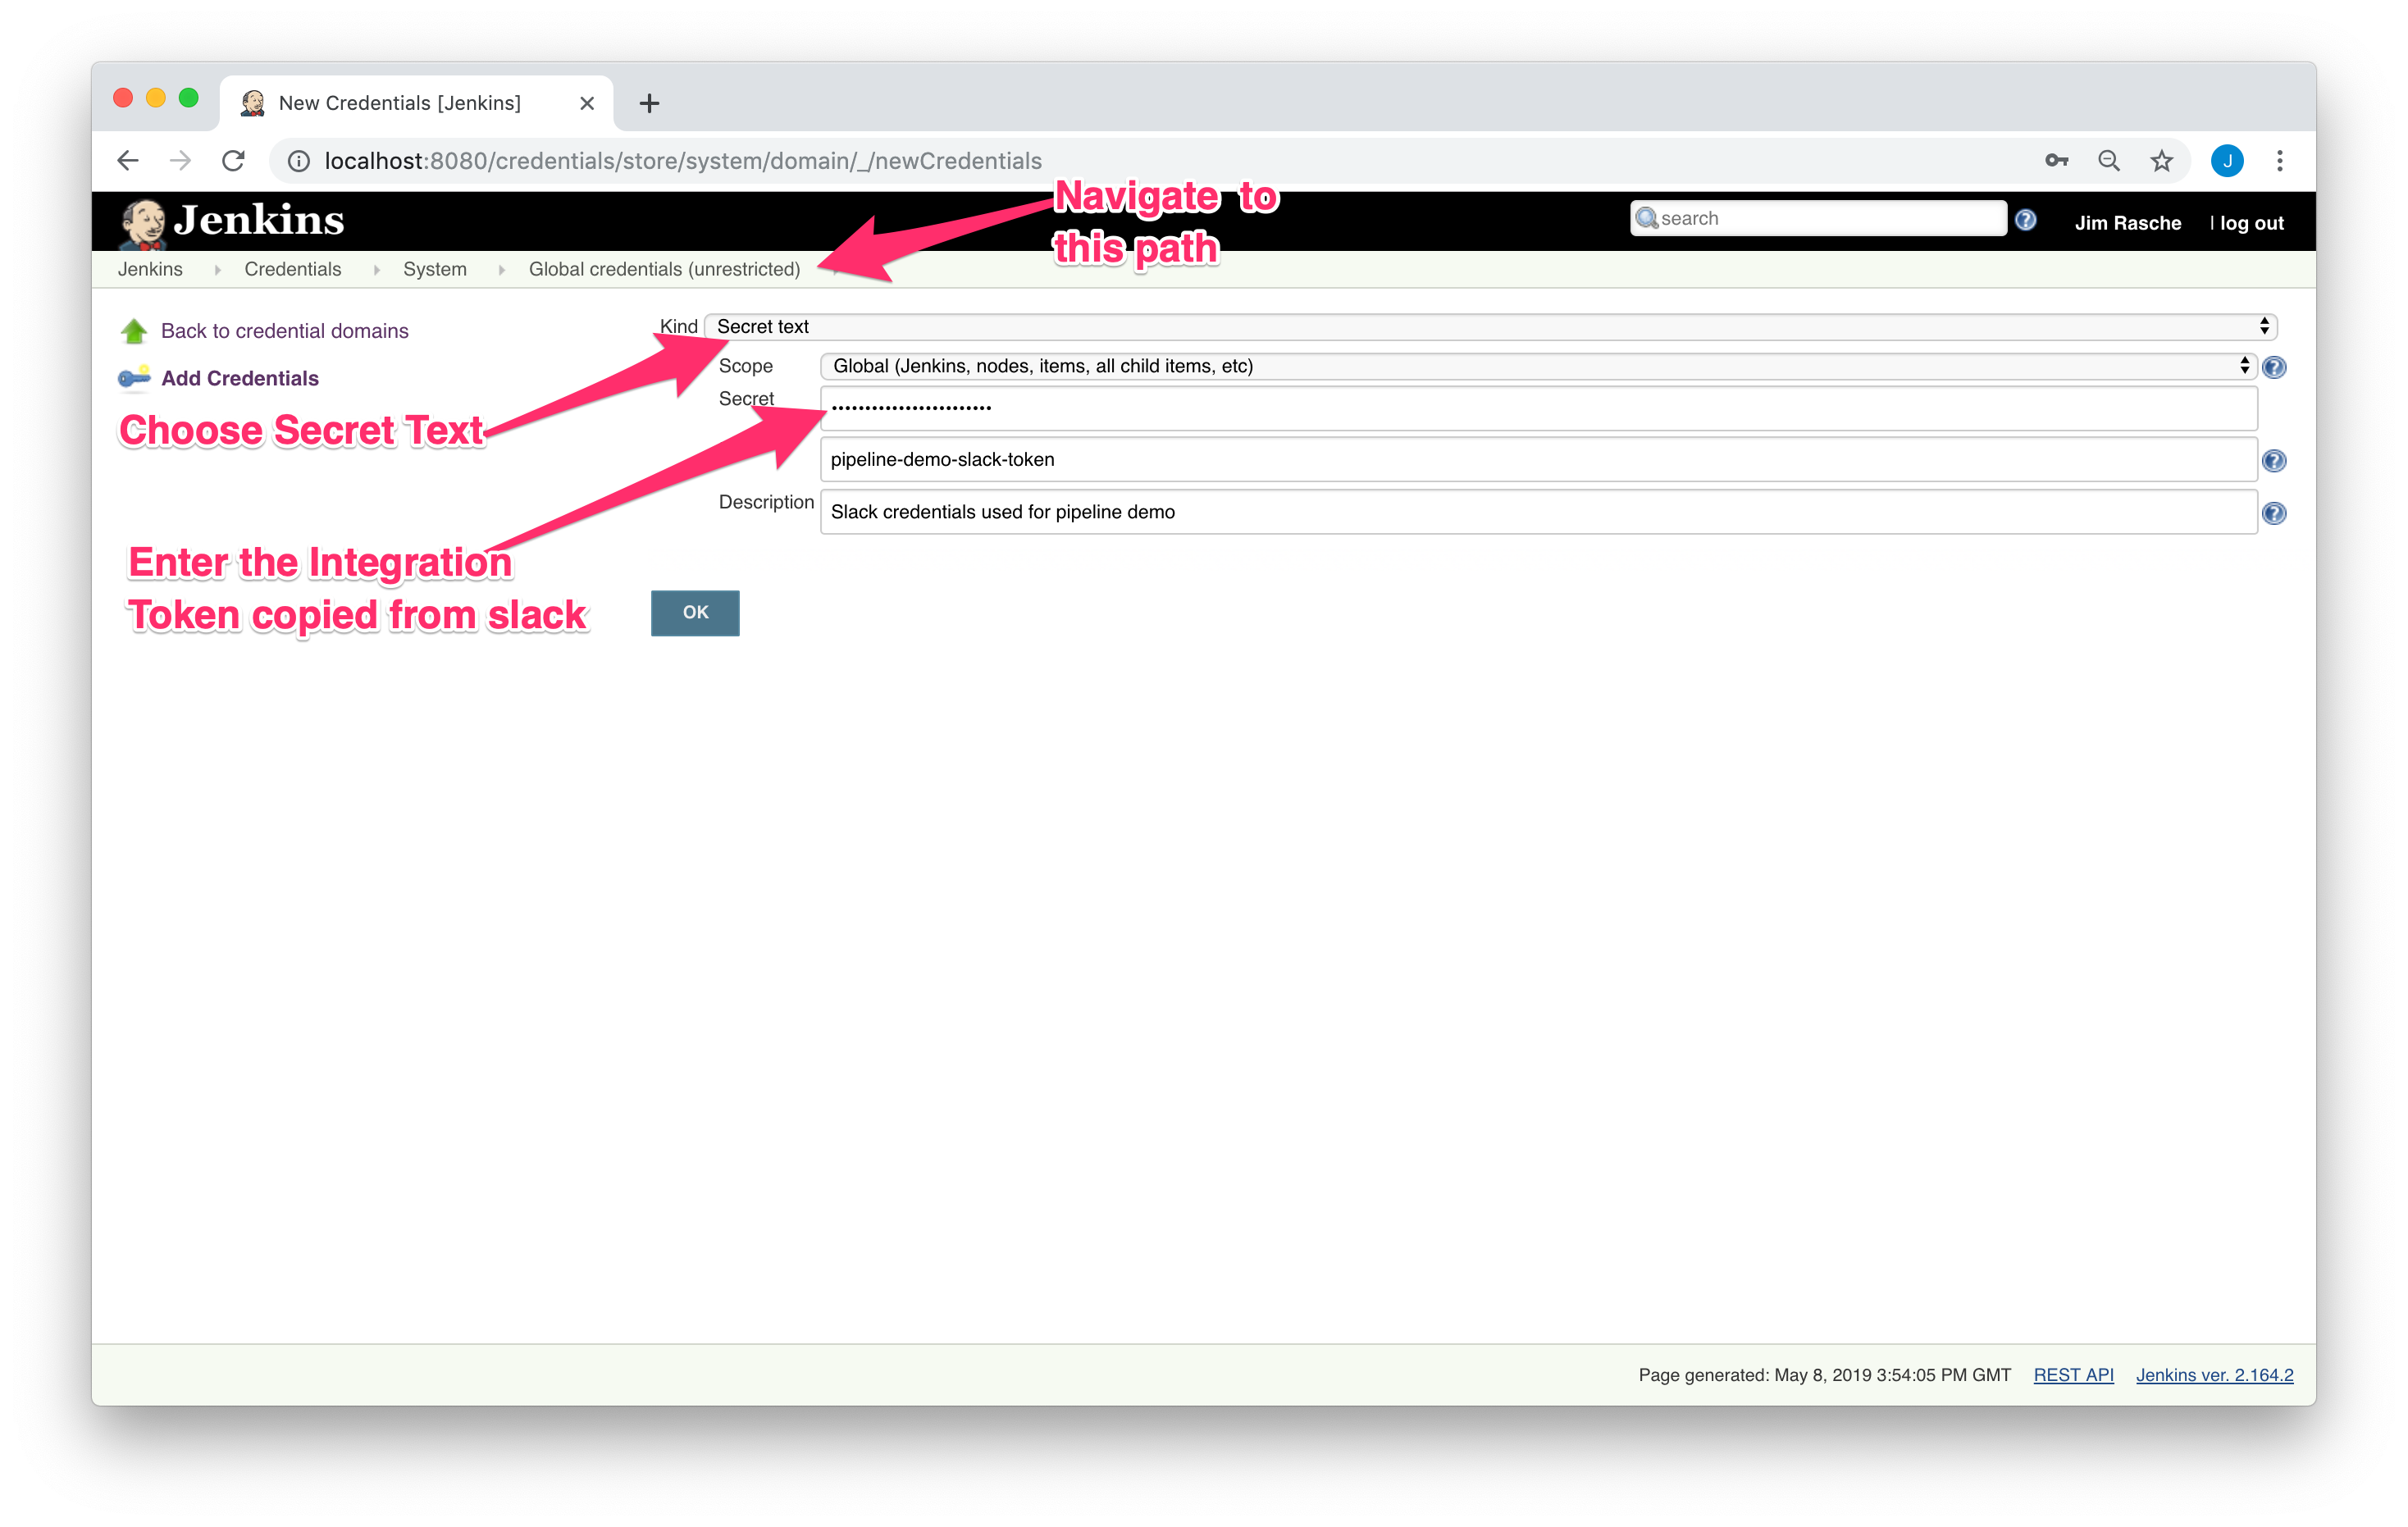
6. Select or enter the following information:
a. Kind: Secret Text
b. Scope: Global (…)
c. Secret Text: Your Slack Integration Token
d. ID: Whatever makes sense to you
e. Description: Whatever makes sense to you
Configuring Jenkins to use the Secret Key
1. Navigate to your Jenkins home page.
2. Click “Manage Jenkins” on the side navigation.
3. Click “Configure System.”
4. Scroll Down to the “Global Slack Notifier Settings” section and enter your information in the following fields:
a. Team Subdomain (Slack workspace domain)
b. Integration credential ID
c. Recipient channel or Slack ID

Verify Slack Message Sending
Now that we have Slack properly configured in Jenkins, our pipeline should work. Let’s test it out.
1. Navigate to your pipeline job.
2. Click “Build Now.”
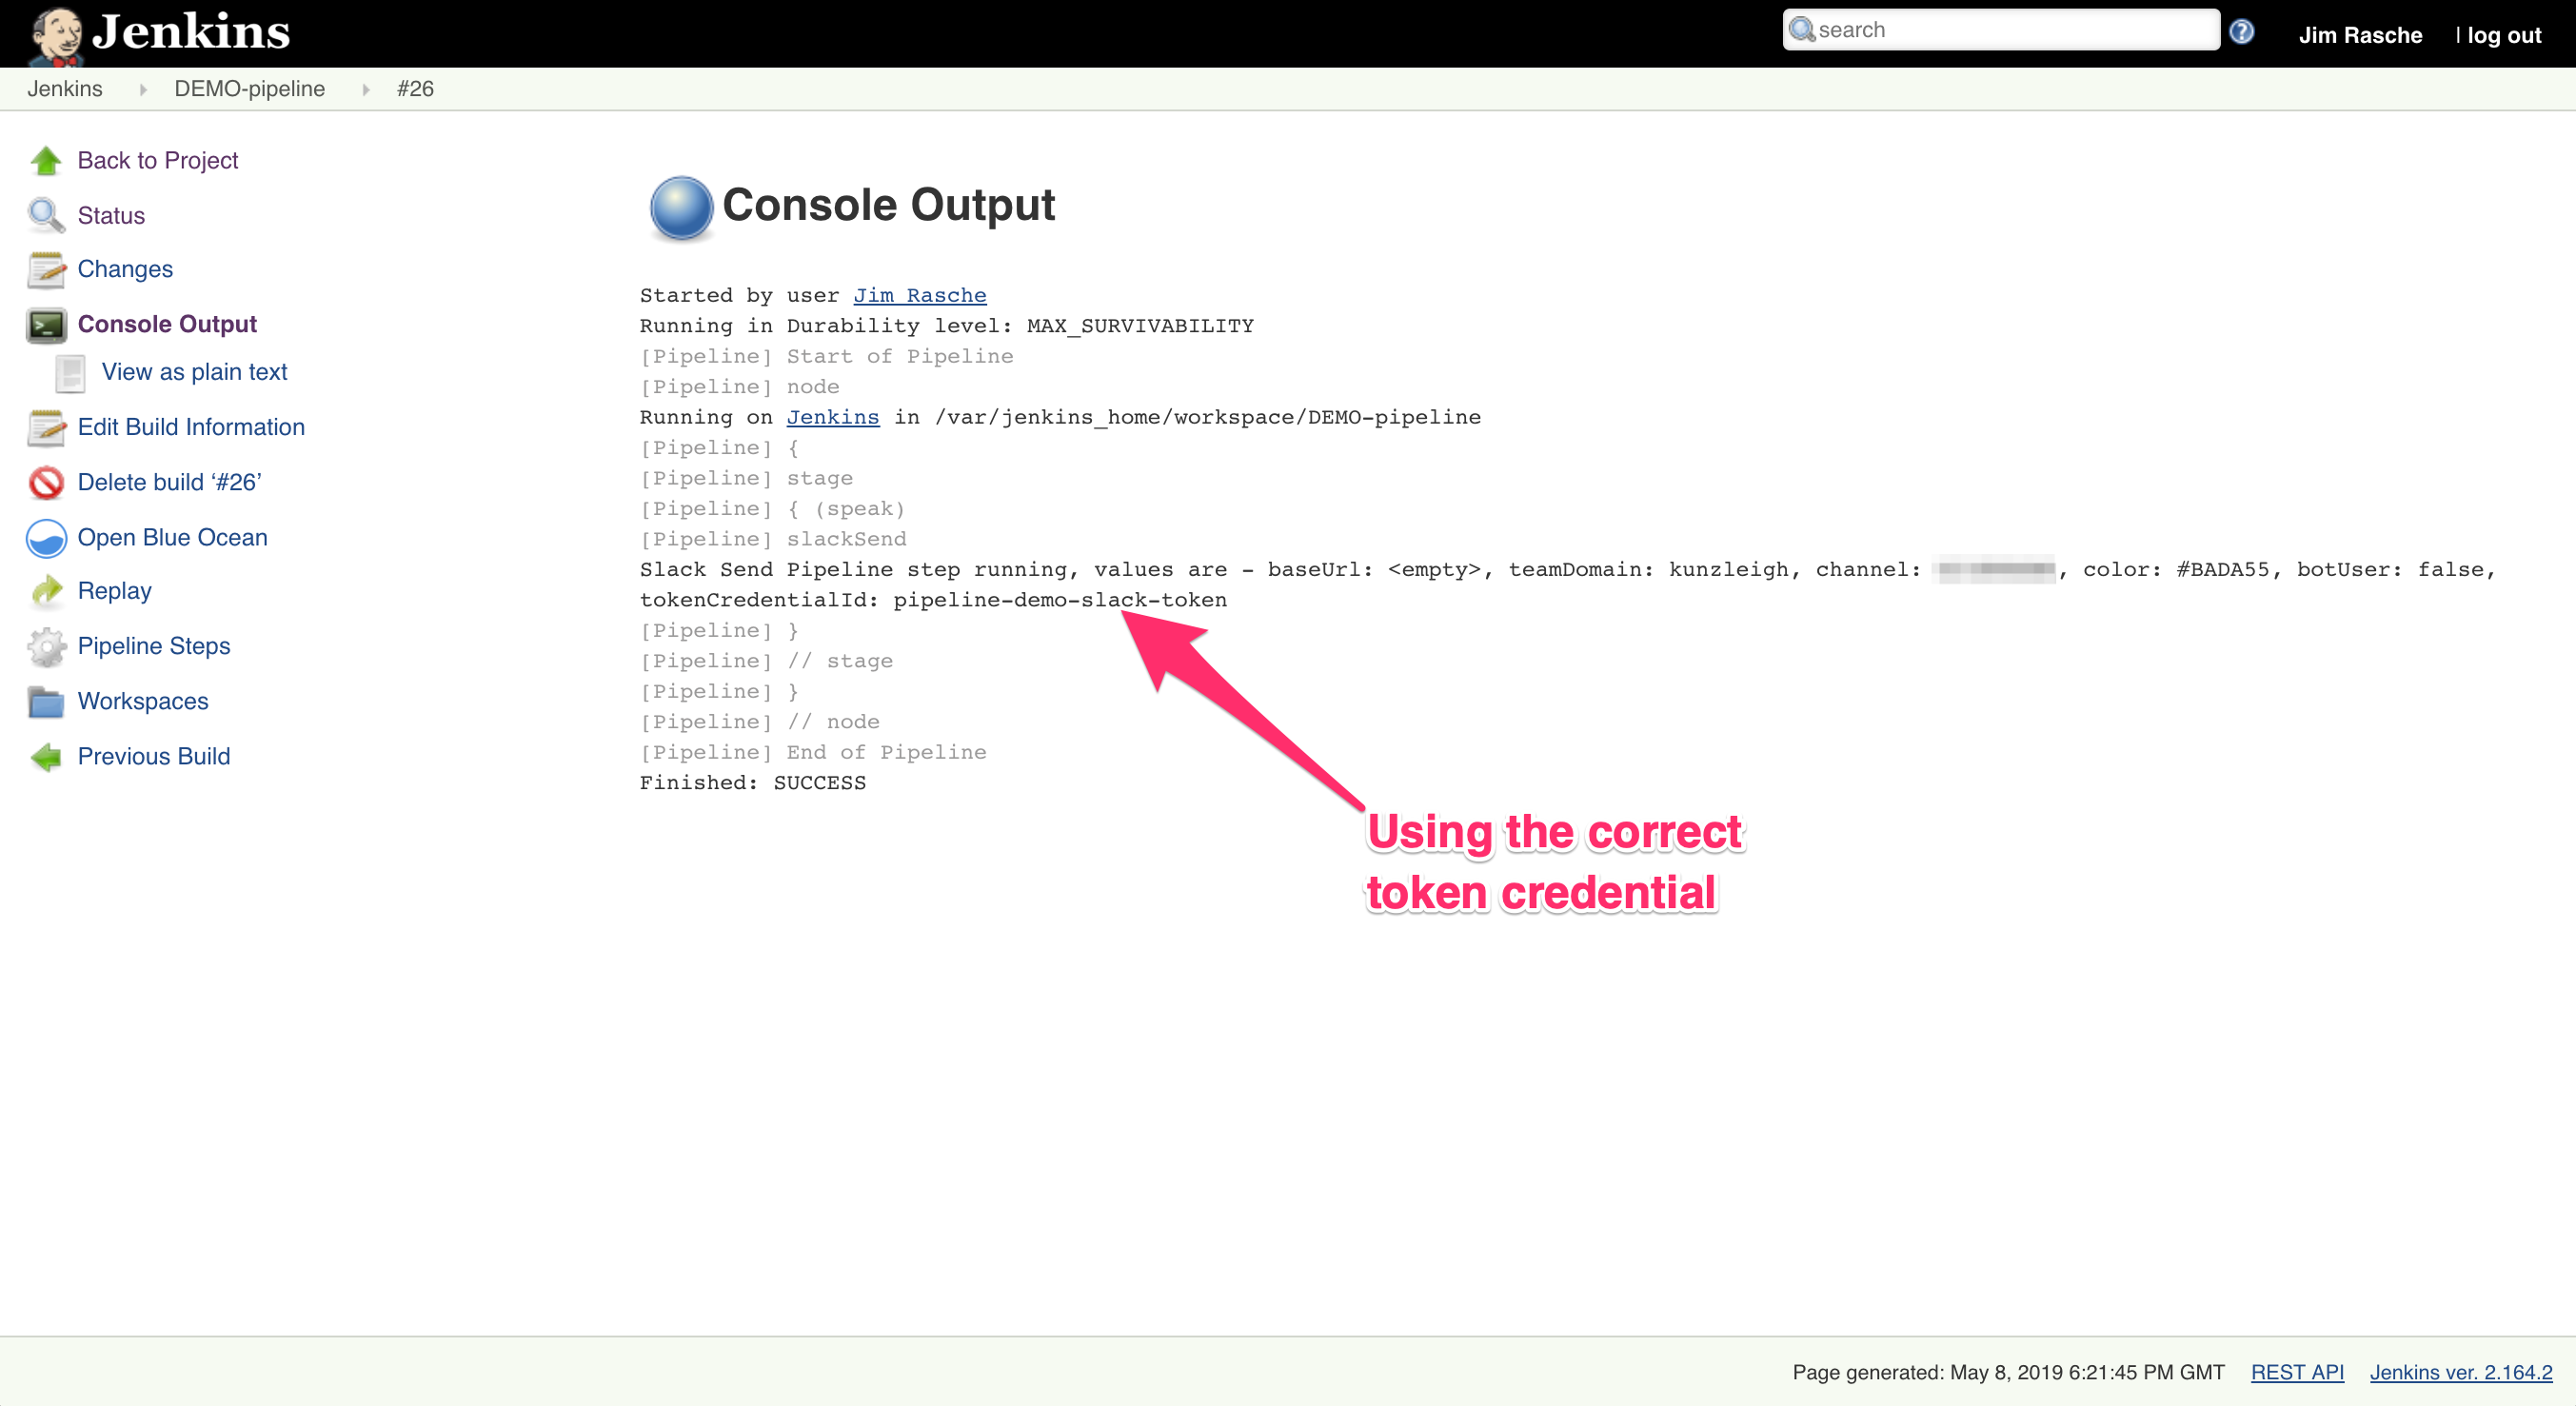
3. View the console output for the latest build. You should see output similar to the following.
4. Navigate to the channel you chose in Slack and notice how the message is being sent on behalf of the Jenkins Slack Integration.

Handling Multiple Projects
Jenkins can talk to Slack, all is right in the world, but what if we have multiple jobs and we need to send messages to different channels based on the job? Easy, we will just configure Slack notifications in the job’s settings instead of the Global settings.
Removing the Global Slack Settings
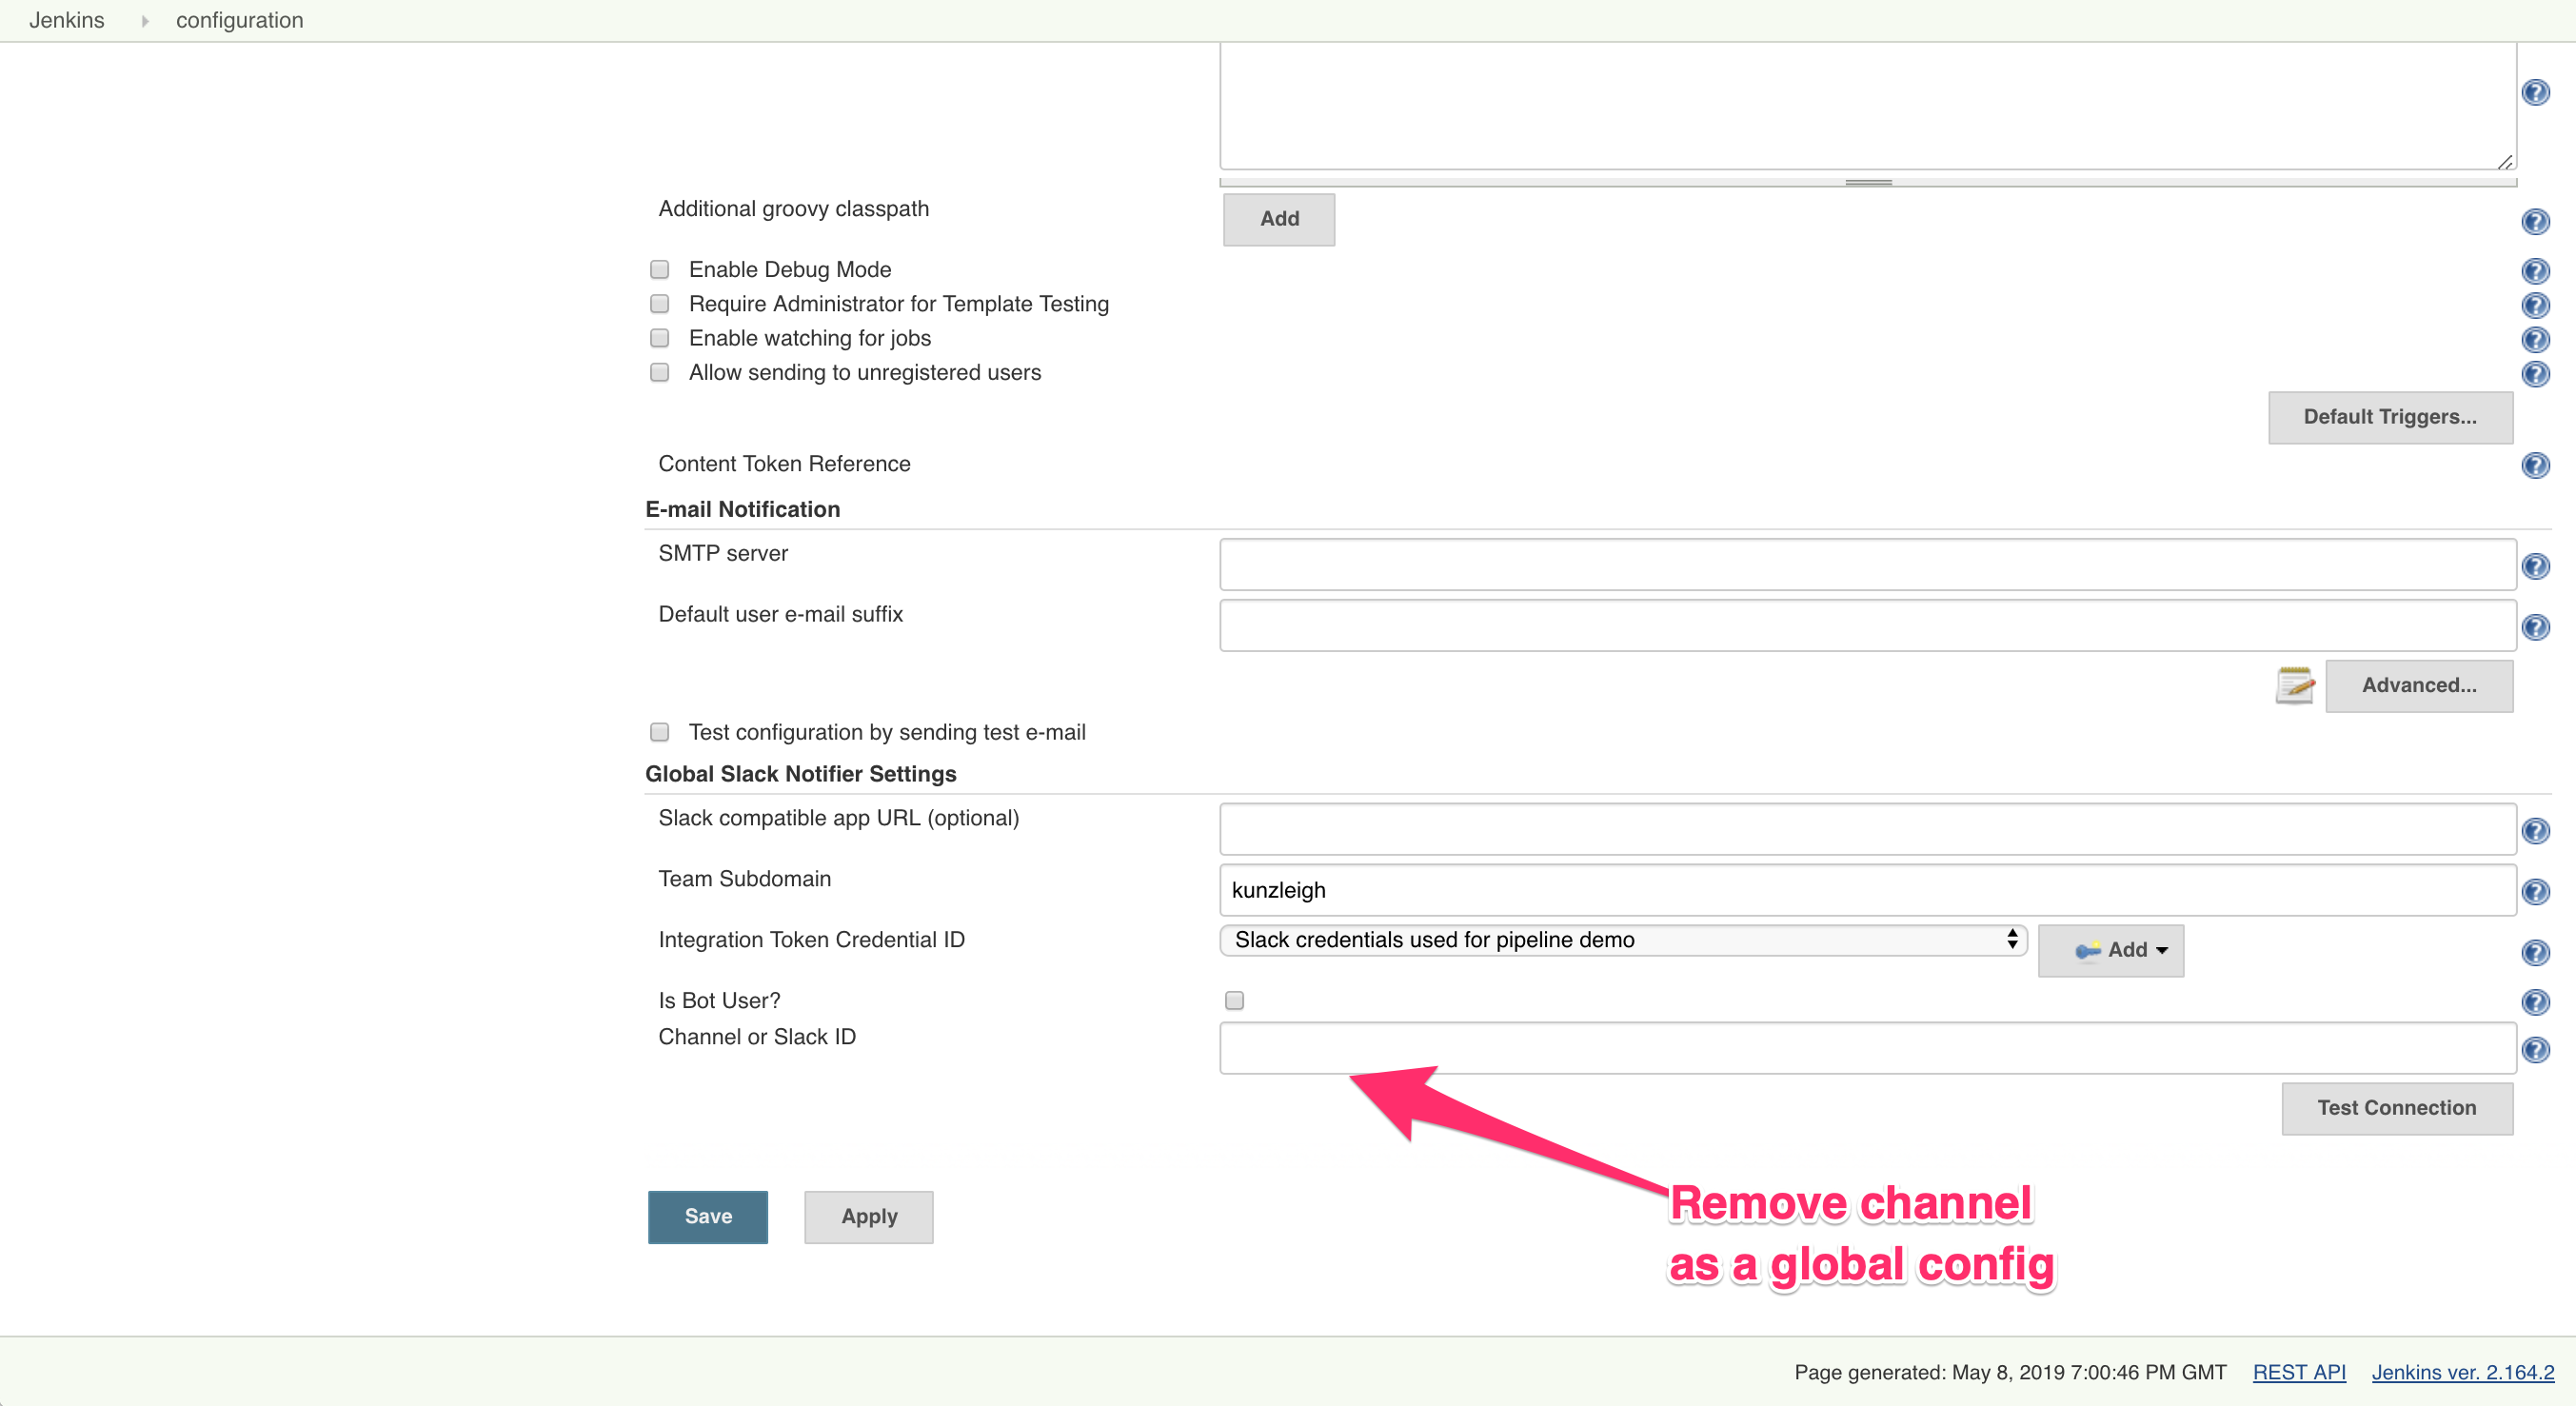
1. Go back to the “Global Slack Notifier Settings” (See “Configuring Jenkins to use the Secret Key” above).
2. Remove your channel name from the “Channel or Slack ID” field.
3. Save your settings.
Configure Slack Settings for your Pipeline Job
1. Navigate to your Pipeline job page.
2. Click “Configure” on the side navigation.
3. Scroll down to the “Pipeline” section and modify your pipeline script to specify the channel. (See example below) This will let the method “slackSend” dictate the recipient of the slack message instead of the global Jenkins setting.
Congratulations! You’ve successfully created a pipeline job that can send messages. This, of course, is not particularly helpful all by itself. However, pair this messaging functionality with a process you want Jenkins to run automatically, e.g. running end-to-end tests against a dev server when code is merged, and you have a slick notification service that can alert you to success/failure of application changes.
Helpful Hints and Tricks
For Jenkins Slack Plugin:
- Order of precedence of channels: Global config overrides step config e.g. SlackSend(channel: myChannel) will be overridden by “Global Slack Notifier Settings”
For Slack’s Jenkins Integration:
- The Slack Jenkins configuration required you to specify a channel, however this is just the default channel messages are sent to when a channel is not specified. Through limited testing, I confirmed that any integration can message public and private channels as well as send to either a single user or multiple users individually.
- You can customize aspects of how the message will look to the recipient. For example, the name and icon of the sender can be changed.
Other recent posts:

Kunz, Leigh and Associates (KL&A) Announces the Retirement of KL&A Co-Founder John Leigh
OKEMOS, MI, April 11, 2023 – Kunz, Leigh and Associates (KL&A) announces the recent retirement of KL&A Co-Founder John Leigh as of March 31, 2023. Mr. Leigh began his career as a developer working on large mainframe systems before moving…

Team Building in a Remote Environment
Blog Barista: Dana Graham | June 15th, 2022 | Culture | Brew time: 5 min
Let me start by saying I don’t care for the term “work family.” I have a family I love, and they have absolutely nothing to do with my career. I want my work life to be its own entity. I like boundaries (and the George Costanza Worlds Theory). Certainly, I want to enjoy and trust my coworkers, and I want to feel supported and cared for…
0 Comments